远


  • Home

  • About

  • Tags

  • Categories

  • Archives

DesignPattern笔记(三)Visitor

Posted on 2020-09-27 | In 编程

https://en.wikipedia.org/wiki/Visitor_pattern


下面的链接是我见过比较好地讲解Visitor模式的文章, 摘录于此, 但调整了结构, 并做了一些补充.
https://manski.net/2013/05/the-visitor-pattern-explained/

double dispatch
visitor模式主要用来解决”double dispatch”问题.
大多数面向对象语言都支持single dispatch, 即virtual methods

1
2
3
4
5
6
public class SpaceShip {   
public virtual string GetShipType() { return "SpaceShip"; }
}

public class ApolloSpacecraft : SpaceShip {
public override string GetShipType() { return "ApolloSpacecraft"; } }

执行下列代码:

1
2
SpaceShip ship = new ApolloSpacecraft();
Console.WriteLine(ship.GetShipType());

输出ApolloSpacecraft

在运行时, 具体调用哪一个GetShipType取决于ship这一个对象的真实类型. 所以叫做single dispatch. 类推一下, double dispatch可以理解为某个方法的调用取决于两个对象的真实类型. 下面的示例代码演示了double dispatch 问题

1
2
3
4
5
6
7
8
9
10
11
12
13
14
15
16
public class Asteroid {   
public virtual void CollideWith(SpaceShip ship) {
Console.WriteLine("Asteroid hit a SpaceShip");
}
public virtual void CollideWith(ApolloSpacecraft ship) {
Console.WriteLine("Asteroid hit an ApolloSpacecraft");
}
};
public class ExplodingAsteroid : Asteroid {
public override void CollideWith(SpaceShip ship) {
Console.WriteLine("ExplodingAsteroid hit a SpaceShip");
}
public override void CollideWith(ApolloSpacecraft ship) {
Console.WriteLine("ExplodingAsteroid hit an ApolloSpacecraft");
}
};

执行下列代码

1
2
3
4
5
6
7
8
9
Asteroid theAsteroid = new Asteroid();
ExplodingAsteroid theExplodingAsteroid = new ExplodingAsteroid();
SpaceShip theSpaceShip = new SpaceShip();
ApolloSpacecraft theApolloSpacecraft = new ApolloSpacecraft();

theAsteroid.CollideWith(theSpaceShip);
theAsteroid.CollideWith(theApolloSpacecraft);
theExplodingAsteroid.CollideWith(theSpaceShip);
theExplodingAsteroid.CollideWith(theApolloSpacecraft);

输出:

Asteroid hit a SpaceShip
Asteroid hit an ApolloSpacecraft
ExplodingAsteroid hit a SpaceShip
ExplodingAsteroid hit an ApolloSpacecraft

没有问题

但如果是

1
2
3
// Note the different data types! 
Asteroid theExplodingAsteroidRef = new ExplodingAsteroid();
SpaceShip theApolloSpacecraftRef = new ApolloSpacecraft(); theExplodingAsteroidRef.CollideWith(theApolloSpacecraftRef);

期望的输出是ExplodingAsteroid hit an ApolloSpacecraft
但实际的输出是ExplodingAsteroid hit a SpaceShip

这是因为调用哪一个CollideWith方法, 只是基于ExplodingAsteroidRef的类型, 而不是基于ExplodingAsteroidRef和 theApolloSpacecraftRef的类型(double dispatch).

More Effective C++ item 31对于这个例子有更详细的讲解.

解决这个问题的经典方式是visitor模式, 另外C# 4.0引入了dynamic关键字, 能更简便地解决这个问题, 参考C# in a nutshell
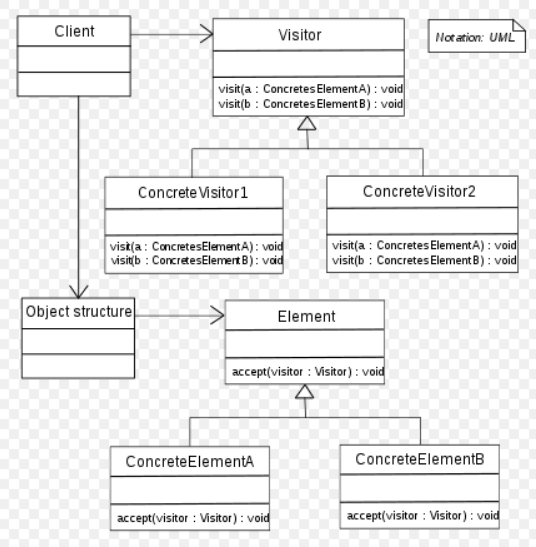
visitor 模式

wiki: In object-oriented programming and software engineering, the visitor design pattern is a way of separating an algorithm from an object structure on which it operates. A practical result of this separation is the ability to add new operations to existent object structures without modifying the structures. It is one way to follow the open/closed principle.

In essence, the visitor allows adding new virtual functions to a family of classes, without modifying the classes. Instead, a visitor class is created that implements all of the appropriate specializations of the virtual function. The visitor takes the instance reference as input, and implements the goal through double dispatch.

简单的讲visitor模式将对象和操作对象的方法分开. 作者用一个文本解析器为例, 文本解析器可以将文本输出为html, LaTeX或其他的格式, 文本Document 包含以下几个部分:

1
2
3
4
5
6
7
8
9
10
11
public abstract class DocumentPart {   
public string Text { get; private set; }
}
public class PlainText : DocumentPart { }
public class BoldText : DocumentPart { }
public class Hyperlink : DocumentPart {
public string Url { get; private set; }
}
public class Document {
private List<DocumentPart> m_parts;
}

先用single dispatch(virtual methods), 看看会出现什么问题

  1. 将文本输出为HTML格式

    1
    2
    3
    4
    5
    6
    7
    8
    9
    10
    11
    12
    13
    14
    15
    16
    17
    18
    19
    20
    21
    22
    23
    24
    25
    public abstract class DocumentPart {   
    public string Text { get; private set; }
    public abstract string ToHTML();
    }
    public class PlainText : DocumentPart {
    public override string ToHTML() { return this.Text; }
    }
    public class BoldText : DocumentPart {
    public override string ToHTML() { return "<b>" + this.Text + "</b>"; }
    }
    public class Hyperlink : DocumentPart {
    public string Url { get; private set; }
    public override string ToHTML() { return "<a href=\"" + this.Url + "\">" + this.Text + "</a>"; }
    }

    public class Document {
    private List<DocumentPart> m_parts;
    public string ToHTML() {
    string output = "";
    foreach (DocumentPart part in this.m_parts) {
    output += part.ToHTML();
    }
    return output;
    }
    }
  2. 将文本输出为LaTeX格式和纯文本格式

    1
    2
    3
    4
    5
    6
    7
    8
    9
    10
    11
    12
    13
    14
    15
    16
    17
    18
    19
    20
    21
    22
    23
    24
    25
    26
    27
    28
    29
    30
    31
    32
    33
    34
    35
    36
    37
    38
    39
    40
    41
    42
    43
    44
    45
    46
    public abstract class DocumentPart {   
    public string Text { get; private set; }
    public abstract string ToHTML();
    public abstract string ToPlainText();
    public abstract string ToLatex();
    }
    public class PlainText : DocumentPart {
    public override string ToHTML() { return this.Text; }
    public override string ToPlainText() { return this.Text; }
    public override string ToLatex() { return this.Text; }
    }
    public class BoldText : DocumentPart {
    public override string ToHTML() { return "<b>" + this.Text + "</b>"; }
    public override string ToPlainText() { return "**" + this.Text + "**"; }
    public override string ToLatex() { return "\\textbf{" + this.Text + "}"; }
    }
    public class Hyperlink : DocumentPart {
    public string Url { get; private set; }
    public override string ToHTML() { return "<a href=\"" + this.Url + "\">" + this.Text + "</a>"; }
    public override string ToPlainText() { return this.Text + " [" + this.Url + "]"; }
    public override string ToLatex() { return "\\href{" + this.Url + "}{" + this.Text + "}"; }
    }
    public class Document {
    private List<DocumentPart> m_parts;
    public string ToHTML() {
    string output = "";
    foreach (DocumentPart part in this.m_parts) {
    output += part.ToHTML();
    }
    return output;
    }
    public string ToPlainText() {
    string output = "";
    foreach (DocumentPart part in this.m_parts) {
    output += part.ToPlainText();
    }
    return output;
    }
    public string ToLatex() {
    string output = "";
    foreach (DocumentPart part in this.m_parts) {
    output += part.ToLatex();
    }
    return output;
    }
    }

这种实现方式将DocumentPart以及操作DocumentPart的方法捆绑在一起, 带来了两个问题:

  1. 如果需要添加新的格式, 需要修改DocumentPart以及它的所有子类
  2. 每个DocumentPart都需要知晓格式的细节

而visitor模式是这样处理该问题的.

1
2
3
4
5
6
7
8
9
10
11
12
13
14
15
16
17
18
19
20
21
22
23
24
25
26
27
28
29
30
31
32
33
34
35
36
37
38
39
40
41
42
43
44
45
46
47
48
49
public interface IVisitor {   
void Visit(PlainText docPart);
void Visit(BoldText docPart);
void Visit(Hyperlink docPart);
}
public class HtmlVisitor : IVisitor {
public string Output { get { return this.m_output; } }
private string m_output = "";
public void Visit(PlainText docPart) { this.Output += docPart.Text; }
public void Visit(BoldText docPart) { this.m_output += "<b>" + docPart.Text + "</b>"; }
public void Visit(Hyperlink docPart) { this.m_output += "<a href=\"" + docPart.Url + "\">" + docPart.Text + "</a>"; }
}

public class LatexVisitor : IVisitor {
public string Output { get { return this.m_output; } }
private string m_output = "";
public void Visit(PlainText docPart) { this.Output += docPart.Text; }
public void Visit(BoldText docPart) { this.m_output += "\\textbf{" + docPart.Text + "}"; }
public void Visit(Hyperlink docPart) { this.m_output += "\\href{" + docPart.Url + "}{" + docPart.Text + "}"; }
}

public abstract class DocumentPart {
public string Text { get; private set; }
public abstract void Accept(IVisitor visitor);
}
public class PlainText : DocumentPart {
public override void Accept(IVisitor visitor) {
visitor.Visit(this);
}
}
public class BoldText : DocumentPart {
public override void Accept(IVisitor visitor) {
visitor.Visit(this);
}
}
public class Hyperlink : DocumentPart {
public string Url { get; private set; }
public override void Accept(IVisitor visitor) {
visitor.Visit(this);
}
}
public class Document {
private List<DocumentPart> m_parts;
public void Accept(IVisitor visitor) {
foreach (DocumentPart part in this.m_parts) {
part.Accept(visitor);
}
}
}

具体输出哪种格式可以这样做

1
2
3
4
Document doc = ...;
HtmlVisitor visitor = new HtmlVisitor();
doc.Accept(visitor);
Console.WriteLine("Html:\n" + visitor.Output);

如此, DocumentPart和具体的格式是解耦的.

为什么说visitor 模式可以解决double dispatch问题? 看一下Document的Accept方法

1
2
3
4
5
public void Accept(IVisitor visitor) {
foreach (DocumentPart part in this.m_parts) {
part.Accept(visitor);
}
}

part.Accept(visitor), 具体调用哪一个Accept方法, 由part的真实类型决定. 这是single dispatch(override)

Accept方法内部是visitor.Visit(this), 具体调用哪一个Visit方法由this来决定, 这是overload

2D Visualization笔记(X2) OxyPlot(三)

Posted on 2018-05-13 | In 编程

除了前面两篇笔记中提到的使用PlotView和PlotModel, OxyPlot.WPF还支持直接在XAML中绑定数据, 使用的是Plot控件, Plot和PlotView一样, 都继承自PlotBase

1
2
3
4
5
6
7
8
9
10
11
12
13
14
15
16
<Window x:Class="WpfApplication2.MainWindow"
xmlns="http://schemas.microsoft.com/winfx/2006/xaml/presentation"
xmlns:x="http://schemas.microsoft.com/winfx/2006/xaml" xmlns:oxy="http://oxyplot.org/wpf"
xmlns:local="clr-namespace:WpfApplication2"
Title="Example 2 (WPF)" Height="350" Width="525">
<Window.DataContext>
<local:MainViewModel/>
</Window.DataContext>
<Grid>
<oxy:Plot Title="{Binding Title}">
<oxy:Plot.Series>
<oxy:LineSeries ItemsSource="{Binding Points}"/>
</oxy:Plot.Series>
</oxy:Plot>
</Grid>
</Window>

1
2
3
4
5
6
7
8
9
10
11
12
13
14
15
16
17
18
19
20
21
22
23
24
25
namespace WpfApplication2
{
using System.Collections.Generic;
using OxyPlot;

public class MainViewModel
{
public MainViewModel()
{
this.Title = "Example 2";
this.Points = new List<DataPoint>
{
new DataPoint(0, 4),
new DataPoint(10, 13),
new DataPoint(20, 15),
new DataPoint(30, 16),
new DataPoint(40, 12),
new DataPoint(50, 12)
};
}

public string Title { get; private set; }
public IList<DataPoint> Points { get; private set; }
}
}

oxy:Plot.Series和oxy:LineSeries直接放在XAML中? Series和LineSeries不是在OxyPlot(Portable)中吗?

答案是这里的Series和LineSeries都继承自ItemControl类, 位于OxyPlot.WPF中, 是一个控件

1
2
3
4
5
6
public abstract class Series : ItemsControl

/// <summary>
/// This is a WPF wrapper of OxyPlot.LineSeries
/// </summary>
public class LineSeries : DataPointSeries

从LineSeries的注释可以看出, 它是对OxyPlot.LineSeries的一个封装. 再来看Plot类, 它的实现逻辑和PlotView不一样

1
2
3
4
5
6
7
8
9
10
11
12
13
14
15
16
17
18
19
20
21
22
23
24
25
26
27
28
29
30
31
32
33
34
35
36
37
38
39
40
41
42
43
44
45
46
47
48
49
50
51
52
53
54
55
56
57
58
59
60
61
62
63
64
65
66
67
68
69
70
71
72
73
74
75
76
77
78
79
80
81
82
83
84
85
86
87
88
89
90
91
92
93
94
95
96
97
98
99
100
101
102
103
104
105
106
107
108
109
110
111
112
113
114
115
116
117
118
119
120
121
122
123
124
125
126
127
128
129
130
131
132
133
public partial class Plot : PlotBase
{
/// <summary>
/// The internal model.
/// </summary>
private readonly PlotModel internalModel;

/// <summary>
/// Initializes a new instance of the <see cref="Plot" /> class.
/// </summary>
public Plot()
{
this.series = new ObservableCollection<Series>();
this.axes = new ObservableCollection<Axis>();
this.annotations = new ObservableCollection<Annotation>();

this.series.CollectionChanged += this.OnSeriesChanged;
this.axes.CollectionChanged += this.OnAxesChanged;
this.annotations.CollectionChanged += this.OnAnnotationsChanged;

this.defaultController = new PlotController();
this.internalModel = new PlotModel();
((IPlotModel)this.internalModel).AttachPlotView(this);
}

/// <summary>
/// Called when series is changed.
/// </summary>
/// <param name="sender">The sender.</param>
/// <param name="e">The <see cref="System.Collections.Specialized.NotifyCollectionChangedEventArgs" /> instance containing the event data.</param>
private void OnSeriesChanged(object sender, NotifyCollectionChangedEventArgs e)
{
this.SyncLogicalTree(e);
}

/// <summary>
/// Synchronizes the logical tree.
/// </summary>
/// <param name="e">The <see cref="System.Collections.Specialized.NotifyCollectionChangedEventArgs" /> instance containing the event data.</param>
private void SyncLogicalTree(NotifyCollectionChangedEventArgs e)
{
// In order to get DataContext and binding to work with the series, axes and annotations
// we add the items to the logical tree
if (e.NewItems != null)
{
foreach (var item in e.NewItems)
{
this.AddLogicalChild(item);
}
}

if (e.OldItems != null)
{
foreach (var item in e.OldItems)
{
this.RemoveLogicalChild(item);
}
}
}

/// <summary>
/// Updates the model. If Model==<c>null</c>, an internal model will be created. The ActualModel.Update will be called (updates all series data).
/// </summary>
/// <param name="updateData">if set to <c>true</c> , all data collections will be updated.</param>
protected override void UpdateModel(bool updateData = true)
{
this.SynchronizeProperties();
this.SynchronizeSeries();
this.SynchronizeAxes();
this.SynchronizeAnnotations();

base.UpdateModel(updateData);
}

/// <summary>
/// Called when the visual appearance is changed.
/// </summary>
protected void OnAppearanceChanged()
{
this.InvalidatePlot(false);
}

/// <summary>
/// Called when the visual appearance is changed.
/// </summary>
/// <param name="d">The d.</param>
/// <param name="e">The <see cref="System.Windows.DependencyPropertyChangedEventArgs" /> instance containing the event data.</param>
private static void AppearanceChanged(DependencyObject d, DependencyPropertyChangedEventArgs e)
{
((Plot)d).OnAppearanceChanged();
}

/// <summary>
/// Synchronizes the series in the internal model.
/// </summary>
private void SynchronizeSeries()
{
this.internalModel.Series.Clear();
foreach (var s in this.Series)
{
this.internalModel.Series.Add(s.CreateModel());
}
}

/// <summary>
/// Synchronize properties in the internal Plot model
/// </summary>
private void SynchronizeProperties()
{
var m = this.internalModel;

m.PlotType = this.PlotType;

m.PlotMargins = this.PlotMargins.ToOxyThickness();
m.Padding = this.Padding.ToOxyThickness();
m.TitlePadding = this.TitlePadding;

m.Culture = this.Culture;

m.DefaultColors = this.DefaultColors.Select(c => c.ToOxyColor()).ToArray();
m.DefaultFont = this.DefaultFont;
m.DefaultFontSize = this.DefaultFontSize;

m.Title = this.Title;
m.TitleColor = this.TitleColor.ToOxyColor();
m.TitleFont = this.TitleFont;
m.TitleFontSize = this.TitleFontSize;
m.TitleFontWeight = this.TitleFontWeight.ToOpenTypeWeight();
m.TitleToolTip = this.TitleToolTip;
//...

}
}

绘制的逻辑是这样的: XAML中增加了LineSeries, 触发OnSeriesChanged, 更新LogicTree, 再触发AppearanceChanged, 调用InvalidatePlot. 该方法是在PlotBase中定义的, 用了模板模式. Plot类重写了父类的UpdateModel. 多了Synchronize的步骤.

但WPF中的Series和LineSeries中并没有Render的代码, Render的逻辑还是在PlotModel中. SynchronizeProperties的作用就是将WPF中的属性同步给PlotModel, 然后由PlotModel绘制. 绘制在哪里, 绘制在PlotBase的Canvas上.

由于PlotBase继承自Control类, 而Control类在WPF是设计为无外观控件, 一般会从generic.xaml中获取默认的控件模板. WPF中有一个专用的OnApplyTemplate()方法, 如果需要在模板中查找元素并关联事件处理程序或添加数据绑定表达式, 应重写该方法. 详见WPF编程宝典18.3创建无外观控件一节. 这里PlotBase在OnApplyTemplate()中添加了绘制的纸和笔

1
2
3
4
5
6
7
8
9
10
11
12
13
14
15
16
17
18
19
20
21
22
23
24
25
26
27
28
29
30
31
/// <summary>
/// When overridden in a derived class, is invoked whenever application code or internal processes (such as a rebuilding layout pass)
/// call <see cref="M:System.Windows.Controls.Control.ApplyTemplate" /> . In simplest terms, this means the method is called
/// just before a UI element displays in an application. For more information, see Remarks.
/// </summary>
public override void OnApplyTemplate()
{
base.OnApplyTemplate();
this.grid = this.GetTemplateChild(PartGrid) as Grid;
if (this.grid == null)
{
return;
}

this.canvas = new Canvas();
this.grid.Children.Add(this.canvas);
this.canvas.UpdateLayout();
this.renderContext = new CanvasRenderContext(this.canvas);

this.overlays = new Canvas();
this.grid.Children.Add(this.overlays);

this.zoomControl = new ContentControl();
this.overlays.Children.Add(this.zoomControl);

// add additional grid on top of everthing else to fix issue of mouse events getting lost
// it must be added last so it covers all other controls
var mouseGrid = new Grid();
mouseGrid.Background = Brushes.Transparent; // background must be set for hit test to work
this.grid.Children.Add(mouseGrid);
}

2D Visualization笔记(X2) OxyPlot(二)

Posted on 2018-05-11 | In 编程

上一篇笔记中出现了Model和View, 如果加上交互, 又是如何? 基类PlotBase继承自Control, 所以它能监听键盘和鼠标事件, 并且进行了重载. 它委托给PlotController来进行事件处理.

1
2
3
4
5
6
7
8
9
10
11
12
13
14
15
16
17
18
19
20
21
22
23
24
25
26
27
28
29
30
31
32
33
34
35
/// <summary>
/// Invoked when an unhandled MouseDown attached event reaches an element in its route that is derived from this class. Implement this method to add class handling for this event.
/// </summary>
/// <param name="e">The <see cref="T:System.Windows.Input.MouseButtonEventArgs" /> that contains the event data. This event data reports details about the mouse button that was pressed and the handled state.</param>
protected override void OnMouseDown(MouseButtonEventArgs e)
{
base.OnMouseDown(e);
if (e.Handled)
{
return;
}

this.Focus();
this.CaptureMouse();

// store the mouse down point, check it when mouse button is released to determine if the context menu should be shown
this.mouseDownPoint = e.GetPosition(this).ToScreenPoint();

e.Handled = this.ActualController.HandleMouseDown(this, e.ToMouseDownEventArgs(this));
}

/// <summary>
/// Invoked when an unhandled MouseMove attached event reaches an element in its route that is derived from this class. Implement this method to add class handling for this event.
/// </summary>
/// <param name="e">The <see cref="T:System.Windows.Input.MouseEventArgs" /> that contains the event data.</param>
protected override void OnMouseMove(MouseEventArgs e)
{
base.OnMouseMove(e);
if (e.Handled)
{
return;
}

e.Handled = this.ActualController.HandleMouseMove(this, e.ToMouseEventArgs(this));
}

在PlotController的基类ControllerBase中找到HandleMouseDown, 发现它又调用了PlotModel的HandleMouseDown方法. 如果PlotModel处理完了, 则返回. 如果PlotModel没有处理, 则下面进一步调用HandleCommand.为什么这样设计, 因为交互可能是针对整个PlotView(缩放,移动等), 也可能是针对其中的某一个PlotElement.而PlotElement位于PlotModel中.

1
2
3
4
5
6
7
8
9
10
11
12
13
14
15
16
17
18
19
20
21
22
23
/// <summary>
/// Handles mouse down events.
/// </summary>
/// <param name="view">The plot view.</param>
/// <param name="args">The <see cref="OxyMouseEventArgs" /> instance containing the event data.</param>
/// <returns><c>true</c> if the event was handled.</returns>
public virtual bool HandleMouseDown(IView view, OxyMouseDownEventArgs args)
{
lock (this.GetSyncRoot(view))
{
if (view.ActualModel != null)
{
view.ActualModel.HandleMouseDown(this, args);
if (args.Handled)
{
return true;
}
}

var command = this.GetCommand(new OxyMouseDownGesture(args.ChangedButton, args.ModifierKeys, args.ClickCount));
return this.HandleCommand(command, view, args);
}
}

Command是在PlotController的构造方法中绑定的

1
2
3
4
5
6
7
8
9
10
11
12
13
public PlotController()
{
// Zoom rectangle bindings: MMB / control RMB / control+alt LMB
this.BindMouseDown(OxyMouseButton.Middle, PlotCommands.ZoomRectangle);
this.BindMouseDown(OxyMouseButton.Right, OxyModifierKeys.Control, PlotCommands.ZoomRectangle);
this.BindMouseDown(OxyMouseButton.Left, OxyModifierKeys.Control | OxyModifierKeys.Alt, PlotCommands.ZoomRectangle);

// Reset bindings: Same as zoom rectangle, but double click / A key
this.BindMouseDown(OxyMouseButton.Middle, OxyModifierKeys.None, 2, PlotCommands.ResetAt);
this.BindMouseDown(OxyMouseButton.Right, OxyModifierKeys.Control, 2, PlotCommands.ResetAt);
this.BindMouseDown(OxyMouseButton.Left, OxyModifierKeys.Control | OxyModifierKeys.Alt, 2, PlotCommands.ResetAt);
//...
}

PlotModel的HandleMouseDown方法是在基类Model中. 该方法, 先测试MouseDown的地方, 有没有PlotElement, 如果有的话, 需要继续往下传. 类似WPF中的路由事件.

1
2
3
4
5
6
7
8
9
10
11
12
13
14
15
16
17
18
19
20
21
22
23
24
25
26
27
28
29
30
31
32
33
34
35
36
37
38
39
40
41
42
43
/// <summary>
/// Handles the mouse down event.
/// </summary>
/// <param name="sender">The sender.</param>
/// <param name="e">The <see cref="OxyPlot.OxyMouseEventArgs" /> instance containing the event data.</param>
public virtual void HandleMouseDown(object sender, OxyMouseDownEventArgs e)
{
var args = new HitTestArguments(e.Position, MouseHitTolerance);
foreach (var result in this.HitTest(args))
{
e.HitTestResult = result;
result.Element.OnMouseDown(e);
if (e.Handled)
{
this.currentMouseEventElement = result.Element;
return;
}
}

if (!e.Handled)
{
this.OnMouseDown(sender, e);
}
}

/// <summary>
/// Raises the <see cref="MouseDown" /> event.
/// </summary>
/// <param name="sender">The sender.</param>
/// <param name="e">The <see cref="OxyMouseEventArgs" /> instance containing the event data.</param>
protected virtual void OnMouseDown(object sender, OxyMouseDownEventArgs e)
{
var handler = this.MouseDown;
if (handler != null)
{
handler(sender, e);
}
}

/// <summary>
/// Occurs when a mouse button is pressed down on the model.
/// </summary>
public event EventHandler<OxyMouseDownEventArgs> MouseDown;

看几个例子

例子1: 用鼠标划线, 该交互是针对整个PlotModel的.

1
2
3
4
5
6
7
8
9
10
11
12
13
14
15
16
17
18
19
20
21
22
23
24
25
26
27
28
29
30
31
32
33
34
35
36
37
38
39
40
41
42
43
44
45
46
47
48
49
50
51
[Example("PlotModel mouse events")]
public static PlotModel MouseEvents()
{
var model = new PlotModel { Title = "Mouse events", Subtitle = "Left click and drag" };
var yaxis = new LinearAxis { Position = AxisPosition.Left, Minimum = -1, Maximum = 1 };
var xaxis = new LinearAxis { Position = AxisPosition.Bottom, Minimum = -1, Maximum = 1 };
model.Axes.Add(yaxis);
model.Axes.Add(xaxis);

LineSeries s1 = null;

// Subscribe to the mouse down event on the line series
model.MouseDown += (s, e) =>
{
// only handle the left mouse button (right button can still be used to pan)
if (e.ChangedButton == OxyMouseButton.Left)
{
// Add a line series
s1 = new LineSeries
{
Title = "LineSeries" + (model.Series.Count + 1),
MarkerType = MarkerType.None,
StrokeThickness = 2
};
s1.Points.Add(xaxis.InverseTransform(e.Position.X, e.Position.Y, yaxis));
model.Series.Add(s1);
model.InvalidatePlot(false);
e.Handled = true;
}
};

model.MouseMove += (s, e) =>
{
if (s1 != null)
{
s1.Points.Add(xaxis.InverseTransform(e.Position.X, e.Position.Y, yaxis));
model.InvalidatePlot(false);
e.Handled = true;
}
};

model.MouseUp += (s, e) =>
{
if (s1 != null)
{
s1 = null;
e.Handled = true;
}
};
return model;
}

注意到model.InvalidatePlot(false);

1
2
3
4
5
6
7
8
9
10
11
12
13
14
/// <summary>
/// Invalidates the plot.
/// </summary>
/// <param name="updateData">Updates all data sources if set to <c>true</c>.</param>
public void InvalidatePlot(bool updateData)
{
var plotView = this.PlotView;
if (plotView == null)
{
return;
}

plotView.InvalidatePlot(updateData);
}

例子2: 该交互针对的是PlotElement

1
2
3
4
5
6
7
8
9
10
11
12
13
14
15
16
17
18
19
20
21
22
23
24
25
26
27
28
29
30
31
[Example("MouseDown event and HitTestResult")]
public static PlotModel MouseDownEventHitTestResult()
{
var model = new PlotModel { Title = "MouseDown HitTestResult", Subtitle = "Reports the index of the nearest point." };

var s1 = new LineSeries();
s1.Points.Add(new DataPoint(0, 10));
s1.Points.Add(new DataPoint(10, 40));
s1.Points.Add(new DataPoint(40, 20));
s1.Points.Add(new DataPoint(60, 30));
model.Series.Add(s1);
s1.MouseDown += (s, e) =>
{
model.Subtitle = "Index of nearest point in LineSeries: " + Math.Round(e.HitTestResult.Index);
model.InvalidatePlot(false);
};

var s2 = new ScatterSeries();
s2.Points.Add(new ScatterPoint(0, 15));
s2.Points.Add(new ScatterPoint(10, 45));
s2.Points.Add(new ScatterPoint(40, 25));
s2.Points.Add(new ScatterPoint(60, 35));
model.Series.Add(s2);
s2.MouseDown += (s, e) =>
{
model.Subtitle = "Index of nearest point in ScatterSeries: " + (int)e.HitTestResult.Index;
model.InvalidatePlot(false);
};

return model;
}

如果PlotModel和PlotElement都没有进行事件监听处理, 那么交互是针对PlotView的

1
2
3
4
5
6
7
8
9
10
11
12
13
14
15
16
17
18
19
20
21
22
23
24
25
26

public class CustomPlotController : PlotController
{
public CustomPlotController()
{
this.UnbindAll();
this.BindKeyDown(OxyKey.Left, PlotCommands.PanRight);
this.BindKeyDown(OxyKey.Right, PlotCommands.PanLeft);
}
}

public class MainViewModel
{
/// <summary>
/// Initializes a new instance of the <see cref="MainViewModel" /> class.
/// </summary>
public MainViewModel()
{
// Set the Model property, the INotifyPropertyChanged event will make the WPF Plot control update its content
this.Model = CreatePlotModel("Custom PlotController", "Supports left/right keys only");
this.Controller = new CustomPlotController();

this.Model1 = CreatePlotModel("Default controller", null);
this.Model2 = CreatePlotModel("Default controller", "UnbindAll()");
}
}

1
<oxy:PlotView Model="{Binding Model}" Controller="{Binding Controller}" />

这种设计方式基本上是一个比较标准的MVC

2D Visualization笔记(X2) OxyPlot(一)

Posted on 2018-05-11 | In 编程

OxyPlot is a cross-platform plotting library for .NET(http://www.oxyplot.org/).

有简单的文档(http://docs.oxyplot.org/en/latest/common-tasks/refresh-plot.html). 这里以OxyPlot.WPF为例.

用词

Plot:
Also called a graph or chart

Plot model:
A model represents the contents of a plot

Plot controller:
Handles user input

Plot view:
The custom control that displays the plot model and communicates with the plot controller

Plot element: An element of the plot model that can be displayed (e.g. a series, annotation or axis)

Axis:
A plot element that displays an axis

Series:
A plot element that displays data

Annotation:
Displays content that is not a series. Annotations are not included in the legend and not used by the tracker

Plot area:
The area where the series are displayed

Legend:
Displays the titles and symbol of the series.

Tracker:
When the user hovers or clicks on a series, the tracker shows the actual values at that point


OxyPlot分为OxyPlot(Portable)和OxyPlot.Wpf两部分. OxyPlot(Portable)暴露IPlotView接口, OxyPlot.Wpf中的PlotBase继承Control, 同时实现IPlotView. 其他和平台无关的类, 都位于OxyPlot(Portable)中, 例如PlotModel和IPlotModel, IPlotController和PlotController.

先看入门样例(http://docs.oxyplot.org/en/latest/getting-started/hello-wpf.html):

创建ViewModel

1
2
3
4
5
6
7
8
9
10
11
12
13
14
15
16
17
18
namespace WpfApplication1
{
using System;

using OxyPlot;
using OxyPlot.Series;

public class MainViewModel
{
public MainViewModel()
{
this.MyModel = new PlotModel { Title = "Example 1" };
this.MyModel.Series.Add(new FunctionSeries(Math.Cos, 0, 10, 0.1, "cos(x)"));
}

public PlotModel MyModel { get; private set; }
}
}

创建View

1
2
3
4
5
6
7
8
9
10
11
12
<Window x:Class="WpfApplication1.MainWindow"
xmlns="http://schemas.microsoft.com/winfx/2006/xaml/presentation"
xmlns:x="http://schemas.microsoft.com/winfx/2006/xaml" xmlns:oxy="http://oxyplot.org/wpf"
xmlns:local="clr-namespace:WpfApplication1"
Title="Example 1 (WPF)" Height="350" Width="525">
<Window.DataContext>
<local:MainViewModel/>
</Window.DataContext>
<Grid>
<oxy:PlotView Model="{Binding MyModel}"/>
</Grid>
</Window>

运行得到下图
先看PlotView的部分代码

1
2
3
4
5
6
7
8
9
10
11
12
13
14
15
16
17
18
19
20
21
22
23
24
25
26
27
28
29
30
31
32
33
34
35
36
37
38
/// <summary>
/// Identifies the <see cref="Model"/> dependency property.
/// </summary>
public static readonly DependencyProperty ModelProperty =
DependencyProperty.Register("Model", typeof(PlotModel), typeof(PlotView), new PropertyMetadata(null, ModelChanged));

/// <summary>
/// Called when the model is changed.
/// </summary>
/// <param name="d">The sender.</param>
/// <param name="e">The <see cref="System.Windows.DependencyPropertyChangedEventArgs" /> instance containing the event data.</param>
private static void ModelChanged(DependencyObject d, DependencyPropertyChangedEventArgs e)
{
((PlotView)d).OnModelChanged();
}

/// <summary>
/// Called when the model is changed.
/// </summary>
private void OnModelChanged()
{
lock (this.modelLock)
{
if (this.currentModel != null)
{
((IPlotModel)this.currentModel).AttachPlotView(null);
this.currentModel = null;
}

if (this.Model != null)
{
((IPlotModel)this.Model).AttachPlotView(this);
this.currentModel = this.Model;
}
}

this.InvalidatePlot();
}

当面Model的值发生变化时, 会调用ModelChanged方法, 进而调用this.InvalidatePlot方法绘图. 这里另外一个地方也很重要: AttachPlotView(this). 将PlotView关联到PlotModel中.

InvalidatePlot方法是在父类PlotBase中定义的, 这个方法至关重要.

1
2
3
4
5
6
7
8
9
10
11
12
13
14
15
16
17
18
19
20
21
22
23
24
25
26
27
28
29
30
31
32
33
/// <summary>
/// Invalidate the PlotView (not blocking the UI thread)
/// </summary>
/// <param name="updateData">The update Data.</param>
public void InvalidatePlot(bool updateData = true)
{
if (this.ActualWidth <= 0 || this.ActualHeight <= 0)
{
return;
}

this.UpdateModel(updateData);

if (Interlocked.CompareExchange(ref this.isPlotInvalidated, 1, 0) == 0)
{
// Invalidate the arrange state for the element.
// After the invalidation, the element will have its layout updated,
// which will occur asynchronously unless subsequently forced by UpdateLayout.
this.BeginInvoke(this.InvalidateArrange);
}
}

/// <summary>
/// Updates the model.
/// </summary>
/// <param name="updateData">The update Data.</param>
protected virtual void UpdateModel(bool updateData = true)
{
if (this.ActualModel != null)
{
((IPlotModel)this.ActualModel).Update(updateData);
}
}

第一步更新PlotModel, 第二步异步调用InvalidateArrange进行绘制. InvalidateArrange是Control的方法, 最终调用的ArrangeOverride方法

1
2
3
4
5
6
7
8
9
10
11
12
13
14
15
16
17
18
19
20
21
22
23
24
25
26
27
28
29
30
31
32
33
34
35
36
37
38
39
40
41
42
43
44
45
46
47
48
49
50
51
52
53
54
55
56
57
58
59
60
61
62
63
64
65
66
67
68
69
70
/// <summary>
/// Provides the behavior for the Arrange pass of Silverlight layout. Classes can override this method to define their own Arrange pass behavior.
/// </summary>
/// <param name="finalSize">The final area within the parent that this object should use to arrange itself and its children.</param>
/// <returns>The actual size that is used after the element is arranged in layout.</returns>
protected override Size ArrangeOverride(Size finalSize)
{
if (this.ActualWidth > 0 && this.ActualHeight > 0)
{
if (Interlocked.CompareExchange(ref this.isPlotInvalidated, 0, 1) == 1)
{
this.UpdateVisuals();
}
}

return base.ArrangeOverride(finalSize);
}

/// <summary>
/// Updates the visuals.
/// </summary>
private void UpdateVisuals()
{
if (this.canvas == null || this.renderContext == null)
{
return;
}

if (!this.isVisibleToUserCache)
{
return;
}

// Clear the canvas
this.canvas.Children.Clear();

if (this.ActualModel != null && this.ActualModel.Background.IsVisible())
{
this.canvas.Background = this.ActualModel.Background.ToBrush();
}
else
{
this.canvas.Background = null;
}

if (this.ActualModel != null)
{
if (this.DisconnectCanvasWhileUpdating)
{
// TODO: profile... not sure if this makes any difference
int idx = this.grid.Children.IndexOf(this.canvas);
if (idx != -1)
{
this.grid.Children.RemoveAt(idx);
}

((IPlotModel)this.ActualModel).Render(this.renderContext, this.canvas.ActualWidth, this.canvas.ActualHeight);

// reinsert the canvas again
if (idx != -1)
{
this.grid.Children.Insert(idx, this.canvas);
}
}
else
{
((IPlotModel)this.ActualModel).Render(this.renderContext, this.canvas.ActualWidth, this.canvas.ActualHeight);
}
}
}

在UpdateVisual方法中, 看到了Render方法. 该方法是在PlotModel中定义的. 也就是说PlotView不关心具体的绘制逻辑, 它只提供绘图的纸和笔(RenderContext, 在WPF中,该RenderContext就是Canvas). 然后由PlotModel负责整个绘制逻辑. PlotModel由各种PlotElement组成, 各种PlotElement有自己的绘图逻辑. 于是PlotModel把从PlotView中拿到的纸和笔, 再交给具体的PlotElement, 由他们自己去绘制.

1
2
3
4
5
6
7
8
9
10
11
12
13
14
15
16
17
18
19
20
21
22
23
24
25
26
27
28
29
30
31
32
33
34
35
36
37
38
39
40
41
42
43
44
45
46
47
48
49
50
51
52
53
54
55
56
57
58
59
60
61
62
63
64
65
66
67
68
69
70
71
72
73
74
75
76
77
78
79
80
81
82
83
84
85
86
87
    /// <summary>
/// Renders the plot with the specified rendering context.
/// </summary>
/// <param name="rc">The rendering context.</param>
/// <param name="width">The width.</param>
/// <param name="height">The height.</param>
void IPlotModel.Render(IRenderContext rc, double width, double height)
{
this.RenderOverride(rc, width, height);
}

/// <summary>
/// Renders the plot with the specified rendering context.
/// </summary>
/// <param name="rc">The rendering context.</param>
/// <param name="width">The width.</param>
/// <param name="height">The height.</param>
protected virtual void RenderOverride(IRenderContext rc, double width, double height)
{
//...
this.RenderBackgrounds(rc);
this.RenderAnnotations(rc, AnnotationLayer.BelowAxes);
this.RenderAxes(rc, AxisLayer.BelowSeries);
this.RenderAnnotations(rc, AnnotationLayer.BelowSeries);
this.RenderSeries(rc);
this.RenderAnnotations(rc, AnnotationLayer.AboveSeries);
this.RenderTitle(rc);
this.RenderBox(rc);
this.RenderAxes(rc, AxisLayer.AboveSeries);

if (this.IsLegendVisible)
{
this.RenderLegends(rc, this.LegendArea);
}
//...
}

/// <summary>
/// Renders the series.
/// </summary>
/// <param name="rc">The render context.</param>
private void RenderSeries(IRenderContext rc)
{
foreach (var s in this.Series.Where(s => s.IsVisible))
{
rc.SetToolTip(s.ToolTip);
s.Render(rc);
}

rc.SetToolTip(null);
}
```
以LineSeries为例
```CSharp
/// <summary>
/// Renders the series on the specified rendering context.
/// </summary>
/// <param name="rc">The rendering context.</param>
public override void Render(IRenderContext rc)
{
var actualPoints = this.ActualPoints;
if (actualPoints == null || actualPoints.Count == 0)
{
return;
}

this.VerifyAxes();

var clippingRect = this.GetClippingRect();
rc.SetClip(clippingRect);

this.RenderPoints(rc, clippingRect, actualPoints);

if (this.LabelFormatString != null)
{
// render point labels (not optimized for performance)
this.RenderPointLabels(rc, clippingRect);
}

rc.ResetClip();

if (this.LineLegendPosition != LineLegendPosition.None && !string.IsNullOrEmpty(this.Title))
{
// renders a legend on the line
this.RenderLegendOnLine(rc);
}
}

WCF笔记(X5) 并发管理

Posted on 2018-05-07 | In 编程

上一篇笔记中提到了ConcurrencyMode, WCF中的并发指的是同一个服务实例上下文同时处理多个服务调用请求. 这里再进一步介绍一下ConcurrencyMode, 特别是ConcurrencyMode与InstanceContextMode之间的关系

WCF并发框架解决的是如何有效地处理被分发到同一个服务实例上下文的多个服务调用请求. 这些并行的调用请求可能来自不同的客户端(服务代理), 也可能来自相同的客户端.

Instance Management and Concurrency

Service-instance thread safety is closely related to the service instancing mode. A per-call service instance is thread-safe by definition, because each call gets its own dedicated instance. That instance is accessible only by its assigned worker thread, and because no other threads will be accessing it, it has no need for synchronization. 对实例资源不需要同步

However, a per-call service is typically state-aware. The state store can be an inmemory resource such as static dictionary, and it can be subject to multithreaded access because the service can sustain concurrent calls, whether from the same client or from multiple clients. Consequently, you must synchronize access to the state store. 对静态资源仍然需要同步

A per-session service always requires concurrency management and synchronization, because the client may use the same proxy and yet dispatch calls to the service on multiple client-side threads. 在同一个Client端发起多个线程, 但使用的是同一个Proxy. 这种情况下, 调用的是同一个Service Instance. 所以需要同步; 如果每个线程都new一个Porxy, 那么它们调用的是不同的Service Instance, 不需要对实例资源进行同步.

A singleton service is even more susceptible(敏感) to concurrent access, and must support synchronized access. The singleton has some inmemory state that all clients implicitly share. On top of the possibility of the client dispatching calls on multiple threads, as with a per-session service, a singleton may simply have multiple clients in different execution contexts, each using its own thread to call the service. All of these calls will enter the singleton on different threads from the I/O completion thread pool—hence the need for synchronization. 单例模式下, 即使是不同的Proxy, 调用的都是同一个Service Instance. 需要同步.

CurrentMode有以下三种

1
2
3
4
5
6
public enum ConcurrencyMode
{
Single,//默认加锁
Reentrant, //可重入
Multiple
}

ConcurrencyMode.Single

When the service is configured with ConcurrencyMode.Single, WCF will provide automatic synchronization to the service context and disallow concurrent calls by associating the context containing the service instance with a synchronization lock. Every call coming into the service must first try to acquire the lock. If the lock is unowned, the caller will be allowed in. Once the operation returns, WCF will unlock the lock, thus allowing in another caller.

The important thing is that only one caller at a time is ever allowed. If there are multiple concurrent callers while the lock is locked, the callers are all placed in a queue and are served out of the queue in order. If a call times out while blocked, WCF will remove the caller from the queue and the client will get a TimeoutException.

Because the default concurrency mode is synchronized access, the susceptible instancing modes of per-session and singleton are also synchronized by default. Note that even calls to a per-call service instance are synchronized by default.

ConcurrencyMode.Multiple

When the service is configured with ConcurrencyMode.Multiple, WCF will stay out of the way and will not synchronize access to the service instance in any way. ConcurrencyMode.Multiple simply means that the service instance is not associated with any synchronization lock, so concurrent calls are allowed on the service instance. Put differently, when a service instance is configured with ConcurrencyMode.Multiple WCF will not queue up the client messages and dispatch them to the service instance as soon as they arrive.

Multiple选项不提供任何同步措施, 需要手动同步, 例如:

1
2
3
4
5
6
7
8
9
10
11
12
13
14
15
16
17
18
19
[ServiceContract(SessionMode = SessionMode.Required)]
interface IMyContract
{
void MyMethod();
}

[ServiceBehavior(ConcurrencyMode = ConcurrencyMode.Multiple)]
class MyService : IMyContract
{
int[] m_Numbers;
List<string> m_Names;
public void MyMethod()
{
lock(this)
{
...
}
}
}

While this code is thread-safe, you actually gain little from the use of ConcurrencyMode.Multiple: the net effect in terms of synchronization is similar to using ConcurrencyMode.Single, yet you have increased the overall code complexity and reliance on developers’ discipline. In general, you should avoid ConcurrencyMode.Multiple. However, there are cases where ConcurrencyMode.Multiple is useful.

ConcurrencyMode.Reentrant

The ConcurrencyMode.Reentrant value is a refinement of the ConcurrencyMode.Single value. Similarly to ConcurrencyMode.Single, ConcurrencyMode.Reentrantassociates the service instance with a synchronization lock, so that concurrent calls on the same instance are never allowed. However, if the reentrant service calls out to another service or a callback, and that call chain (or causality) somehow winds its way back to the service instance 如下图所示, WCF silently releases the synchronization lock that is associated with the instance.it is allowed to reenter the service instance.

ConcurrencyMode.Reentrant is designed to avoid the potential deadlock of reentrancy.

A service configured with ConcurrencyMode.Multiple is by definition also reentrant, because no lock is held during the callout.However, unlike a reentrant service, which is inherently threadsafe, a service configured with ConcurrencyMode.Multiple must provide for its own synchronization (for example, by locking the instance during every call, as explained previously). It is up to the developer of such a service to decide if it should release the lock before calling out to avoid a reentrancy deadlock. ConcurrencyMode.Multiple本身也是可重入的

可重入不是说两个线程可以并发调用该方法, 它仍然是single模式, 后一个会等前一个执行完之后再进入
可重入是说, 在方法内部调用其他Service或者回调, 当Service或者回调返回时, 仍然能够回到该Context中. 如果不能返回, 就是死锁.

上一篇笔记中提到, 即使Callback中加了ConcurrencyMode.Reentrant, 仍有可能发生死锁.

Instances and Concurrent Access

Using the same proxy, a single client can issue multiple concurrent calls to a service. The client can use multiple threads to invoke calls on the service, or it can issue oneway calls in rapid succession on the same thread. In both of these cases, whether the calls from the same client are processed concurrently is the product of the service’s configured instancing mode, the service’s concurrency mode, and the configured delivery mode (that is, the transport session). The following discussion applies equally to request-reply and one-way calls.

Per-Call Services

In the case of a per-call service, if there is no transport-level session, concurrent processing of calls is allowed. Calls are dispatched as they arrive, each to a new instance, and execute concurrently. This is the case regardless of the service concurrency mode.

If the service is configured with ConcurrencyMode.Single, concurrent processing of the pending calls is not allowed, and the calls are dispatched one at a time.

If the service is configured with ConcurrencyMode.Multiple, concurrent processing is allowed. Calls are dispatched as they arrive, each to a new instance, and execute concurrently. it is a good idea to configure a per-call service with Concurrency Mode.Multiple—the instance itself will still be thread-safe (so you will not incur the synchronization liability), yet you will allow concurrent calls from the same client

When the service is configured with ConcurrencyMode.Reentrant, if the service does not call out, it behaves similarly to a service configured with ConcurrencyMode.Single. If the service does call out, the next call is allowed in, and the returning call has to negotiate the lock like all other pending calls

Sessionful and Singleton Services

In the case of a sessionful or a singleton service, the configured concurrency mode alone governs the concurrent execution of pending calls. If the service is configured with ConcurrencyMode.Single, calls will be dispatched to the service instance one at a time, and pending calls will be placed in a queue. You should avoid lengthy processing of calls, because it may risk call timeouts.

If the service instance is configured with ConcurrencyMode.Multiple, concurrent processing of calls from the same client is allowed. Calls will be executed by the service instance as fast as they come off the channel (up to the throttle limit). Of course, as is always the case with a stateful unsynchronized service instance, you must synchronize access to the service instance or risk state corruption.

If the service instance is configured with ConcurrencyMode.Reentrant, it behaves just as it would with ConcurrencyMode.Single. However, if the service calls out, the next call is allowed to execute. You must follow the guidelines discussed previously regarding programming in a reentrant environment.

WCF笔记(X4) 双工通信

Posted on 2018-05-06 | In 编程

WCF的整体结构如下图所示

图上展示的是Client调用Service的过程. 在前面的笔记中已经提到, 调用过程也可以反向进行, 从Service回调Client, 这就是WCF中的双工通信.原先的Service和Client将发生对调,Service成为Client,Client成为Service。

WCF支持3种消息交换模式: 1. Request/Reply (请求/回复); 2. One-Way(单向); 3. Duplex(双工). 前面两种是基本的消息交换模式, 可以用OperationContract描述, Duplex可以看成是前两种基本消息交换模式的组合.

1.Request/Reply 默认方式

As the name implies, in these operations, the client issues a request in the form of a message and blocks until it gets the reply message. If the service does not respond within a default timeout of one minute, the client will get a TimeoutException. Request-reply is the default operation mode. Programming against request-reply operations is simple enough and resembles programming using the classic client/server model. The returned response message containing the results or returned values is converted to normal method return values. In addition, the proxy will throw an exception on the client side if there are any communication or service-side exceptions

2.One-Way
One-Way 这种方式在调用方法后会立即返回。需要注意的是 One-Way 不能用在非void,或者包含 out/ref 参数的方法上,会导致抛出 InvalidOperationException 异常。

There are cases when an operation has no return value, and the client does not care about the success or failure of the invocation. To support this sort of fire-and-forget invocation, WCF offers one-way operations: once the client issues the call, WCF generates a request message, but no correlated reply message will ever return to the client. As a result, one-way operations cannot return values, and any exceptions thrown
on the service side will not make their way to the client.

Ideally, when the client calls a one-way method, it should be blocked only for the briefest moment required to dispatch the call. However, in reality, one-way calls do not equate to asynchronous calls. When one-way calls reach the service, they may not be dispatched all at once but may instead be buffered on the service side to be dispatched one at a time, according to the service’s configured concurrency mode behavior. The
number of messages the service can buffer (be they one-way or request-reply operations) is a product of the configured channel and reliability mode. If the number of messages exceeds the buffer’s capacity, the client will be blocked even if it has issued a one-way call. However, once the call is deposited in the buffer, the client will be unblocked and can continue executing while the service processes the operation in
the background. 假如one-way call到达Service但没有立即被Dispatch, 而是在缓存队列中, 这是client会被阻塞

It’s also wrong to equate one-way calls with concurrent calls. If the client uses the same proxy yet utilizes multiple threads to invoke one-way calls, the calls may or may not execute concurrently on the service, and the exact nature of the interaction will be determined by the service concurrency management mode and the transport session (see Chapter 8 for more on this subject).All of the WCF bindings support one-way operations.

3.Duplex

WCF supports allowing a service to call back to its clients. During a callback, in many respects the tables are turned: the service is the client, and the client becomes the service (see Figure 5-1). Callback operations can be used in a variety of scenarios and applications, but they are especially useful when it comes to events, or notifying the client(s) that some event has happened on the service side.

Not all bindings support callback operations. Only bidirectional-capable bindings support callback operations. For example, because of its connectionless nature, HTTP cannot be used for callbacks, and therefore you cannot use callbacks over the BasicHttpBinding or the WSHttpBinding. The only two commonly used bindings that offer callbacks are the NetTcpBinding and the NetNamedPipeBinding, because by their very nature, the TCP and the IPC protocols support duplex communication.

一个服务契约若要定义回调,必须专门定义一个用于回调的契约。一个服务契约最多包含一个回调契约,一个服务契约一旦定义了回调契约那客户端必须支持这个回调。那如何为一个服务契约定义回调呢?使用ServiceContract特性的CallBackContract特性,代码如下:

1
2
3
4
5
6
7
8
9
10
11
12
interface IMyContractCallback
{
[OperationContract]
void OnCallback();
}

[ServiceContract(CallbackContract = typeof(IMyContractCallback))]
interface IMyContract
{
[OperationContract]
void DoSomething();
}

Client Callback Setup

It is up to the client to host the callback object and expose a callback endpoint. Recall from Chapter 1 that the innermost execution scope of the service instance is the instance context. The InstanceContext class provides a constructor that takes the service instance to the host:

All the client needs to do to host a callback object is instantiate the callback object and construct a context around it:

1
2
3
4
5
6
7
8
9
10
class MyCallback : IMyContractCallback
{
public void OnCallback()
{...}
}
IMyContractCallback callback = new MyCallback();
InstanceContext context = new InstanceContext(callback);

MyContractClient proxy = new MyContractClient(context);
proxy.DoSomething();

Service-Side Callback Invocation

The client-side callback endpoint reference is passed along with every call the client makes to the service, and it is part of the incoming message. The OperationContext class provides the service with easy access to the callback reference via the generic method GetCallbackChannel()

1
2
3
4
5
6
7
8
9
10
11
12
13
14
15
16
17
18
[ServiceBehavior(InstanceContextMode = InstanceContextMode.PerCall)]
class MyService : IMyContract
{
static List<IMyContractCallback> m_Callbacks = new List<IMyContractCallback>();
public void DoSomething()
{
IMyContractCallback callback = OperationContext.Current.GetCallbackChannel<IMyContractCallback>();
if(m_Callbacks.Contains(callback) == false)
{
m_Callbacks.Add(callback);
}
}
public static void CallClients()
{
Action<IMyContractCallback> invoke = callback => callback.OnCallback();
m_Callbacks.ForEach (invoke);
}
}

Callback reentrancy

The service may also want to invoke the callback reference that’s passed in (or a saved copy of it) during the execution of a contract operation. However, such invocations are disallowed by default. The reason is the default service concurrency management.By default, the service class is configured for single-threaded access: the service instance context is associated with a lock, and only one thread at a time can own the
lock and access the service instance inside that context. Calling out to the client during an operation call requires blocking the service thread and invoking the callback. The problem is that processing the reply message from the client on the same channel once the callback returns requires reentering the same context and negotiating ownership of the same lock, which will result in a deadlock. Note that the service may still invoke callbacks to other clients or call other services; it is the callback to its calling client that will cause the deadlock

To prevent such a deadlock, if the single-threaded service instance tries to call back to its client, WCF will throw an InvalidOperationException. There are three possible solutions. The first is to configure the service for multithreaded access. Callbacks to the calling client will then be allowed because the service instance will not be associated with a lock; however, this will increase the burden on the service developer, because of the need to provide synchronization for the service. The second solution is to configure the service for reentrancy. When configured for reentrancy, the service instance context is still associated with a lock, and only single-threaded access is allowed. However, if the service is calling back to its client, WCF will silently release the lock first. you can set the concurrency behavior to either multithreaded or reentrant using the Concurrency Mode property of the ServiceBehavior attribute:

1
2
3
4
5
6
public enum ConcurrencyMode
{
Single, //Default
Reentrant,
Multiple
}

1
2
3
4
5
6
7
8
9
10
11
12
13
14
15
16
17
18
19
20
21
22
[ServiceContract(CallbackContract = typeof(IMyContractCallback))]
interface IMyContract
{
[OperationContract]
void DoSomething();
}

interface IMyContractCallback
{
[OperationContract]
void OnCallback();
}

[ServiceBehavior(ConcurrencyMode = ConcurrencyMode.Reentrant)]
class MyService : IMyContract
{
public void DoSomething()
{
IMyContractCallback callback = OperationContext.Current.GetCallbackChannel<IMyContractCallback>();
callback.OnCallback();
}
}

The third solution that allows the service to safely call back to the calling client is to configure the callback contract operations as one-way operations. Doing so will enable the service to call back even when the concurrency mode is set to singlethreaded, because there will not be any reply message to contend for the lock.

1
2
3
4
5
6
7
8
9
10
11
12
13
14
15
16
17
18
19
20
21
22
//Example 5-8. One-way callbacks are allowed by default
[ServiceContract(CallbackContract = typeof(IMyContractCallback))]
interface IMyContract
{
[OperationContract]
void DoSomething();
}

interface IMyContractCallback
{
[OperationContract(IsOneWay = true)]
void OnCallback();
}

class MyService : IMyContract
{
public void DoSomething()
{
IMyContractCallback callback = OperationContext.Current.GetCallbackChannel<IMyContractCallback>();
callback.OnCallback();
}
}

Callbacks and the UI Synchronization Context

Configuring the callback for affinity to the UI thread may trigger a deadlock. Suppose a Windows Forms client establishes an affinity between a callback object (or even itself) and the UI synchronization context, and then calls a service, passing the callback reference. The service is configured for reentrancy, and it calls back to the client.

A deadlock now occurs because the callback to the client needs to execute on the UI thread, and that thread is blocked waiting for the service call to return. For example,Example 8-22 has the potential for this deadlock. Configuring the callback as a oneway operation will not resolve the problem here, because the one-way call still needs to be marshaled first to the UI thread. The only way to resolve the deadlock in this case is to turn off using the UI synchronization context by the callback, and to manually and asynchronously marshal the update to the form using its synchronization context. Example 8-24 demonstrates using this technique.

Thread Affinity (线程亲和性) 和 marshal(封送), 这两个概念是一块儿的

Whenever an affinity to a particular thread or threads is expected, the service cannot simply execute the call on the incoming WCF worker thread. Instead, the service must marshal the call to the correct thread(s) required by the resource that it accesses.

marshal指的是A线程中向B线程发送一个调用请求, 例如工作线程marshal(封送)到UI线程

UseSynchronizationContext的运用

If the thread that is opening the host has a synchronization context and UseSynchronizationContext is true, WCF will establish an affinity between that synchronization context and all of the instances of the service that is hosted by that host. WCF will automatically marshal all of the incoming calls to the service’s synchronization context.

The default value of UseSynchronizationContext is true,

The classic use of UseSynchronizationContext is to enable the service to update UI controls and windows directly. WCF greatly simplifies UI updates by providing an affinity between all of the service instances from a particular host and a specific UI thread.

Whenever you use hosting on the UI thread, deadlocks are possible. For example, the following setup is guaranteed to result with a deadlock: A Windows Forms application is hosting a service with UseSynchronizationContext set to true, and UI thread affinity is established. The Windows Forms application then calls the service over one of its endpoints. The call to the service blocks the UI thread, while WCF posts a message to the UI thread to invoke the service. That message is never processed, because of the blocking UI thread—hence, the deadlock.

UseSynchronizationContext 默认为true, 那么UI线程调用服务, 服务回调默认也发生在UI线程中.
假如调用不是request-reply, 那么会出现死锁: UI线程等待服务结束调用(堵塞), 服务结束调用, 需要回调返回, 而回调又需要UI线程, 所以死循环了

一个解决方法是UseSynchronizationContext 设为false, 那么回调就会发生在work thread中, 然后再从work thread封送到UI线程, 假如需要操作UI控件的话

1
2
3
4
5
6
7
8
9
10
11
12
13
14
15
16
17
18
19
20
21
22
23
24
25
//Example 8-22 
partial class MyForm : Form,IMyContractCallback
{
MyContractClient m_Proxy;
public MyForm()
{
InitializeComponent();
m_Proxy = new MyContractClient(new InstanceContext(this));
}
//Called as a result of a UI event
public void OnCallService(object sender,EventArgs args)
{
m_Proxy.MyMethod(); //Affinity established here
}
//This method always runs on the UI thread
public void OnCallback()
{
//No need for synchronization and marshaling
Text = "Some Callback";
}
public void OnClose(object sender,EventArgs args)
{
m_Proxy.Close();
}
}
1
2
3
4
5
6
7
8
9
10
11
12
13
14
15
16
17
18
19
20
21
22
23
24
25
26
27
28
29
30
31
32
33
34
35
36
37
38
39
40
41
42
43
44
45
46
47
48
49
50
51
52
53
54
55
//Example 8-24. Avoiding a callback deadlock on the UI thread
////////////////////////// Client Side /////////////////////
[CallbackBehavior(UseSynchronizationContext = false)]
partial class MyForm : Form,IMyContractCallback
{
SynchronizationContext m_Context;
MyContractClient m_Proxy;
public MyForm()
{
InitializeComponent();
m_Context = SynchronizationContext.Current;
m_Proxy = new MyContractClient(new InstanceContext(this));
}
public void CallService(object sender,EventArgs args)
{
m_Proxy.MyMethod();
}
//Callback runs on worker threads
public void OnCallback()
{
SendOrPostCallback setText = _=>
{
Text = "Manually marshaling to UI thread";
};
m_Context.Post(setText,null);
}
public void OnClose(object sender,EventArgs args)
{
m_Proxy.Close();
}
}


////////////////////////// Service Side /////////////////////
[ServiceContract(CallbackContract = typeof(IMyContractCallback))]
interface IMyContract
{
[OperationContract]
void MyMethod();
}
interface IMyContractCallback
{
[OperationContract]
void OnCallback();
}

[ServiceBehavior(ConcurrencyMode = ConcurrencyMode.Reentrant)]
class MyService : IMyContract
{
public void MyMethod()
{
IMyContractCallback callback = OperationContext.Current.GetCallbackChannel<IMyContractCallback>();
callback.OnCallback();
}
}

WCF解决死锁的策略
WCF resolves service call deadlocks by eventually timing out the call and throwing a TimeoutException

参考:
Writing Smart Clients by Using Windows Communication Foundation(https://msdn.microsoft.com/en-us/library/cc294424.aspx)

WCF笔记(X3) 实例管理

Posted on 2018-05-06 | In 编程

前面提到了Client通过Proxy或者Channel将服务调用转发给Service Instance(服务实例). 接下来的一个问题是, 假如有多个Client同时调用服务, Client与Service Instance之间是多对多的关系, 还是多对一的关系, 亦或其他关系?
回答这个问题之前, 先看WCF中服务寄宿的结构

Each service host instance has zero or more contexts. The context is the innermost execution scope of the service instance.A context is associated with zero or one service instance, meaning it could also be
empty (i.e., not associated with any service instance). It is the combined work of the service host and the context that exposes a native CLR type as a service. After the message is passed through the channels, the host maps that message to a new or existing context (and the object instance inside) and lets it process the call.

WCF支持以下三种实例上下文模式

1
2
3
4
5
6
public enum InstanceContextMode
{
PerCall,//单调
PerSession, //会话, 默认
Single //单例
}

The enum is correctly called InstanceContextMode rather than InstanceMode because it actually controls the instantiation mode of the context hosting the instance, rather than that of the instance itself. By default, however, the instance and its context are treated as a single unit, so the enum does control the life of the instance as well

PerCall模式

PerCall字面上就是每一次服务调用. 不管服务调用是否来自相同的客户端, host这边总是创建一个全新的实例上下文来处理每一个请求.

  1. The client calls the proxy and the proxy forwards the call to the service.
  2. WCF creates a new context with a new service instance and calls the method on
    it.
  3. When the method call returns, if the object implements IDisposable, WCF calls
    IDisposable.Dispose() on it. WCF then destroys the context.
  4. The client calls the proxy and the proxy forwards the call to the service.
  5. WCF creates an object and calls the method on it.

PerCall模式的好处

In the classic client/server programming model, using languages such as C++ or C#, every client gets its own dedicated server object. The fundamental problem with this approach is that it doesn’t scale well. Imagine an application that has to serve many clients. Typically, these clients create the objects they need when the client application starts and dispose of them when the client application shuts down. What impedes
scalability with the client/server model is that the client applications can hold onto objects for long periods of time, while actually using them for only a fraction of that time. Those objects may hold expensive or scarce resources, such as database connections, communication ports, or files. If you allocate an object for each client, you will tie up such crucial and/or limited resources for long periods, and you will eventually run out of resources.

A better activation model is to allocate an object for a client only while a call is in progress from the client to the service. That way, you have to create and maintain in memory only as many objects as there are concurrent calls, not as many objects as there are outstanding clients. My personal experience indicates that in a typical Enterprise system, especially one that involves users, at most 1% of all clients make concurrent calls (in a high-load Enterprise system, that figure rises to 3%). Thus, if your system can concurrently sustain 100 expensive service instances, it can still typically serve as many as 10,000 outstanding clients. This is precisely the benefit the per-call instance activation mode offers

1
2
3
4
5
6
7
8
9
10
11
12
13
14
15
16
17
18
19
20
21
22
23
24
25
26
27
28
29
30
31
32
33
34
35
36
37
38
///////////////////////// Service Code /////////////////////
[ServiceContract]
interface IMyContract
{
[OperationContract]
void MyMethod();
}

[ServiceBehavior(InstanceContextMode = InstanceContextMode.PerCall)]
class MyService : IMyContract,IDisposable
{
int m_Counter = 0;
MyService()
{
Trace.WriteLine("MyService.MyService()");
}
public void MyMethod()
{
m_Counter++;
Trace.WriteLine("Counter = " + m_Counter);
}
public void Dispose()
{
Trace.WriteLine("MyService.Dispose()");
}
}
///////////////////////// Client Code /////////////////////
MyContractClient proxy = new MyContractClient();
proxy.MyMethod();
proxy.MyMethod();
proxy.Close();
//Possible output
MyService.MyService()
Counter = 1
MyService.Dispose()
MyService.MyService()
Counter = 1
MyService.Dispose()

PerSesssion模式

All bindings support configuring the contract on the endpoint with Session
Mode.Allowed. When the SessionMode property is configured with this value, transport sessions are allowed, but not enforced. The exact resulting behavior is a product of the service configuration and the binding used.

If the service is configured for percall activation, it still behaves as per-call service,
Whenthe service is configured for per-session activation, it will behave as a per-session service only if the binding used maintains a transport-level session. For example, the BasicHttpBinding can never have a transport-level session, due to the connectionless nature of the HTTP protocol. The WSHttpBinding without Message security and without reliable messaging will also not maintain a transport-level session. In both of these cases, although the service is configured with InstanceContextMode.PerSession and the contract with SessionMode.Allowed, the service will behave as a percall service.

However, if you use the WSHttpBinding with Message security (its default configuration) or with reliable messaging, or if you use the NetTcpBinding or the NetNamedPipeBinding, the service will behave as a per-session service.

When designing a sessionful contract, I recommend explicitly using SessionMode.Required and not relying on the default of SessionMode.Allowed
SessionMode.NotAllowed disallows the use of a transport-level session, which precludes(排除) an application-level session. Regardless of the service configuration, when this value is used, the service will always behave as a per-call service.

WCF can maintain a logical session between a client and a particular service instance. When the client creates a new proxy to a service configured as a sessionful service, the client gets a new dedicated(专用的) service instance that is independent of all other instances of the same service.
That instance will typically remain in service until the client no longer needs it. This activation mode (sometimes also referred to as the privatesession mode) is very much like the classic client/server model: each private session uniquely binds a proxy and its set of client- and service-side channels to a particular service instance, or more specifically, to its context. It follows that a transport session is required for the private-session instantiation mode, as discussed later in this section.
Because the service instance remains in memory throughout the session, it can maintain state in memory, and the programming model is very much like that of the classic client/server model. Consequently, it suffers from the same scalability and transaction issues as the classic client/server model. A service configured for private sessions cannot typically support more than a few dozen (or perhaps up to one or two hundred) outstanding clients, due to the cost associated with each such dedicated service instance.
The client session is per service endpoint per proxy. If the client creates another proxy to the same or a different endpoint, that second proxy will be associated with a new instance and session.

1
2
3
4
5
6
7
8
9
10
11
12
13
14
15
16
17
18
19
20
21
22
23
24
25
26
27
28
29
30
31
32
33
34
///////////////////////// Service Code /////////////////////
[ServiceContract(SessionMode = SessionMode.Required)]
interface IMyContract
{
[OperationContract]
void MyMethod();
}
class MyService : IMyContract,IDisposable
{
int m_Counter = 0;
MyService()
{
Trace.WriteLine("MyService.MyService()");
}
public void MyMethod()
{
m_Counter++;
Trace.WriteLine("Counter = " + m_Counter);
}
public void Dispose()
{
Trace.WriteLine("MyService.Dispose()");
}
}
///////////////////////// Client Code /////////////////////
MyContractClient proxy = new MyContractClient();
proxy.MyMethod();
proxy.MyMethod();
proxy.Close();
//Output
MyService.MyService()
Counter = 1
Counter = 2
MyService.Dispose()

Every session has a unique ID that both the client and the service can obtain. The session ID is largely in the form of a GUID, and it can be used for logging and diagnostics. The service can access the session ID via the operation call context, which is a set of properties (including the session ID) that are used for callbacks, message headers, transaction management, security, host access, and access to the object represent‐
ing the execution context itself.

Single模式

The singleton service is the ultimate shareable service. When you configure a service as a singleton, all clients are independently connected to the same single well-known instance context and implicitly to the same instance inside, regardless of which endpoint of the service they connect to. The singleton is created exactly once, when the host is created, and lives forever: it is disposed of only when the host shuts down.

If the contract the client consumes has a session, during the call the singleton will have the same session ID as the client (binding permitting), but closing the client proxy will terminate only the transport session, not the singleton context and the instance inside

If the singleton service supports contracts without a session, those contracts will not be per-call: they too will be connected to the same instance. By its very nature, the singleton is shared, and each client should simply create its own proxy or proxies to it.

1
2
3
4
5
6
7
8
9
10
11
12
13
14
15
16
17
18
19
20
21
22
23
24
25
26
27
28
29
30
31
32
33
34
35
36
37
38
39
40
41
42
43
44
45
46
47
48
///////////////////////// Service Code /////////////////////
[ServiceContract(SessionMode = SessionMode.Required)]
interface IMyContract
{
[OperationContract]
void MyMethod();
}

[ServiceContract(SessionMode = SessionMode.NotAllowed)]
interface IMyOtherContract
{
[OperationContract]
void MyOtherMethod();
}
[ServiceBehavior(InstanceContextMode=InstanceContextMode.Single)]
class MySingleton : IMyContract,IMyOtherContract,IDisposable
{
int m_Counter = 0;
public MySingleton()
{
Trace.WriteLine("MySingleton.MySingleton()");
}
public void MyMethod()
{
m_Counter++;
Trace.WriteLine("Counter = " + m_Counter);
}
public void MyOtherMethod()
{
m_Counter++;
Trace.WriteLine("Counter = " + m_Counter);
}
public void Dispose()
{
Trace.WriteLine("Singleton.Dispose()");
}
}
///////////////////////// Client Code /////////////////////
MyContractClient proxy1 = new MyContractClient();
proxy1.MyMethod();
proxy1.Close();
MyOtherContractClient proxy2 = new MyOtherContractClient();
proxy2.MyOtherMethod();
proxy2.Close();
//Output
MySingleton.MySingleton()
Counter = 1
Counter = 2

PerCall, PerSession, Single之间怎么选择

  • Per-Call: 最通用; 适用于无状态
  • Per-Session: 经典的C/S模式, 需要保存一些会话数据
  • Singleton: 日志服务

Per-Call与Per-Session的区别 (https://stackoverflow.com/questions/15104960/persession-vs-percall)

In my opinion, to take a decision consider these two points

  1. For going with InstanceContextMode.PerSession - If your users have some session values stored on the WCF service on the server.
  2. For going with InstanceContextMode.PerCall - If your users have nothing stored in session on the WCF service on the server i.e. WCF service requires No per user settings required to store in memory. Requires scalability.
    Some points regarding When-And-Why,

InstanceContextMode.PerCall

  • If your service is stateless and scalable, i.e. benefits are similar to HTTP as it is also stateless.
  • If service has light-weight initialization code (or none at all).
  • If your service is single threaded.
  • Example scenario: For any 1000 client requests in a given time period in a PerCall situation, there will only be 100 objects instantiated for 100 active calls. Secondly if server were to crash then in PerCall situation the only errors that would occur would be to the 100 actual requests that were in progress (assuming fast failover). The other 900 clients could be routed to another server on their next call.

InstanceContextMode.PerSession

  • If your service has to maintain some state between calls from the same client.
  • If your service has light-weight initialization code (or none at all). Even though you are only getting a new instance for each client proxy, you still want to be careful about having expensive initialization code in a constructor.
  • Example scenario: For any 1000 client requests in a given time period in a PerSessionsituation you may have 1000 objects instantiated on the server but only 100 are actually activein call at any moment. And thus instantiated PerSession objects could be a waste of resources and may impact the ability to serve requests under load. Secondly if server were to crash then in PerSession all 1000 clients who have a session on that server would lose their session and be unable to complete their work.

Reference links:

  1. MSDN - WCF Instancing, Concurrency, and Throttling
  2. SO - Per-Call vs Per-Session
  3. MSDN - Using Sessions in WCF context

Choosing a Singleton

The singleton service is the sworn enemy of scalability. The reason has to do with singleton state synchronization, rather than the cost of that single instance. Having a singleton implies that the singleton has some valuable state that you wish to share across multiple clients. The problem is that if the singleton’s state is mutable and multiple clients connect to the singleton, they may all do so concurrently, and the incoming client calls will be on multiple worker threads. The singleton must therefore synchronize access to its state to avoid state corruption. This, in turn, means that only one client at a time can access the singleton. This constraint may degrade throughput, responsiveness, and availability to the point that the singleton is unusable in a decentsized system. For example, if an operation on a singleton takes one-tenth of a second, the singleton can service only 10 clients per second. If there are many more clients(say 20 or 100), the system’s performance will be inadequate.

In general, you should use a singleton only if it maps well to a natural singleton in the application domain. A natural singleton is a resource that is, by its very nature, single and unique. Examples of natural singletons are a global logbook to which all services should log their activities, a single communication port, or a single mechanical motor. Avoid using a singleton if there is even the slightest chance that the business logic will allow more than one such service in the future (for example, adding another motor or a second communication port). The reason is clear: if your clients all depend on implicitly being connected to the well-known instance and more than one service instance is available, the clients will suddenly need to have a way to bind to the correct instance. This can have severe implications for the application’s programming model. Because of these limitations, I recommend that you avoid singletons in the general case and find ways to share the state of the singleton instead of the singleton instance itself. That said, there are cases when using a singleton is acceptable, as mentioned earlier.

WCF笔记(X2) 基本使用

Posted on 2018-05-06 | In 编程

上一篇介绍了WCF的基本概念, 这一篇介绍WCF的基本使用方法.

Every service is associated with an address(地址) that defines where the service is, a binding(绑定) that defines how to communicate with the service, and a contract(契约) that defines what the service does.

简称ABC三要素, 这三个要素合起来叫做Endpoint.

Address

WCF支持多种不同的传输协议, sample address如下:

  • http://localhost:8001/MyService
  • net.tcp://localhost:8002/MyService
  • net.pipe://localhost/MyPipe
  • net.msmq://localhost/MyQueue
  • ws://localhost/MyService
  • soap.udp://localhost:8081/MyService

Binding

对传输协议, 消息编码, 通信模式, 可靠性, 安全性, 事务等等的配置则是放在binding中, WCF提供了诸如NetTcpBinding, NetNamedPipeBinding, WSHttpBinding等常用的binding

Contract

WCF中定义了4类Contract.最常用的2类是Service contracts和Data contracts. 其中Data contracts表示在调用服务操作时传递的数据, 例如参数和返回值.在Service contracts内部, 还需要在方法上添加OperationContract, 表示该Service公开的操作.

Service的实现类可以支持多个Service接口, 例如

1
2
3
4
5
6
7
8
9
10
11
12
13
14
15
16
17
18
19
20
21
[ServiceContract]
interface IMyContract
{
[OperationContract]
string MyMethod();
}

[ServiceContract]
interface IMyOtherContract
{
[OperationContract]
void MyOtherMethod();
}

class MyService : IMyContract,IMyOtherContract
{
public string MyMethod()
{...}
public void MyOtherMethod()
{...}
}

Logically, the endpoint is the service’s interface and is analogous to a CLR or COM interface

所以这里MyService至少暴露了2个Endpoint.

Every service must expose at least one business endpoint, and each endpoint has
exactly one contract. All endpoints on a service have unique addresses, and a single
service can expose multiple endpoints. These endpoints can use the same or different
bindings and can expose the same or different contracts
. There is absolutely no relationship between the various endpoints a service provides.

Endpoint可以设置在配置文件中

1
2
3
4
5
6
7
8
9
10
11
12
13
14
15
16
17
<service name = "MyService">
<endpoint
address = "http://localhost:8000/MyService"
binding = "wsHttpBinding"
contract = "IMyContract"
/>
<endpoint
address = "net.tcp://localhost:8001/MyService"
binding = "netTcpBinding"
contract = "IMyContract"
/>
<endpoint
address = "net.tcp://localhost:8002/MyService"
binding = "netTcpBinding"
contract = "IMyOtherContract"
/>
</service>

也可以用代码的方式设置

1
2
3
4
5
6
7
8
9
10
11
// Example 1-9. Service-side programmatic endpoint confguration
ServiceHost host = new ServiceHost(typeof(MyService));
Binding wsBinding = new WSHttpBinding();
Binding tcpBinding = new NetTcpBinding();
host.AddServiceEndpoint(typeof(IMyContract),wsBinding,
"http://localhost:8000/MyService");
host.AddServiceEndpoint(typeof(IMyContract),tcpBinding,
"net.tcp://localhost:8001/MyService");
host.AddServiceEndpoint(typeof(IMyOtherContract),tcpBinding,
"net.tcp://localhost:8002/MyService");
host.Open();

Service这边设置好了Endpoint, 下一步就是公开元数据了. 一种比较简单的方式是HTTP-GET, 可以在Endpoint配置文件中指定. 然后, 启动Service进程, 打开浏览器, 输入网址, 得到

图上写明了如何使用工具生成Service在本地环境中的Proxy, 和使用Proxy的方式. Proxy对应的是Service Class的其中一个Endpoint

除了SvcUtil.exe工具, 还可以用Visual Studio生成Proxy, 详见Programming WCF Service 4th P60

Client这边使用Proxy, 也需要配置文件, 或者直接在程序中配置

1
2
3
4
5
6
7
8
WSHttpBinding wsBinding = new WSHttpBinding();
wsBinding.SendTimeout = TimeSpan.FromMinutes(5);
wsBinding.TransactionFlow = true;

EndpointAddress endpointAddress = new EndpointAddress("http://localhost:8000/MyService");
MyContractClient proxy = new MyContractClient(wsBinding,endpointAddress);
proxy.MyMethod();
proxy.Close();

以上就是WCF的基本使用方式, 官方有一个Tutorial(https://docs.microsoft.com/en-us/dotnet/framework/wcf/getting-started-tutorial)指导一步一步怎么做.

另外也可以不生成Proxy, 直接使用Channel进行Service的调用, 这样更加方便.

1
2
3
4
5
6
7
Binding binding = new NetTcpBinding();
EndpointAddress address = new EndpointAddress("net.tcp://localhost:8000");
IMyContract proxy = ChannelFactory<IMyContract>.CreateChannel(binding,address);
using(proxy as IDisposable)
{
proxy.MyMethod();
}

Using proxies is simple, and it’s the right approach in many situations. It’s not the only choice, however. Beneath the veneer a proxy provides, the client’s communication with a service is handled by one or more channels. If desired, a client can work directly with these channels (as can a service). Using WCF’s ChannelFactory class, the developer can create whatever channels are required, then invoke their services directly. Doing this gives the developer more control, but also introduces somewhat more complexity.

WCF笔记(X1) 基本概念

Posted on 2018-05-04 | In 编程

WCF(Windows Communication Foundation)和WPF一样复杂, 这里仅记录一下WCF的基本知识.

面向服务架构

WCF是微软目前的分布式通信框架(.Net3.0和WPF一起推出, 现是.Net4.5版本). 在接触WCF之前, 只知道Communication的双方, 一个叫Client, 一个叫Server. 在WCF中, Server换成了Service. 语义上来讲, 都和服务相关, 但Server和Service并不等同.

为什么叫Service, 这和面向服务架构(SOA, Service-Oriented Architecture)有关. WCF的Wiki是这样描述的:

WCF is a tool often used to implement and deploy a service-oriented architecture (SOA). It is designed using service-oriented architecture principles to support distributed computing whereservices have remote consumers. Clients can consume multiple services; services can be consumed by multiple clients. Services are loosely coupled to each other. Services typically have a WSDL interface (Web Services Description Language) that any WCF client can use to consume the service, regardless of which platform the service is hosted on. WCF implements many advanced Web services (WS) standards such as WS-Addressing, WS-ReliableMessaging and WS-Security.

顺便说一下, 目前兴起一种叫做微服务的架构方式, 是从SOA发展而来. SOA的提出是在企业应用, 而微服务架构是从互联网应用兴起的. 企业应用, 不要被企业两个字吓住, 如果不是交易系统的话,并发量都不是很大的. 而互联网应用的用户规模和并发量相比企业应用就大很多.

SOA中的服务(Services)就是公开的一组功能的集合. 从软件设计的角度考虑, 软件设计思想经历了从函数发展到对象,从对象发展到组件,再从组件发展到服务的几次变迁.

消费服务的一方叫做Client. Client与Service通过一种SOAP(简单对象访问模型)的消息进行通信, SOAP是一种XML格式. 和具体的传输协议无关.

这样Client和Service就分离开来了. WCF的Client可以与非WCF的Service交互. WCF的Service也可以与非WCF的Client交互.如此, 就做到分布式和松耦合.

Client与Service之间, 并不是原始的类似Socket那样收发消息,而是通过RPC的方式进行交互.既然是RPC的方式, 那么Client需要引用Service的相关功能. 怎么做到呢?

Service通过公开元数据(metadata)的方式公开服务.一个非WCF的Client可以将元数据导入到本地环境中, 生成本地的类型数据. 类似的, WCF的Client也可以导入非WCF的Service的元数据, 然后以本地CLR类与接口的方式进行调用.

具体来讲, 在WCF中, Client使用proxy将服务调用转发给Service. proxy是Service在本地环境中的代理, 接口和Service一样. proxy是通过Service公开的元数据生成的(借助相关工具).

WCF不仅允许Client和Service跨机器交互

也允许Client和Service在同一机器上交互

WCF架构

不仅限于简单的通信, WCF还提供了对可靠性、事务性、并发管理、安全性等技术的支持.它们依赖基于拦截(interception)机制的WCF体系架构.

这部分引用Programming WCF Service 4th P76

The interception starts when the proxy serializes the call stack frame to a
message and sends the message down a chain of channels. The channel is merely an
interceptor whose purpose is to perform a specific task. Each client-side channel does
pre-call processing of the message. The exact structure and composition of the chain
depend mostly on the binding. For example, one of the channels may be responsible
for encoding the message (binary, text, or MTOM), another for passing the security
call context, another for propagating the client transaction, another for managing the
reliable session, another for encrypting the message body (if so configured), and so
on. The last channel on the client side is the transport channel, which sends the mes‐
sage over the configured transport to the host.

具体有哪些Channel, 依赖于需求和配置.

On the host side, the message goes through another chain of channels that perform
host-side pre-call processing of the message. The first channel on the host side is the
transport channel, which receives the message from the transport. Subsequent chan‐
nels perform various tasks, such as decryption of the message body, decoding of the
message, joining the propagated transaction, setting the security principal, managing
the session, and activating the service instance. The last channel on the host side
passes the message to the dispatcher. The dispatcher converts the message to a stack
frame and calls the service instance
.

The service has no way of knowing that it was not called by a local client. In fact, it
was called by a local client—the dispatcher.

The service instance executes the call and returns control to the dispatcher, which
then converts the returned values and error information (if any) into a return mes‐
sage. The process is then reversed: the dispatcher passes the message through the
host-side channels to perform post-call processing, such as managing the transaction,
deactivating the instance, encoding the reply, encrypting it, and so on. The returned
message then goes to the transport channel, which sends it to the client-side channels
for client-side post-call processing. This process in turn consists of tasks such as
decryption, decoding, committing or aborting the transaction, and so on. The last
channel passes the message to the proxy, which converts the returned message to a
stack frame and returns control to the client
.

参考:

  1. Programming WCF Service 4th
  2. understanding-wcf-bindings-and-channel-stack(http://www.c-sharpcorner.com/UploadFile/81a718/understanding-wcf-bindings-and-channel-stack/)
  3. Introducing Windows Communication Foundation in .NET Framework 4 (https://msdn.microsoft.com/en-us/library/ee958158.aspx)

Paint.Net笔记(X4) Effect

Posted on 2018-04-28 | In 编程

上一篇讲菜单项中的Action 与 HistoryFunction. 两者之间的区别, 暂时还不甚了然. 先放一放, 这一篇整理一下Paint.Net中的Effect

Effect是以Plugin的方式提供的, 可以使用单独的dll, 放在特定的目录下. 程序启动时, 会自动加载.但Paint.Net并不是插件结构. 和SharpDevelop不同, SharpDevelop中界面的UI也是以Plugin的方式提供的.

Effect滤镜的主要逻辑在EffectMenuBase.cs中

1
2
3
4
5
6
7
8
9
10
11
12
13
14
15
16
17
18
19
20
21
22
23
24
25
26
27
28
29
30
31
32
private void EffectMenuItem_Click(object sender, EventArgs e)
{
if (AppWorkspace.ActiveDocumentWorkspace == null)
{
return;
}

PdnMenuItem pmi = (PdnMenuItem)sender;
Type effectType = (Type)pmi.Tag;

RunEffect(effectType);
}

public void RunEffect(Type effectType)
{
bool oldDirtyValue = AppWorkspace.ActiveDocumentWorkspace.Document.Dirty;
bool resetDirtyValue = false;

AppWorkspace.Update(); // make sure the window is done 'closing'
AppWorkspace.Widgets.StatusBarProgress.ResetProgressStatusBar();
DocumentWorkspace activeDW = AppWorkspace.ActiveDocumentWorkspace;

PdnRegion selectedRegion; //选择区域,滤镜是应用于整幅图像,还是一个选择区域。下图就是只应用于一个选择区域

if (activeDW.Selection.IsEmpty)
{
selectedRegion = new PdnRegion(activeDW.Document.Bounds);
}
else
{
selectedRegion = activeDW.Selection.CreateRegion();
}

这里Effect通过EffectFlags.Configurable分为2类(有没有参数配置,可以调整参数)

第一类(没有参数配置):

1
2
3
4
5
6
7
8
9
10
11
12
13
14
15
16
17
18
19
20
21
22
23
24
25
26
27
28
if (!(effect.CheckForEffectFlags(EffectFlags.Configurable)))
{
Surface copy = activeDW.BorrowScratchSurface(this.GetType() + ".RunEffect() using scratch surface for non-configurable rendering");

try
{
using (new WaitCursorChanger(AppWorkspace))
{
copy.CopySurface(layer.Surface);
}

EffectEnvironmentParameters eep = new EffectEnvironmentParameters(
AppWorkspace.AppEnvironment.PrimaryColor,
AppWorkspace.AppEnvironment.SecondaryColor,
AppWorkspace.AppEnvironment.PenInfo.Width,
selectedRegion,
copy);

effect.EnvironmentParameters = eep;

DoEffect(effect, null, selectedRegion, selectedRegion, copy, out exception);
}

finally
{
activeDW.ReturnScratchSurface(copy);
}
}

第二类(有参数配置):有参数配置,就需要一个调整参数的对话框,例如上图中的高斯模糊. 先是创建一个EffectConfigDialog

1
2
3
4
5
6
7
8
9
10
11
12
13
14
15
16
17
18
19
20
21
22
23
24
25
26
27
28
29
30
31
32
33
34

using (EffectConfigDialog configDialog = effect.CreateConfigDialog())
{
configDialog.Opacity = 0.9;
configDialog.Effect = effect;
configDialog.EffectSourceSurface = originalSurface;
configDialog.Selection = selectedRegion;

BackgroundEffectRenderer ber = null;

EventHandler eh =
delegate(object sender, EventArgs e)
{
EffectConfigDialog ecf = (EffectConfigDialog)sender;

if (ber != null)
{
AppWorkspace.Widgets.StatusBarProgress.ResetProgressStatusBarAsync();

try
{
ber.Start();
}

catch (Exception ex)
{
exception = ex;
ecf.Close();
}
}
};

configDialog.EffectTokenChanged += eh;
}

如何创建EffectConfigDialog应该是Paint.Net中最有技巧性的东西了,真是大开眼界

翻看了不少代码,大致明白了是怎么回事。因为Effect在Paint.Net中是以plugin的形式存在,假如Effect有参数可以调整,那么在什么地方去调整参数呢?想像一下,我们需要有一个参数的Dialog。在没有源码的情况下,如何创建这个Dialog。以高斯模糊为例,只要该Effect提供参数,由Paint.Net帮你创建EffectConfigDialog

Paint.Net在框架中提供了一种参数与Control的一一对应,然后根据参数列表,创建一个一个的Control,然后用一个Panel将这些Control添加进来。再提供一个参数变更引发的事件。
这些参数用一个叫做EffectConfigToken的类封装起来(具体是PropertyCollection)

以高斯模糊为例

1
2
3
4
5
6
7
8
9
10
11
public sealed class GaussianBlurEffect
: InternalPropertyBasedEffect

public abstract class InternalPropertyBasedEffect
: PropertyBasedEffect

public abstract class PropertyBasedEffect
: Effect<PropertyBasedEffectConfigToken>

public sealed class PropertyBasedEffectConfigToken
: EffectConfigToken

其中

1
2
internal sealed class PropertyBasedEffectConfigDialog
: EffectConfigDialog<PropertyBasedEffect, PropertyBasedEffectConfigToken>

AmountEffectConfigDialog.cs

1
2
3
4
5
6
7
8
9
10
11
12
13
14
15
16
17
18
19
20
21
22
private void amountUpDown_ValueChanged(object sender, System.EventArgs e)
{
if (amountTrackBar.Value != (int)amountUpDown.Value)
{
amountTrackBar.Value = (int)amountUpDown.Value;
FinishTokenUpdate();
}
}

public void FinishTokenUpdate()
{
InitTokenFromDialog();
OnEffectTokenChanged();
}

protected virtual void OnEffectTokenChanged()
{
if (EffectTokenChanged != null)
{
EffectTokenChanged(this, EventArgs.Empty);
}
}

扫描有多少个Effect,这部分是以插件的形式出现的,加载后出现在菜单项中

1
2
3
4
5
6
7
8
9
10
11
12
13
14
15
16
17
18
19
20
21
22
23
24
25
26
27
28
29
30
31
32
33
34
35
36
37
38
39
40
41
42
43
44
45
46
47
private static EffectsCollection GatherEffects()
{
List<Assembly> assemblies = new List<Assembly>();

// PaintDotNet.Effects.dll
assemblies.Add(Assembly.GetAssembly(typeof(Effect)));

// TARGETDIR\Effects\*.dll
string homeDir = PdnInfo.GetApplicationDir();
string effectsDir = Path.Combine(homeDir, InvariantStrings.EffectsSubDir);
bool dirExists;

try
{
dirExists = Directory.Exists(effectsDir);
}

catch
{
dirExists = false;
}

if (dirExists)
{
string fileSpec = "*" + InvariantStrings.DllExtension;
string[] filePaths = Directory.GetFiles(effectsDir, fileSpec);

foreach (string filePath in filePaths)
{
Assembly pluginAssembly = null;

try
{
pluginAssembly = Assembly.LoadFrom(filePath);
assemblies.Add(pluginAssembly);
}

catch (Exception ex)
{
Tracing.Ping("Exception while loading " + filePath + ": " + ex.ToString());
}
}
}

EffectsCollection ec = new EffectsCollection(assemblies);
return ec;
}

12…7

zmapleaf

67 posts
2 categories
11 tags
© 2020 zmapleaf
Powered by Hexo
|
Theme — NexT.Mist v5.1.4