远


  • Home

  • About

  • Tags

  • Categories

  • Archives

Paint.Net笔记(X3) Action 与 HistoryFunction

Posted on 2018-04-28 | In 编程

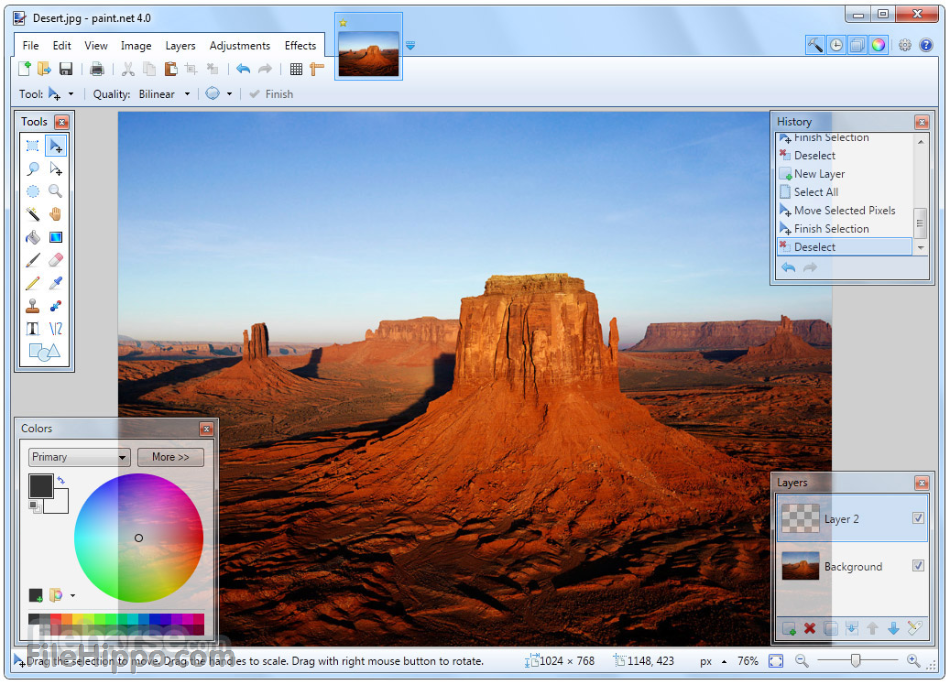
上一篇介绍了ToolForm的操作机制, 这一篇看一下菜单项的操作.

看ImageMenus.cs会发现如下代码

1
2
3
4
5
6
7
8
9
10
11
12
13
14
15
16
17
18
private void MenuImageCrop_Click(object sender, System.EventArgs e)
{
if (AppWorkspace.ActiveDocumentWorkspace != null)
{
if (!AppWorkspace.ActiveDocumentWorkspace.Selection.IsEmpty)
{
AppWorkspace.ActiveDocumentWorkspace.ExecuteFunction(new CropToSelectionFunction());
}
}
}

private void MenuImageResize_Click(object sender, System.EventArgs e)
{
if (AppWorkspace.ActiveDocumentWorkspace != null)
{
AppWorkspace.ActiveDocumentWorkspace.PerformAction(new ResizeAction());
}
}

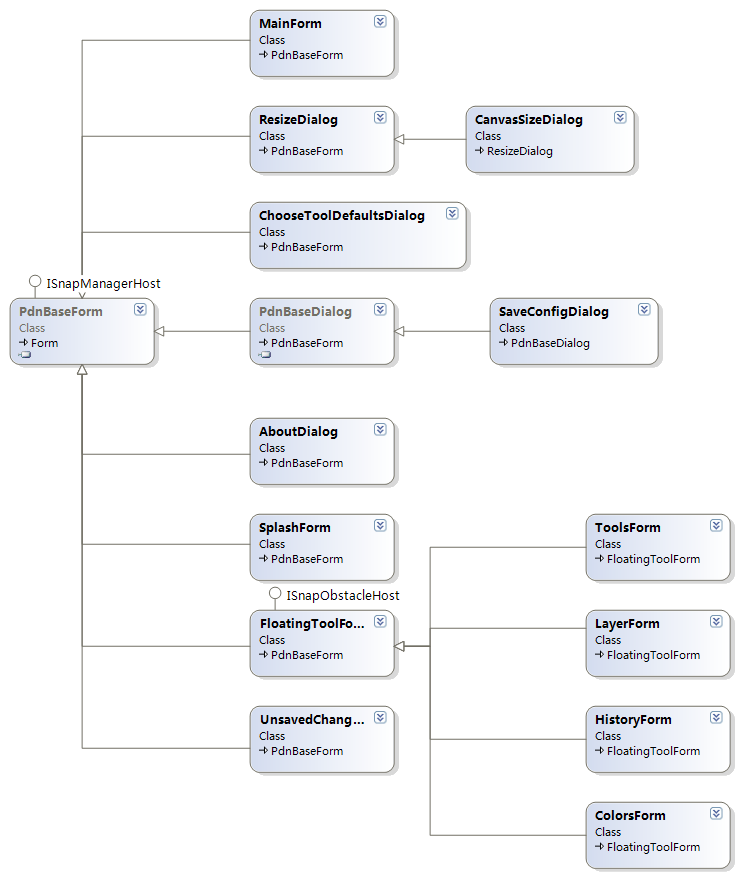
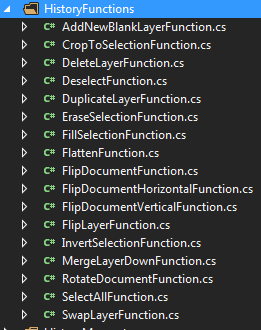
有些菜单项是ExecuteFunction, 有些菜单项是PerformAction. 各种Action和Function如下图所示
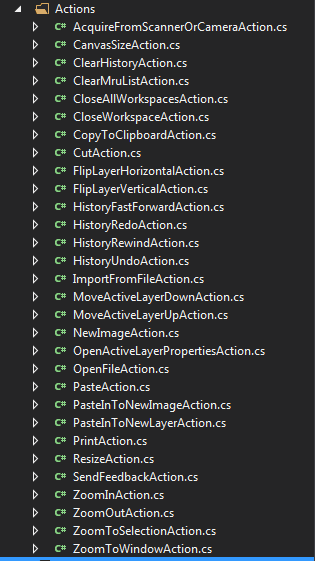
)
)
ResizeAction继承DocumentWorkspaceAction, CropToSelectionFunction继承HistoryFunctiont

另外AppWorkspace也能执行Action

1
2
3
4
private void MenuFileOpen_Click(object sender, System.EventArgs e)
{
AppWorkspace.PerformAction(new OpenFileAction());
}

OpenFileAction继承AppWorkspaceAction, 另外有些Action不继承其他类.

它们之间的区别是什么?

DocumentWorkspaceAction与AppWorkspaceAction的区别, 一个是作用的对象不同, 另一个是DocumentWorkspaceAction还能够撤销(命令模式+备忘录模式). 如下所示

1
2
3
4
5
6
7
8
9
10
11
12
13
14
15
16
17
18
19
20
21
22
23
24
25
26
27
28
29
30
31
32
33
34
35
36
37
38
39
40
41
42
43
44
45
46
47
48
49
50
51
   internal abstract class AppWorkspaceAction
{
public abstract void PerformAction(AppWorkspace appWorkspace);

public AppWorkspaceAction()
{
SystemLayer.Tracing.LogFeature("AWAction(" + GetType().Name + ")");
}
}


/// <summary>
/// Provides a way to do a tool-less action that operates on the DocumentWorkspace.
/// DocumentActions must NOT touch directly the History -- they should return history
/// actions that can undo what they have already done. These history actions will
/// then be placed in to the history by whomever invoked the DocumentAction.
/// If the action does not affect the Document, it should return null from its
/// PerformAction method.
/// DocumentActions should ONLY mutate the DocumentWorkspace and any contained
/// objects.
/// </summary>
internal abstract class DocumentWorkspaceAction
{
private ActionFlags actionFlags;
public ActionFlags ActionFlags
{
get
{
return this.actionFlags;
}
}

/// <summary>
/// Implement this to provide an action. You must return a HistoryMemento so that you
/// can be undone. However, you should return null if you didn't do anything that
/// affected the document.
/// </summary>
/// <returns>A HistoryMemento object that will be placed onto the HistoryStack.</returns>
public abstract HistoryMemento PerformAction(DocumentWorkspace documentWorkspace);

/// <summary>
/// Initializes an instance of a class dervied from DocumentAction.
/// </summary>
/// <param name="documentWorkspace">The DocumentWorkspace to interact with.</param>
/// <param name="actionFlags">Flags that describe action behavior or requirements.</param>
public DocumentWorkspaceAction(ActionFlags actionFlags)
{
this.actionFlags = actionFlags;
SystemLayer.Tracing.LogFeature("DWAction(" + GetType().Name + ")");
}
}

那HistoryFunction呢? HistoryFunction与DocumentWorkspaceAction有什么不同

1
2
public HistoryMemento Execute(IHistoryWorkspace historyWorkspace);
public abstract HistoryMemento OnExecute(IHistoryWorkspace historyWorkspace);

从前面2张图片对比, 从名称上看, HistoryFunction貌似更多在和layer和selection打交道.

Paint.Net笔记(X1) 基本结构

Posted on 2018-04-28 | In 编程

源码版本:paint.net 3.36 (https://github.com/rivy/OpenPDN), 后续的版本貌似不提供源码了
重要的几个工程目录:
Base: 基础数据结构, 和项目无关,例如Pair,Tuple,Set,EventArgs等
Core:和项目相关的数据结构,例如RendreArgs,Surface,Histogram,HsvColor
Data:项目文件类型,例如PdnFileType,JpegFileType等
paintdotnet:主入口,主逻辑
Effect:滤镜
SystemLayer:和系统相关, 例如ThreadBackground, Memory等,不是图层的Layer
Resource:cursor,icon,image等

启动入口:Startup类

1
2
3
4
5
6
7
8
9
10
11
12
13
14
15
16
17
18
19
20
21
22
23
24
25
26
27
28
29
30
31
32
33
34
35
36
37
38
39
40
StartPart2
{
Application.Run(this.mainForm);
}

internal sealed class MainForm: PdnBaseForm
{
private AppWorkspace appWorkspace;

private void InitializeComponent()
{
this.components = new System.ComponentModel.Container();
this.defaultButton = new System.Windows.Forms.Button();
// 构造
this.appWorkspace = new PaintDotNet.AppWorkspace();
this.floaterOpacityTimer = new System.Windows.Forms.Timer(this.components);
this.deferredInitializationTimer = new System.Windows.Forms.Timer(this.components);
this.SuspendLayout();
//
// appWorkspace
//
this.appWorkspace.Dock = System.Windows.Forms.DockStyle.Fill;
this.appWorkspace.Location = new System.Drawing.Point(0, 0);
this.appWorkspace.Name = "appWorkspace";
this.appWorkspace.Size = new System.Drawing.Size(752, 648);
this.appWorkspace.TabIndex = 2;
this.appWorkspace.ActiveDocumentWorkspaceChanging += new EventHandler(AppWorkspace_ActiveDocumentWorkspaceChanging);
this.appWorkspace.ActiveDocumentWorkspaceChanged += new EventHandler(AppWorkspace_ActiveDocumentWorkspaceChanged);
//...

this.AutoScaleDimensions = new SizeF(96F, 96F);
this.AutoScaleMode = System.Windows.Forms.AutoScaleMode.Dpi;
this.ClientSize = new System.Drawing.Size(950, 738);

// 添加appWorkspace
this.Controls.Add(this.appWorkspace);
this.Controls.Add(this.defaultButton);
//...
}
}

AppWorkspace非常关键, 代码如下

1
2
3
4
5
6
7
8
9
10
11
12
13
14
15
16
17
18
19
20
21
22
23
24
25
26
27
28
29
30
31
32
33
34
35
36
37
38
39
40
41
42
43
44
45
46
47
48
49
50
51
52
53
54
55
56
57
58
59
60
61
62
63
64
65
66
67
68
69
70
71
72
73
74
75
76
77
78
79
80
81
82
83
84
85
86
87
88
89
90
91
92
93
94
95
96
97
98
99
100
101
102
103
104
105
106
107
108
109
110
111
112
113
114
115
116
117
118
119
120
121
122
123
124
125
126
127
128
129
130
131
132
133
134
135
136
137
138
139
140
141
142
143
144
145
146
147
148
149
150
151
152
153
154
155
156
157
158
159
160
161
162
163
164
165
166
167
168
169
170
171
internal class AppWorkspace: UserControl, ISnapObstacleHost
{
private AppEnvironment appEnvironment;
private DocumentWorkspace activeDocumentWorkspace;

// if a new workspace is added, and this workspace is not dirty, then it will be removed.
// This keeps track of the last workspace added via CreateBlankDocumentInNewWorkspace (if
// true was passed for its 2nd parameter)
private DocumentWorkspace initialWorkspace;

private List<DocumentWorkspace> documentWorkspaces = new List<DocumentWorkspace>();
private WorkspaceWidgets widgets;

//状态栏, 工具条, 悬浮窗
private Panel workspacePanel;
private PdnToolBar toolBar;
private PdnStatusBar statusBar;

private ToolsForm mainToolBarForm;
private LayerForm layerForm;
private HistoryForm historyForm;
private ColorsForm colorsForm;

//...

public AppWorkspace()
{
SuspendLayout();

// initialize!
InitializeComponent();
InitializeFloatingForms();

this.mainToolBarForm.ToolsControl.SetTools(DocumentWorkspace.ToolInfos);
this.mainToolBarForm.ToolsControl.ToolClicked += new ToolClickedEventHandler(this.MainToolBar_ToolClicked);

this.toolBar.ToolChooserStrip.SetTools(DocumentWorkspace.ToolInfos);
this.toolBar.ToolChooserStrip.ToolClicked += new ToolClickedEventHandler(this.MainToolBar_ToolClicked);

this.toolBar.AppWorkspace = this;

// init the Widgets container
this.widgets = new WorkspaceWidgets(this);
this.widgets.ViewConfigStrip = this.toolBar.ViewConfigStrip;
this.widgets.CommonActionsStrip = this.toolBar.CommonActionsStrip;
this.widgets.ToolConfigStrip = this.toolBar.ToolConfigStrip;
this.widgets.ToolsForm = this.mainToolBarForm;
this.widgets.LayerForm = this.layerForm;
this.widgets.HistoryForm = this.historyForm;
this.widgets.ColorsForm = this.colorsForm;
this.widgets.StatusBarProgress = this.statusBar;
this.widgets.DocumentStrip = this.toolBar.DocumentStrip;

// Load our settings and initialize the AppEnvironment
LoadSettings();

// hook into Environment *Changed events
AppEnvironment.PrimaryColorChanged += PrimaryColorChangedHandler;
AppEnvironment.SecondaryColorChanged += SecondaryColorChangedHandler;
AppEnvironment.ShapeDrawTypeChanged += ShapeDrawTypeChangedHandler;
AppEnvironment.GradientInfoChanged += GradientInfoChangedHandler;
AppEnvironment.ToleranceChanged += OnEnvironmentToleranceChanged;
AppEnvironment.AlphaBlendingChanged += AlphaBlendingChangedHandler;
AppEnvironment.FontInfo = this.toolBar.ToolConfigStrip.FontInfo;
AppEnvironment.TextAlignment = this.toolBar.ToolConfigStrip.FontAlignment;
AppEnvironment.AntiAliasingChanged += Environment_AntiAliasingChanged;
AppEnvironment.FontInfoChanged += Environment_FontInfoChanged;
AppEnvironment.FontSmoothingChanged += Environment_FontSmoothingChanged;
AppEnvironment.TextAlignmentChanged += Environment_TextAlignmentChanged;
AppEnvironment.PenInfoChanged += Environment_PenInfoChanged;
AppEnvironment.BrushInfoChanged += Environment_BrushInfoChanged;
AppEnvironment.ColorPickerClickBehaviorChanged += Environment_ColorPickerClickBehaviorChanged;
AppEnvironment.ResamplingAlgorithmChanged += Environment_ResamplingAlgorithmChanged;
AppEnvironment.SelectionCombineModeChanged += Environment_SelectionCombineModeChanged;
AppEnvironment.FloodModeChanged += Environment_FloodModeChanged;
AppEnvironment.SelectionDrawModeInfoChanged += Environment_SelectionDrawModeInfoChanged;

this.toolBar.DocumentStrip.RelinquishFocus += RelinquishFocusHandler;

this.toolBar.ToolConfigStrip.ToleranceChanged += OnToolBarToleranceChanged;
this.toolBar.ToolConfigStrip.FontAlignmentChanged += ToolConfigStrip_TextAlignmentChanged;
this.toolBar.ToolConfigStrip.FontInfoChanged += ToolConfigStrip_FontTextChanged;
this.toolBar.ToolConfigStrip.FontSmoothingChanged += ToolConfigStrip_FontSmoothingChanged;
this.toolBar.ToolConfigStrip.RelinquishFocus += RelinquishFocusHandler2;

this.toolBar.CommonActionsStrip.RelinquishFocus += OnToolStripRelinquishFocus;
this.toolBar.CommonActionsStrip.MouseWheel += OnToolStripMouseWheel;
this.toolBar.CommonActionsStrip.ButtonClick += CommonActionsStrip_ButtonClick;

this.toolBar.ViewConfigStrip.DrawGridChanged += ViewConfigStrip_DrawGridChanged;
this.toolBar.ViewConfigStrip.RulersEnabledChanged += ViewConfigStrip_RulersEnabledChanged;
this.toolBar.ViewConfigStrip.ZoomBasisChanged += ViewConfigStrip_ZoomBasisChanged;
this.toolBar.ViewConfigStrip.ZoomScaleChanged += ViewConfigStrip_ZoomScaleChanged;
this.toolBar.ViewConfigStrip.ZoomIn += ViewConfigStrip_ZoomIn;
this.toolBar.ViewConfigStrip.ZoomOut += ViewConfigStrip_ZoomOut;
this.toolBar.ViewConfigStrip.UnitsChanged += ViewConfigStrip_UnitsChanged;
this.toolBar.ViewConfigStrip.RelinquishFocus += OnToolStripRelinquishFocus;
this.toolBar.ViewConfigStrip.MouseWheel += OnToolStripMouseWheel;

this.toolBar.ToolConfigStrip.BrushInfoChanged += DrawConfigStrip_BrushChanged;
this.toolBar.ToolConfigStrip.ShapeDrawTypeChanged += DrawConfigStrip_ShapeDrawTypeChanged;
this.toolBar.ToolConfigStrip.PenInfoChanged += DrawConfigStrip_PenChanged;
this.toolBar.ToolConfigStrip.GradientInfoChanged += ToolConfigStrip_GradientInfoChanged;
this.toolBar.ToolConfigStrip.AlphaBlendingChanged += OnDrawConfigStripAlphaBlendingChanged;
this.toolBar.ToolConfigStrip.AntiAliasingChanged += DrawConfigStrip_AntiAliasingChanged;
this.toolBar.ToolConfigStrip.RelinquishFocus += OnToolStripRelinquishFocus;
this.toolBar.ToolConfigStrip.ColorPickerClickBehaviorChanged += ToolConfigStrip_ColorPickerClickBehaviorChanged;
this.toolBar.ToolConfigStrip.ResamplingAlgorithmChanged += ToolConfigStrip_ResamplingAlgorithmChanged;
this.toolBar.ToolConfigStrip.SelectionCombineModeChanged += ToolConfigStrip_SelectionCombineModeChanged;
this.toolBar.ToolConfigStrip.FloodModeChanged += ToolConfigStrip_FloodModeChanged;
this.toolBar.ToolConfigStrip.SelectionDrawModeInfoChanged += ToolConfigStrip_SelectionDrawModeInfoChanged;
this.toolBar.ToolConfigStrip.SelectionDrawModeUnitsChanging += ToolConfigStrip_SelectionDrawModeUnitsChanging;

this.toolBar.ToolConfigStrip.MouseWheel += OnToolStripMouseWheel;

this.toolBar.DocumentStrip.RelinquishFocus += OnToolStripRelinquishFocus;
this.toolBar.DocumentStrip.DocumentClicked += DocumentStrip_DocumentTabClicked;
this.toolBar.DocumentStrip.DocumentListChanged += DocumentStrip_DocumentListChanged;

// Synchronize
AppEnvironment.PerformAllChanged();

this.globalToolTypeChoice = this.defaultToolTypeChoice;
this.toolBar.ToolConfigStrip.ToolBarConfigItems = ToolBarConfigItems.None;

this.layerForm.LayerControl.AppWorkspace = this;

ResumeLayout();
PerformLayout();
}

private void InitializeFloatingForms()
{
// MainToolBarForm
mainToolBarForm = new ToolsForm();
mainToolBarForm.RelinquishFocus += RelinquishFocusHandler;
mainToolBarForm.ProcessCmdKeyEvent += OnToolFormProcessCmdKeyEvent;

// LayerForm
layerForm = new LayerForm();
layerForm.LayerControl.AppWorkspace = this;
layerForm.LayerControl.ClickedOnLayer += LayerControl_ClickedOnLayer;
layerForm.NewLayerButtonClick += LayerForm_NewLayerButtonClicked;
layerForm.DeleteLayerButtonClick += LayerForm_DeleteLayerButtonClicked;
layerForm.DuplicateLayerButtonClick += LayerForm_DuplicateLayerButtonClick;
layerForm.MergeLayerDownClick += new EventHandler(LayerForm_MergeLayerDownClick);
layerForm.MoveLayerUpButtonClick += LayerForm_MoveLayerUpButtonClicked;
layerForm.MoveLayerDownButtonClick += LayerForm_MoveLayerDownButtonClicked;
layerForm.PropertiesButtonClick += LayerForm_PropertiesButtonClick;
layerForm.RelinquishFocus += RelinquishFocusHandler;
layerForm.ProcessCmdKeyEvent += OnToolFormProcessCmdKeyEvent;

// HistoryForm
historyForm = new HistoryForm();
historyForm.RewindButtonClicked += HistoryForm_RewindButtonClicked;
historyForm.UndoButtonClicked += HistoryForm_UndoButtonClicked;
historyForm.RedoButtonClicked += HistoryForm_RedoButtonClicked;
historyForm.FastForwardButtonClicked += HistoryForm_FastForwardButtonClicked;
historyForm.RelinquishFocus += RelinquishFocusHandler;
historyForm.ProcessCmdKeyEvent += OnToolFormProcessCmdKeyEvent;

// ColorsForm
colorsForm = new ColorsForm();
colorsForm.PaletteCollection = new PaletteCollection();
colorsForm.WhichUserColor = WhichUserColor.Primary;
colorsForm.UserPrimaryColorChanged += ColorsForm_UserPrimaryColorChanged;
colorsForm.UserSecondaryColorChanged += ColorsForm_UserSecondaryColorChanged;
colorsForm.RelinquishFocus += RelinquishFocusHandler;
colorsForm.ProcessCmdKeyEvent += OnToolFormProcessCmdKeyEvent;
}
}

下图是Paint.Net的UI界面

是个悬浮窗分别是ToolsForm, LayerForm, HistoryForm, ColorsForm. 中间图像所在区域可以理解为DocumentWorkspace. 由于可以打开多张图像, 所以存在一个DocumentWorkspace列表. 当前正在处理的是activeDocumentWorkspace. 另外还有一个WorkspaceWidgets, 代码中将layerForm, historyForm, colorsForm, mainToolBarForm都赋值给了它

Paint.Net笔记(X2) ToolForm

Posted on 2018-04-28 | In 编程

上一篇笔记整理了Paint.Net的基本结构. 这一篇整理一下Paint.Net中的Tool工具是如何对图形进行操作的.

首先是有一个toolsForm的悬浮窗

1
2
3
4
5
internal class ToolsForm 
: FloatingToolForm
{
private ToolsControl toolsControl = null;
}

在Paint.Net中窗口的继承结构如下图所示:

ToolsForm内部包含ToolsControl, 后者包含各种Tool的toolStripEx. 再在toolStripEx中添加各种工具的button

1
2
3
4
5
6
7
8
9
10
11
12
13
14
15
16
17
18
19
20
21
22
23
24
25
26
27
28
29
30
31
32
33
34
35
36
37
38
39
40
41
42
43
44
45
46
47
48
49
50
51
52
53
54
55
56
57
58
59
60
61
62
63
64
65
66
67
68
69
70
71
72
73
74
75
76
   internal class ToolsControl 
: UserControl,
IToolChooser
{
private ToolStripEx toolStripEx;

//添加tool button
public void SetTools(ToolInfo[] toolInfos)
{
if (this.toolStripEx != null)
{
this.toolStripEx.Items.Clear();
}

this.imageList = new ImageList();
this.imageList.ColorDepth = ColorDepth.Depth32Bit;
this.imageList.TransparentColor = Utility.TransparentKey;

this.toolStripEx.ImageList = this.imageList;

ToolStripItem[] buttons = new ToolStripItem[toolInfos.Length];
string toolTipFormat = PdnResources.GetString("ToolsControl.ToolToolTip.Format");

for (int i = 0; i < toolInfos.Length; ++i)
{
ToolInfo toolInfo = toolInfos[i];
ToolStripButton button = new ToolStripButton();

int imageIndex = imageList.Images.Add(
toolInfo.Image.Reference,
imageList.TransparentColor);

button.ImageIndex = imageIndex;
button.Tag = toolInfo.ToolType;
button.ToolTipText = string.Format(toolTipFormat, toolInfo.Name, char.ToUpperInvariant(toolInfo.HotKey).ToString());
buttons[i] = button;
}

this.toolStripEx.Items.AddRange(buttons);
}

// 增加tool按钮的点击事件
private void ToolStripEx_ItemClicked(object sender, ToolStripItemClickedEventArgs e)
{
foreach (ToolStripButton button in this.toolStripEx.Items)
{
button.Checked = (button == e.ClickedItem);
}

OnToolClicked((Type)e.ClickedItem.Tag);
}


public event ToolClickedEventHandler ToolClicked;
protected virtual void OnToolClicked(Type toolType)
{
if (this.ignoreToolClicked <= 0)
{
if (ToolClicked != null)
{
ToolClicked(this, new ToolClickedEventArgs(toolType));
}
}
}
}

internal class ToolInfo
{
private string name;
private string helpText;
private ImageResource image;
private bool skipIfActiveOnHotKey;
private char hotKey;
private Type toolType; //具体的工具类型
private ToolBarConfigItems toolBarConfigItems;
}

各种tool如下所示:

ToolClicked事件是在AppWorkspace的构造方法中被监听的

1
2
3
4
5
6
7
8
9
10
11
12
13
14
15
16
17
18
19
20
21

public AppWorkspace()
{
SuspendLayout();

// initialize!
InitializeComponent();
InitializeFloatingForms();

this.mainToolBarForm.ToolsControl.SetTools(DocumentWorkspace.ToolInfos);
this.mainToolBarForm.ToolsControl.ToolClicked += new ToolClickedEventHandler(this.MainToolBar_ToolClicked);
}

private void MainToolBar_ToolClicked(object sender, ToolClickedEventArgs e)
{
if (ActiveDocumentWorkspace != null)
{
ActiveDocumentWorkspace.Focus();
ActiveDocumentWorkspace.SetToolFromType(e.ToolType);
}
}

然后转移到ActiveDocumentWorkspace

1
2
3
4
5
6
7
8
9
10
11
12
13
14
15
16
public void SetToolFromType(Type toolType)
{
if (toolType == GetToolType())
{
return;
}
else if (toolType == null)
{
SetTool(null);
}
else
{
Tool newTool = CreateTool(toolType);
SetTool(newTool);
}
}

SetTool内部会调用Tool的PerformActivate方法, 并将该tool设为activeTool

1
2
3
4
5
// Methods to send messages to this class
public void PerformActivate()
{
Activate();
}

Activate方法又会调用OnActivate方法, 后者是一个虚方法, 由子类去实现, 这里以PencilTool为例(看了一圈, PencilTool这个最简单)

1
2
3
4
5
6
7
8
9
10
11
12
13
14
15
16
17
18
19
20
21
22
23
24
25
26
protected override void OnActivate()
{
base.OnActivate();

this.pencilToolCursor = new Cursor(PdnResources.GetResourceStream("Cursors.PencilToolCursor.cur"));
this.Cursor = this.pencilToolCursor; //改变鼠标形状

this.savedRects = new List<Rectangle>();

if (ActiveLayer != null)
{
bitmapLayer = (BitmapLayer)ActiveLayer;
renderArgs = new RenderArgs(bitmapLayer.Surface);
tracePoints = new List<Point>();
}
else
{
bitmapLayer = null;

if (renderArgs != null)
{
renderArgs.Dispose();
renderArgs = null;
}
}
}

PencilTool被激活后, 用户用鼠标在activeDocumentWorkspace上绘图. 鼠标事件如何传递到PencilTool? 看下面的代码

1
2
3
4
5
6
7
8
9
10
11
12
13
14
15
16
17
18
//AppWorkspace.cs
protected virtual void OnActiveDocumentWorkspaceChanged()
{
this.activeDocumentWorkspace.DocumentMouseEnter += this.DocumentMouseEnterHandler;
this.activeDocumentWorkspace.DocumentMouseLeave += this.DocumentMouseLeaveHandler;
this.activeDocumentWorkspace.DocumentMouseMove += this.DocumentMouseMoveHandler;
this.activeDocumentWorkspace.DocumentMouseDown += this.DocumentMouseDownHandler;
//...
//...
}

private void DocumentMouseMoveHandler(object sender, MouseEventArgs e)
{
if (ActiveDocumentWorkspace.Tool != null)
{
ActiveDocumentWorkspace.Tool.PerformMouseMove(e); // ActiveDocumentWorkspace.Tool为activeTool
}
}

再到Tool类

1
2
3
4
5
6
7
8
9
10
11
12
13
14
15
16
17
18
19
20
21
public void PerformMouseMove(MouseEventArgs e)
{
if (IsOverflow(e))
{
return;
}

if (e is StylusEventArgs)
{
if (this.SupportsInk)
{
StylusMove(e as StylusEventArgs);
}

// if the tool does not claim ink support, discard
}
else
{
MouseMove(e);
}
}

MouseMove被PencilTool重写, 内部调用DrawLines方法, 后者调用DrawPoint方法

1
2
3
4
5
6
7
8
9
10
11
12
// Draws a point, but first intersects it with the selection
private void DrawPoint(RenderArgs ra, Point p, ColorBgra color)
{
if (ra.Surface.Bounds.Contains(p))
{
if (ra.Graphics.IsVisible(p))
{
BinaryPixelOp op = AppEnvironment.AlphaBlending ? blendOp : copyOp;
ra.Surface[p.X, p.Y] = op.Apply(ra.Surface[p.X, p.Y], color);
}
}
}

最后在看一下DocumentWorkspace初始化ToolInfo

1
2
3
4
5
6
7
8
9
10
11
12
13
14
15
16
17
18
19
20
21
22
23
24
25
26
27
28
29
30
31
32
33
34
35
36
37
38
39
40
41
42
43
44
45
46
47
48
49
50
//DocumentWorkspace.cs
private static void InitializeTools()
{
// add all the tools
tools = new Type[]
{
typeof(RectangleSelectTool),
typeof(MoveTool),
typeof(LassoSelectTool),
typeof(MoveSelectionTool),

typeof(EllipseSelectTool),
typeof(ZoomTool),

typeof(MagicWandTool),
typeof(PanTool),

typeof(PaintBucketTool),
typeof(GradientTool),

typeof(PaintBrushTool),
typeof(EraserTool),
typeof(PencilTool),
typeof(ColorPickerTool),
typeof(CloneStampTool),
typeof(RecolorTool),
typeof(TextTool),

typeof(LineTool),
typeof(RectangleTool),
typeof(RoundedRectangleTool),
typeof(EllipseTool),
typeof(FreeformShapeTool),
};
}

private static void InitializeToolInfos()
{
int i = 0;
toolInfos = new ToolInfo[tools.Length];

foreach (Type toolType in tools)
{
using (Tool tool = DocumentWorkspace.CreateTool(toolType, null))
{
toolInfos[i] = tool.Info;
++i;
}
}
}

2D Visualization笔记(X0) HueRing

Posted on 2018-04-28 | In 编程

为油画生成色相轮
https://github.com/zmapleaf/TypeScriptHTMLApp_HueRing-1

WPF笔记(X1) Threading Model (四)

Posted on 2018-04-25 | In 编程

这一篇整理一下DispatcherTimer. 看DispatcherTimer之前, 先看一下.Net中的其他Timer

Timer(C# in a nutshell 6th)
The .NET Framework provides four timers. Two of these are general-purpose multithreaded timers:

  • System.Threading.Timer
  • System.Timers.Timer

The other two are special-purpose single-threaded timers:

  • System.Windows.Forms.Timer (Windows Forms timer)
  • System.Windows.Threading.DispatcherTimer (WPF timer)

The multithreaded timers are more powerful, accurate, and flexible; the singlethreaded timers are safer and more convenient for running simple tasks that update Windows Forms controls or WPF elements.
System.Threading.Timer is the simplest multithreaded timer: it has just a constructor and two methods

The .NET Framework provides another timer class of the same name in the System.Timers namespace. This simply wraps the System.Threading.Timer (参考:https://www.gnu.org/software/dotgnu/pnetlib-doc/System/Threading/Timer.html)

Multithreaded timers use the thread pool to allow a few threads to serve many timers. This means that the callback method or Elapsed event may fire on a different thread each time it is called. Furthermore, the Elapsed event always fires(approximately) on time—regardless of whether the previous Elapsed event finished executing. Hence, callbacks or event handlers must be thread-safe.

使用的是线程池, 回调函数有可能是在不同的线程中被调用. 不管前一个调用是否完成, 后一个调用会如期而至, 因此回调函数必须是线程安全的(可重入的)

定时器精度在10-20ms之间

而DispatcherTimer的时间精度就没那么准(参考:https://msdn.microsoft.com/en-us/library/system.windows.threading.dispatchertimer.interval(v=vs.110).aspx)

Timers are not guaranteed to execute exactly when the time interval occurs, but they are guaranteed to not execute before the time interval occurs. This is because DispatcherTimer operations are placed on the Dispatcher queue like other operations. When the DispatcherTimer operation executes is dependent on the other jobs in the queue and their priorities.

如果要计时的话, 用stopwatch, 参考https://stackoverflow.com/questions/4251644/getting-elapsed-time-with-dispatchtimer-to-1-millisecond-accuracy
和https://social.msdn.microsoft.com/forums/windowsapps/en-us/058a755e-059b-45ee-b5ec-3d35f3b53515/dispatchertimer-accuracy

DispatcherTimer这个类不复杂, 阅读它的代码能学到不少东西, 可以进一步了解Dispatcher的运行方式.

1
2
3
4
5
6
7
8
9
10
11
12
13
14
15
16
17
18
19
20
21
22
23
24
25
26
27
28
29
30
31
32
33
34
35
36
37
38
39
40
41
42
43
44
45
46
47
48
49
50
51
52
53
54
55
56
57
58
59
60
61
62
63
64
65
66
67
68
69
70
71
72
73
74
75
76
77
78
79
80
81
82
83
84
85
86
87
88
89
90
91
92
93
94
95
96
97
98
99
100
101
102
103
104
105
106
107
108
109
110
111
112
113
114
115
116
117
118
119
120
121
122
123
124
125
126
127
128
129
130
131
132
133
134
135
136
137
138
139
140
141
142
143
144
145
146
147
148
149
150
151
152
153
154
155
156
157
158
159
160
161
162
163
164
165
166
167
168
169
170
171
172
173
174
175
176
177
178
179
180
181
182
183
184
185
186
187
188
189
190
191
192
193
194
195
196
197
198
199
200
201
202
203
204
205
206
207
208
209
210
211
212
213
214
215
216
217
218
219
220
221
222
223
224
225
226
227
228
229
230
231
232
233
234
235
236
237
238
239
240
241
242
243
244
245
246
247
248
249
250
251
252
253
254
255
256
257
258
259
260
261
262
263
264
265
266
267
268
269
270
271
272
273
274
275
276
277
278
279
280
281
282
283
284
285
286
287
288
289
290
291
292
293
294
295
296
297
298
299
300
301
302
303
304
305
306
307
308
309
310
311
312
313
314
315
316
317
318
319
320
321
322
323
324
325
326
327
328
329
330
331
332
333
334
335
336
337
using System;
using System.Threading;
using System.Windows;
using System.Diagnostics;
using System.Collections.Generic;
using MS.Internal.WindowsBase;

namespace System.Windows.Threading
{
/// <summary>
/// A timer that is integrated into the Dispatcher queues, and will
/// be processed after a given amount of time at a specified priority.
/// </summary>
public class DispatcherTimer
{
/// <summary>
/// Creates a timer that uses the current thread's Dispatcher to
/// process the timer event at background priority.
/// </summary>
public DispatcherTimer() : this(DispatcherPriority.Background) // NOTE: should be Priority Dispatcher.BackgroundPriority
{
}

/// <summary>
/// Creates a timer that uses the current thread's Dispatcher to
/// process the timer event at the specified priority.
/// </summary>
/// <param name="priority">
/// The priority to process the timer at.
/// </param>
public DispatcherTimer(DispatcherPriority priority) // NOTE: should be Priority
{
Initialize(Dispatcher.CurrentDispatcher, priority, TimeSpan.FromMilliseconds(0));
}

/// <summary>
/// Creates a timer that uses the specified Dispatcher to
/// process the timer event at the specified priority.
/// </summary>
/// <param name="priority">
/// The priority to process the timer at.
/// </param>
/// <param name="dispatcher">
/// The dispatcher to use to process the timer.
/// </param>
public DispatcherTimer(DispatcherPriority priority, Dispatcher dispatcher) // NOTE: should be Priority
{
if(dispatcher == null)
{
throw new ArgumentNullException("dispatcher");
}

Initialize(dispatcher, priority, TimeSpan.FromMilliseconds(0));
}

/// <summary>
/// Creates a timer that is bound to the specified dispatcher and
/// will be processed at the specified priority, after the
/// specified timeout.
/// </summary>
/// <param name="interval">
/// The interval to tick the timer after.
/// </param>
/// <param name="priority">
/// The priority to process the timer at.
/// </param>
/// <param name="callback">
/// The callback to call when the timer ticks.
/// </param>
/// <param name="dispatcher">
/// The dispatcher to use to process the timer.
/// </param>
public DispatcherTimer(TimeSpan interval, DispatcherPriority priority, EventHandler callback, Dispatcher dispatcher) // NOTE: should be Priority
{
//
if(callback == null)
{
throw new ArgumentNullException("callback");
}
if(dispatcher == null)
{
throw new ArgumentNullException("dispatcher");
}

if (interval.TotalMilliseconds < 0)
throw new ArgumentOutOfRangeException("interval", SR.Get(SRID.TimeSpanPeriodOutOfRange_TooSmall));

if (interval.TotalMilliseconds > Int32.MaxValue)
throw new ArgumentOutOfRangeException("interval", SR.Get(SRID.TimeSpanPeriodOutOfRange_TooLarge));

Initialize(dispatcher, priority, interval);

Tick += callback;
Start();
}

/// <summary>
/// Gets the dispatcher this timer is associated with.
/// </summary>
public Dispatcher Dispatcher
{
get
{
return _dispatcher;
}
}

/// <summary>
/// Gets or sets whether the timer is running.
/// </summary>
public bool IsEnabled
{
get
{
return _isEnabled;
}

set
{
lock(_instanceLock)
{
if(!value && _isEnabled)
{
Stop();
}
else if(value && !_isEnabled)
{
Start();
}
}
}
}

/// <summary>
/// Gets or sets the time between timer ticks.
/// </summary>
public TimeSpan Interval
{
get
{
return _interval;
}

set
{
bool updateWin32Timer = false;

if (value.TotalMilliseconds < 0)
throw new ArgumentOutOfRangeException("value", SR.Get(SRID.TimeSpanPeriodOutOfRange_TooSmall));

if (value.TotalMilliseconds > Int32.MaxValue)
throw new ArgumentOutOfRangeException("value", SR.Get(SRID.TimeSpanPeriodOutOfRange_TooLarge));

lock(_instanceLock)
{
_interval = value;

if(_isEnabled)
{
_dueTimeInTicks = Environment.TickCount + (int)_interval.TotalMilliseconds;
updateWin32Timer = true;
}
}

if(updateWin32Timer)
{
_dispatcher.UpdateWin32Timer();
}
}
}

/// <summary>
/// Starts the timer.
/// </summary>
public void Start()
{
lock(_instanceLock)
{
if(!_isEnabled)
{
_isEnabled = true;

Restart();
}
}
}

/// <summary>
/// Stops the timer.
/// </summary>
public void Stop()
{
bool updateWin32Timer = false;

lock(_instanceLock)
{
if(_isEnabled)
{
_isEnabled = false;
updateWin32Timer = true;

// If the operation is in the queue, abort it.
if(_operation != null)
{
_operation.Abort();
_operation = null;
}

}
}

if(updateWin32Timer)
{
_dispatcher.RemoveTimer(this);
}
}

/// <summary>
/// Occurs when the specified timer interval has elapsed and the
/// timer is enabled.
/// </summary>
public event EventHandler Tick;

/// <summary>
/// Any data that the caller wants to pass along with the timer.
/// </summary>
public object Tag
{
get
{
return _tag;
}

set
{
_tag = value;
}
}


private void Initialize(Dispatcher dispatcher, DispatcherPriority priority, TimeSpan interval)
{
// Note: all callers of this have a "priority" parameter.
Dispatcher.ValidatePriority(priority, "priority");
if(priority == DispatcherPriority.Inactive)
{
throw new ArgumentException(SR.Get(SRID.InvalidPriority), "priority");
}

_dispatcher = dispatcher;
_priority = priority;
_interval = interval;
}

private void Restart()
{
lock(_instanceLock)
{
if (_operation != null)
{
// Timer has already been restarted, e.g. Start was called form the Tick handler.
return;
}

// BeginInvoke a new operation.
_operation = _dispatcher.BeginInvoke(
DispatcherPriority.Inactive,
new DispatcherOperationCallback(FireTick),
null);


_dueTimeInTicks = Environment.TickCount + (int) _interval.TotalMilliseconds;

if (_interval.TotalMilliseconds == 0 && _dispatcher.CheckAccess())
{
// shortcut - just promote the item now
Promote();
}
else
{
_dispatcher.AddTimer(this);
}
}

}

internal void Promote() // called from Dispatcher
{
lock(_instanceLock)
{
// Simply promote the operation to it's desired priority.
if(_operation != null)
{
_operation.Priority = _priority;
}
}
}

private object FireTick(object unused)
{
// The operation has been invoked, so forget about it.
_operation = null;

// The dispatcher thread is calling us because item's priority
// was changed from inactive to something else.
if(Tick != null)
{
Tick(this, EventArgs.Empty);
}

// If we are still enabled, start the timer again.
if(_isEnabled)
{
Restart();
}

return null;
}

// This is the object we use to synchronize access.
private object _instanceLock = new object();

// Note: We cannot BE a dispatcher-affinity object because we can be
// created by a worker thread. We are still associated with a
// dispatcher (where we post the item) but we can be accessed
// by any thread.
private Dispatcher _dispatcher;

private DispatcherPriority _priority; // NOTE: should be Priority
private TimeSpan _interval;
private object _tag;
private DispatcherOperation _operation;
private bool _isEnabled;

internal int _dueTimeInTicks; // used by Dispatcher
}
}

从DispatcherTimer的使用方式入手

1
2
3
4
5
//  DispatcherTimer setup
dispatcherTimer = new System.Windows.Threading.DispatcherTimer();
dispatcherTimer.Tick += new EventHandler(dispatcherTimer_Tick);
dispatcherTimer.Interval = new TimeSpan(0,0,1);
dispatcherTimer.Start();

无参构造方法DispatcherTimer()将DispatcherPriority设为Background

1
2
3
4
5
6
7
/// <summary>
/// Creates a timer that uses the current thread's Dispatcher to
/// process the timer event at background priority.
/// </summary>
public DispatcherTimer() : this(DispatcherPriority.Background) // NOTE: should be Priority Dispatcher.BackgroundPriority
{
}

Background优先级很低, 所以不一定能够按时执行.

再看Start方法

1
2
3
4
5
6
7
8
9
10
11
12
13
14
15
/// <summary>
/// Starts the timer.
/// </summary>
public void Start()
{
lock(_instanceLock)
{
if(!_isEnabled)
{
_isEnabled = true;

Restart();
}
}
}

调用的是Restart()

1
2
3
4
5
6
7
8
9
10
11
12
13
14
15
16
17
18
19
20
21
22
23
24
25
26
27
28
29
30
31
private void Restart()
{
lock(_instanceLock)
{
if (_operation != null)
{
// Timer has already been restarted, e.g. Start was called form the Tick handler.
return;
}

// BeginInvoke a new operation.
_operation = _dispatcher.BeginInvoke(
DispatcherPriority.Inactive,
new DispatcherOperationCallback(FireTick),
null);


_dueTimeInTicks = Environment.TickCount + (int) _interval.TotalMilliseconds;

if (_interval.TotalMilliseconds == 0 && _dispatcher.CheckAccess())
{
// shortcut - just promote the item now
Promote();
}
else
{
_dispatcher.AddTimer(this);
}
}

}

这个方法比较关键

  1. 它往Dispatcher Queue里面放了一个Operation, 但它的优先级是DispatcherPriority.Inactive. 顾名思义, 这个优先级表示该Operation是不激活状态. 它不会被执行
    1
    2
    3
    4
    /// <summary>
    /// Operations at this priority are not processed.
    /// </summary>
    Inactive = 0,

因为时间间隔不到, Operation不能被执行. 只有时间间隔到了, Operation才会被激活. 如何激活? 且看下面

  1. Promote()方法, 就是激活该Operation. Promote是提升的意思, 也就是提升Operation的优先级.
    1
    2
    3
    4
    5
    6
    7
    8
    9
    10
    11
    internal void Promote() // called from Dispatcher
    {
    lock(_instanceLock)
    {
    // Simply promote the operation to it's desired priority.
    if(_operation != null)
    {
    _operation.Priority = _priority;
    }
    }
    }

_priority构造的时候为DispatcherPriority.Background. 即从DispatcherPriority.Inactive提升(Promote)到
DispatcherPriority.Background. 如此, Operation就可以被执行了.

注意called from Dispatcher, 表示, 时间间隔到了, 提升Operation的优先级是由Dispatcher来完成的.
Dispatcher和DispatcherTimer有什么关系呢? 且看下面

  1. _dispatcher.AddTimer(this);
    1
    2
    3
    4
    5
    6
    7
    8
    9
    10
    11
    12
    internal void AddTimer(DispatcherTimer timer)
    {
    lock(_instanceLock)
    {
    if(!_hasShutdownFinished) // Could be a non-dispatcher thread, lock to read
    {
    _timers.Add(timer);
    _timersVersion++;
    }
    }
    UpdateWin32Timer();
    }

添加了一个DispatcherTimer, 需要UpdateWin32Timer, 去操作系统设置定时器

1
2
3
4
5
6
7
8
9
10
11
12
13
14
15
16
17
18
19
20
21
22
23
24
25
26
27
28
29
30
31
32
33
34
35
36
37
38
39
40
41
42
43
44
45
46
47
48
49
50
51
52
53
54
55
56
57
58
59
60
61
62
63
64
65
66
67
68
69
70
71
72
73
74
75
76
77
78
79
80
81
82
83
84
85
86
internal void UpdateWin32Timer() // Called from DispatcherTimer
{
if(CheckAccess())
{
UpdateWin32TimerFromDispatcherThread(null);
}
else
{
BeginInvoke(DispatcherPriority.Send,
new DispatcherOperationCallback(UpdateWin32TimerFromDispatcherThread),
null);
}
}

private object UpdateWin32TimerFromDispatcherThread(object unused)
{

lock(_instanceLock)
{
if(!_hasShutdownFinished) // Dispatcher thread, does not technically need the lock to read
{
bool oldDueTimeFound = _dueTimeFound;
int oldDueTimeInTicks = _dueTimeInTicks;
_dueTimeFound = false;
_dueTimeInTicks = 0;

if(_timers.Count > 0)
{
// We could do better if we sorted the list of timers.
for(int i = 0; i < _timers.Count; i++)
{
DispatcherTimer timer = _timers[i];

if(!_dueTimeFound || timer._dueTimeInTicks - _dueTimeInTicks < 0)
{
_dueTimeFound = true;
_dueTimeInTicks = timer._dueTimeInTicks;
}
}
}

if(_dueTimeFound)
{
if(!_isWin32TimerSet || !oldDueTimeFound || (oldDueTimeInTicks != _dueTimeInTicks))
{
SetWin32Timer(_dueTimeInTicks);
}
}
else if(oldDueTimeFound)
{
KillWin32Timer();
}
}
}

return null;
}

///<SecurityNote>
/// Critical - accesses critical data
/// TreatAsSafe - we think it's ok to expose timers in the SEE.
/// a denial-of-service attack may be possible - but these are low-pri and possible in many other ways.
/// we can never bring down the iexplore process.
///</SecurityNote>
[SecurityCritical, SecurityTreatAsSafe]
private void SetWin32Timer(int dueTimeInTicks)
{
if(!IsWindowNull())
{
int delta = dueTimeInTicks - Environment.TickCount;
if(delta < 1)
{
delta = 1;
}

// We are being called on the dispatcher thread so we can rely on
// _window.Value being non-null without taking the instance lock.

SafeNativeMethods.SetTimer(
new HandleRef(this, _window.Value.Handle),
TIMERID_TIMERS,
delta);

_isWin32TimerSet = true;
}
}

这样, 系统才会发WM_TIMER给窗口处理函数, Dispatcher才会从DispatcherQueue里面取出Operation, 看下面的代码

1
2
3
4
5
6
7
8
9
10
private IntPtr WndProcHook(IntPtr hwnd, int msg, IntPtr wParam, IntPtr lParam, ref bool handled)

else if(message == WindowMessage.WM_TIMER && (int) wParam == TIMERID_TIMERS)
{
// We want 1-shot only timers. So stop the timer
// that just fired.
KillWin32Timer();

PromoteTimers(Environment.TickCount);
}

PromoteTimers()判断时间间隔有没有到; 如果到了,调用的是timer.Promote()方法, 提升Operation的优先级

1
2
3
4
5
6
7
8
9
10
11
12
13
14
15
16
17
18
19
20
21
22
23
24
internal void PromoteTimers(int currentTimeInTicks)

while(iTimer < _timers.Count)
{
// WARNING: this is vulnerable to wrapping
if(timers[iTimer]._dueTimeInTicks - currentTimeInTicks <= 0) //判断时间有没有到
{
// Remove this timer from our list.
// Do not increment the index.
timer = timers[iTimer];
timers.RemoveAt(iTimer);
break;
}
else
{
iTimer++;
}
}

// Now that we are outside of the lock, promote the timer.
if(timer != null)
{
timer.Promote();
}

  1. 时间间隔到了, 执行FireTick方法
    1
    2
    3
    4
    5
    6
    7
    8
    9
    10
    11
    12
    13
    14
    15
    16
    17
    18
    19
    20
    private object FireTick(object unused)
    {
    // The operation has been invoked, so forget about it.
    _operation = null;

    // The dispatcher thread is calling us because item's priority
    // was changed from inactive to something else.
    if(Tick != null)
    {
    Tick(this, EventArgs.Empty);
    }

    // If we are still enabled, start the timer again.
    if(_isEnabled)
    {
    Restart();//再把op放到queue中
    }

    return null;
    }

前面由于DispatcherOperation已经从DispatcherQueue里面取出, 所以这里需要重新再向DispatcherQueue放入DispatcherOperation, 等下一个时间间隔来临时执行. 做法是, 再次调用Restart方法.

WPF笔记(X1) Threading Model (三)

Posted on 2018-04-25 | In 编程

上一篇整理了Dispatcher的消息循环和BeginInvoke机制, 这一篇继续深入窥探一下DispatcherFrame.

1
2
3
4
5
6
7
8
9
10
11
12
13
14
15
16
17
18
19
20
21
22
23
24
25
26
27
28
29
30
31
32
33
34
35
36
37
38
39
40
41
42
43
44
45
46
47
48
49
50
51
52
53
54
55
56
57
58
//Dispatcher.cs
private void PushFrameImpl(DispatcherFrame frame)

//<SecurityNote>
// Critical - as this calls critical methods (GetMessage, TranslateMessage, DispatchMessage).
// TreatAsSafe - as the critical method is not leaked out, and not controlled by external inputs.
//</SecurityNote>
[SecurityCritical, SecurityTreatAsSafe ]
private void PushFrameImpl(DispatcherFrame frame)
{
SynchronizationContext oldSyncContext = null;
SynchronizationContext newSyncContext = null;
MSG msg = new MSG();

_frameDepth++;
try
{
// Change the CLR SynchronizationContext to be compatable with our Dispatcher.
oldSyncContext = SynchronizationContext.Current;
newSyncContext = new DispatcherSynchronizationContext(this);
SynchronizationContext.SetSynchronizationContext(newSyncContext);

try
{
while(frame.Continue)
{
if (!GetMessage(ref msg, IntPtr.Zero, 0, 0))
break;

TranslateAndDispatchMessage(ref msg);
}

// If this was the last frame to exit after a quit, we
// can now dispose the dispatcher.
if(_frameDepth == 1)
{
if(_hasShutdownStarted)
{
ShutdownImpl();
}
}
}
finally
{
// Restore the old SynchronizationContext.
SynchronizationContext.SetSynchronizationContext(oldSyncContext);
}
}
finally
{
_frameDepth--;
if(_frameDepth == 0)
{
// We have exited all frames.
_exitAllFrames = false;
}
}
}

DispatcherFrame的代码如下,

1
2
3
4
5
6
7
8
9
10
11
12
13
14
15
16
17
18
19
20
21
22
23
24
25
26
27
28
29
30
31
32
33
34
35
36
37
38
39
40
41
42
43
44
45
46
47
48
49
50
51
52
53
54
55
56
57
58
59
60
61
62
63
64
65
66
67
68
69
70
71
72
73
74
75
76
77
78
79
80
81
82
83
84
85
86
87
88
89
90
91
92
93
94
95
96
97
98
99
100
101
102
103
104
105
using System;
using System.Security;

namespace System.Windows.Threading
{
/// <summary>
/// Representation of Dispatcher frame.
/// </summary>
public class DispatcherFrame : DispatcherObject
{

/// <SecurityNote>
/// Critical: This code exists to ensure that the static variables initialized
/// do not cause security violations.The reason this comes into existance is because
/// of the call to RegisterWindowMessage
/// TreatAsSafe:This is safe to call
/// </SecurityNote>
[SecurityCritical,SecurityTreatAsSafe]
static DispatcherFrame()
{
}

/// <summary>
/// Constructs a new instance of the DispatcherFrame class.
/// </summary>
public DispatcherFrame() : this(true)
{
}

/// <summary>
/// Constructs a new instance of the DispatcherFrame class.
/// </summary>
/// <param name="exitWhenRequested">
/// Indicates whether or not this frame will exit when all frames
/// are requested to exit.
/// <p/>
/// Dispatcher frames typically break down into two categories:
/// 1) Long running, general purpose frames, that exit only when
/// told to. These frames should exit when requested.
/// 2) Short running, very specific frames that exit themselves
/// when an important criteria is met. These frames may
/// consider not exiting when requested in favor of waiting
/// for their important criteria to be met. These frames
/// should have a timeout associated with them.
/// </param>
public DispatcherFrame(bool exitWhenRequested)
{
_exitWhenRequested = exitWhenRequested;
_continue = true;
}

/// <summary>
/// Indicates that this dispatcher frame should exit.
/// </summary>
/// <SecurityNote>
/// Critical - calls a critical method - postThreadMessage.
/// PublicOK - all we're doing is posting a current message to our thread.
/// net effect is the dispatcher "wakes up"
/// and uses the continue flag ( which may have just changed).
/// </SecurityNote>
public bool Continue
{
get
{
// This method is free-threaded.

// First check if this frame wants to continue.
bool shouldContinue = _continue;
if(shouldContinue)
{
// This frame wants to continue, so next check if it will
// respect the "exit requests" from the dispatcher.
if(_exitWhenRequested)
{
Dispatcher dispatcher = Dispatcher;

// This frame is willing to respect the "exit requests" of
// the dispatcher, so check them.
if(dispatcher._exitAllFrames || dispatcher._hasShutdownStarted)
{
shouldContinue = false;
}
}
}

return shouldContinue;
}

[SecurityCritical]
set
{
// This method is free-threaded.

_continue = value;

// Post a message so that the message pump will wake up and
// check our continue state.
Dispatcher.BeginInvoke(DispatcherPriority.Send, (DispatcherOperationCallback) delegate(object unused) {return null;}, null);
}
}

private bool _exitWhenRequested;
private bool _continue;
}
}

关于DispatcherFrame, Threading Model中https://docs.microsoft.com/en-us/dotnet/framework/wpf/advanced/threading-model有一节提到**Nested Pumping**

Sometimes it is not feasible to completely lock up the UI thread. Let’s consider the Show method of the MessageBox class. Show doesn’t return until the user clicks the OK button. It does, however, create a window that must have a message loop in order to be interactive. While we are waiting for the user to click OK, the original application window does not respond to user input. It does, however, continue to process paint messages. The original window redraws itself when covered and revealed.(移动MessageBox, 它后面的background window会重绘, 但又无法响应用户的输入)

Some thread must be in charge of the message box window. WPF could create a new thread just for the message box window, but this thread would be unable to paint the disabled elements in the original window (remember the earlier discussion of mutual exclusion.线程A无法修改线程B中的UI元素, 所以messageBox中启动了另一个线程的假设不成立). Instead, WPF uses a nested message processing system. The Dispatcher class includes a special method called PushFrame, which stores an application’s current execution point then begins a new message loop. When the nested message loop finishes, execution resumes after the original PushFrame call.

In this case, PushFrame maintains the program context at the call to MessageBox.Show, and it starts a new message loop to repaint the background window and handle input to the message box window(重绘background window, 是由new message loop负责的). When the user clicks OK and clears the pop-up window, the nested loop exits and control resumes after the call to Show.

除了上面的Nested Pumping, MSDN中还提到了DispatcherFrame的另一个作用, 模拟实现Winform中Application的DoEvents功能

1
2
3
4
5
6
7
8
9
10
11
12
13
14
15
16
//https://msdn.microsoft.com/zh-cn/library/system.windows.threading.dispatcher.pushframe.aspx
public static class ApplicationExtensions
{
#region DoEvents using a DispatcherFrame

public static void DoEvents(this Application application)
{
DispatcherFrame frame = new DispatcherFrame();
Dispatcher.CurrentDispatcher.BeginInvoke(DispatcherPriority.Background, new ExitFrameHandler(frm => frm.Continue = false), frame);
Dispatcher.PushFrame(frame);
}

private delegate void ExitFrameHandler(DispatcherFrame frame);

#endregion
}

Application.DoEvents方法有什么作用, 看如下代码:

1
2
3
4
5
6
7
8
private void button1_Click(object sender, EventArgs e)  
{
for (int i = 0; i < 10000; i++)
{
label1.Text = i.ToString();
Application.DoEvents();
}
}

该方法是想让label的文本从0更新到9999. 如果注释掉Application.DoEvents(), Label只会最后显示一个9999; 而加上Application.DoEvents(), label会有一个从0到9999的跳变过程.

label1.Text = i.ToString(); 这一行需要更新lable1, 其实是有一个repaint消息. 但由于UI线程正在执行for循环,没有空闲去处理该消息. 所以在没有Application.DoEvents(); 的情况下, 只有等UI线程执行完for循环后, UI线程才会去处理repaint消息, label才会更新.如果加了Application.DoEvents(), 该方法的功能就是强制UI线程去执行消息队列中的消息, 即使在for循环中. 于是label能够实时得到更新.

Dispatcher.PushFrame(frame);强制启动了一个新的loop. UI线程会保存PushFrame之前的context. 该loop会将dispatcher queue中的所有消息进行处理, 最后退出. repaint, mousemove等都是在dispatcher queue中
即每一次迭代, 都强制启动了一个loop, 去处理所有消息队列中的消息. 这样每一次迭代, label都可以得到更新. 如果不强制启动新loop, UI线程的dispatcher都在处理for循环, 没有空闲去处理消息队列中的其他消息.

1
Dispatcher.CurrentDispatcher.BeginInvoke(DispatcherPriority.Background, new ExitFrameHandler(frm => frm.Continue = false), frame);

这一行的意思是在dispatcher queue中添加一个dispatchOperation, 该operation的作用是将DispatcherFrame的Continue属性设为false, 如此就能退出loop. 由于它的优先级是Background, 该dispatchOperation会在消息队列中的末端, 最后执行.
即处理完消息队列中的所有消息后退出loop.

下面是Winforms中对Application.DoEvents()的解释https://msdn.microsoft.com/en-us/library/system.windows.forms.application.doevents.aspx

When you run a Windows Form, it creates the new form, which then waits for events to handle. Each time the form handles an event, it processes all the code associated with that event. All other events wait in the queue. While your code handles the event, your application does not respond. For example, the window does not repaint if another window is dragged on top.

If you call DoEvents in your code, your application can handle the other events. For example, if you have a form that adds data to a ListBox and add DoEvents to your code, your form repaints when another window is dragged over it. If you remove DoEvents from your code, your form will not repaint until the click event handler of the button is finished executing. For more information on messaging, see User Input in Windows Forms.

Unlike Visual Basic 6.0, the DoEvents method does not call the Thread.Sleep method.Typically, you use this method in a loop to process messages.

不过用Application.DoEvents也会带来一些问题, 参考https://blogs.msdn.microsoft.com/jfoscoding/2005/08/06/keeping-your-ui-responsive-and-the-dangers-of-application-doevents/

其他参考:

  1. https://www.codeproject.com/Articles/152137/DispatcherFrame-Look-in-Depth

  2. https://kent-boogaart.com/blog/dispatcher-frames

WPF笔记(X1) Threading Model (二)

Posted on 2018-04-24 | In 编程

上一篇整理了Dispatcher的使用方式, 这一篇窥探一下Dispatcher的内部机制.

1
2
3
4
5
6
7
8
9
10
11
12
13
14
15
16
17
//https://msdn.microsoft.com/en-us/library/system.windows.application(v=vs.110).aspx
using System; // STAThread
using System.Windows; // Application

namespace SDKSample
{
public class AppCode : Application
{
// Entry point method
[STAThread]
public static void Main()
{
AppCode app = new AppCode();
app.Run();
}
}
}

app.Run()层层调用, 最后会到达Dispatcher.Run();

1
2
3
4
5
6
7
8
9
10
11
12
13
14
15
16
17
18
19
20
21
22
23
24
25
26
27
28
29
30
31
32
33
34
35
36
37
38
39
40
41
42
43
44
45
46
47
48
49
50
51
52
53
54
55
56
57
58
59
60
61
62
63
64
65
66
67
68
69
70
71
72
73
74
75
76
77
78
79
80
81
82
83
84
85
86
87
//Dispatcher.cs
public static void Run()
{
PushFrame(new DispatcherFrame());
}

public static void PushFrame(DispatcherFrame frame)
{
if(frame == null)
{
throw new ArgumentNullException("frame");
}

Dispatcher dispatcher = Dispatcher.CurrentDispatcher;
if(dispatcher._hasShutdownFinished) // Dispatcher thread - no lock needed for read
{
throw new InvalidOperationException(SR.Get(SRID.DispatcherHasShutdown));
}

if(frame.Dispatcher != dispatcher)
{
throw new InvalidOperationException(SR.Get(SRID.MismatchedDispatchers));
}

if(dispatcher._disableProcessingCount > 0)
{
throw new InvalidOperationException(SR.Get(SRID.DispatcherProcessingDisabled));
}

dispatcher.PushFrameImpl(frame);
}

//<SecurityNote>
// Critical - as this calls critical methods (GetMessage, TranslateMessage, DispatchMessage).
// TreatAsSafe - as the critical method is not leaked out, and not controlled by external inputs.
//</SecurityNote>
[SecurityCritical, SecurityTreatAsSafe ]
private void PushFrameImpl(DispatcherFrame frame)
{
SynchronizationContext oldSyncContext = null;
SynchronizationContext newSyncContext = null;
MSG msg = new MSG();

_frameDepth++;
try
{
// Change the CLR SynchronizationContext to be compatable with our Dispatcher.
oldSyncContext = SynchronizationContext.Current;
newSyncContext = new DispatcherSynchronizationContext(this);
SynchronizationContext.SetSynchronizationContext(newSyncContext);

try
{
while(frame.Continue)
{
if (!GetMessage(ref msg, IntPtr.Zero, 0, 0))
break;

TranslateAndDispatchMessage(ref msg);
}

// If this was the last frame to exit after a quit, we
// can now dispose the dispatcher.
if(_frameDepth == 1)
{
if(_hasShutdownStarted)
{
ShutdownImpl();
}
}
}
finally
{
// Restore the old SynchronizationContext.
SynchronizationContext.SetSynchronizationContext(oldSyncContext);
}
}
finally
{
_frameDepth--;
if(_frameDepth == 0)
{
// We have exited all frames.
_exitAllFrames = false;
}
}
}

出现了GetMessage和TranslateAndDispatchMessage, 后者将消息派发到窗口的消息处理函数中(WndProcHook)

1
2
3
4
5
6
7
8
9
10
11
12
13
14
15
16
17
18
19
20
21
22
23
24
25
26
27
//Dispatcher.cs
private IntPtr WndProcHook(IntPtr hwnd, int msg, IntPtr wParam, IntPtr lParam, ref bool handled)
{
//...
if(message == WindowMessage.WM_DESTROY)
{
if(!_hasShutdownStarted && !_hasShutdownFinished) // Dispatcher thread - no lock needed for read
{
// Aack! We are being torn down rudely! Try to
// shut the dispatcher down as nicely as we can.
ShutdownImpl();
}
}
else if(message == _msgProcessQueue)
{
ProcessQueue();
}
else if(message == WindowMessage.WM_TIMER && (int) wParam == TIMERID_BACKGROUND)
{
// This timer is just used to process background operations.
// Stop the timer so that it doesn't fire again.
SafeNativeMethods.KillTimer(new HandleRef(this, hwnd), TIMERID_BACKGROUND);

ProcessQueue();
}
//...
}

当收到的消息为_msgProcessQueue时, 调用的是ProcessQueue方法. ProcessQueue方法从DispatcherQueue里面(PriorityQueue)取出DispatcherOperation执行.

那么WndProcHook是在哪里被注册的呢? 看Dispatcher的构造方法

1
2
3
4
5
6
7
8
9
10
11
12
13
14
15
16
17
18
19
20
21
22
23
24
25
26
private Dispatcher()
{
_queue = new PriorityQueue<DispatcherOperation>();

_tlsDispatcher = this; // use TLS for ownership only
_dispatcherThread = Thread.CurrentThread;

// Add ourselves to the map of dispatchers to threads.
lock(_globalLock)
{
_dispatchers.Add(new WeakReference(this));
}

_unhandledExceptionEventArgs = new DispatcherUnhandledExceptionEventArgs(this);
_exceptionFilterEventArgs = new DispatcherUnhandledExceptionFilterEventArgs(this);

_defaultDispatcherSynchronizationContext = new DispatcherSynchronizationContext(this);

// Create the message-only window we use to receive messages
// that tell us to process the queue.
MessageOnlyHwndWrapper window = new MessageOnlyHwndWrapper();
_window = new SecurityCriticalData<MessageOnlyHwndWrapper>( window );

_hook = new HwndWrapperHook(WndProcHook);
_window.Value.AddHook(_hook);
}

_msgProcessQueue是什么时候被放入消息队列中的? 搜了一下代码, 只一处有:

1
2
3
4
5
6
7
8
9
10
11
12
13
14
15
16
17
18
19
20
21
private bool RequestForegroundProcessing()
{
if(_postedProcessingType < PROCESS_FOREGROUND)
{
// If we have already set a timer to do background processing,
// make sure we stop it before posting a message for foreground
// processing.
if(_postedProcessingType == PROCESS_BACKGROUND)
{
SafeNativeMethods.KillTimer(new HandleRef(this, _window.Value.Handle), TIMERID_BACKGROUND);
}

_postedProcessingType = PROCESS_FOREGROUND;

// We have foreground items to process.
// By posting a message, Win32 will service us fairly promptly.
return UnsafeNativeMethods.TryPostMessage(new HandleRef(this, _window.Value.Handle), _msgProcessQueue, IntPtr.Zero, IntPtr.Zero);
}

return true;
}

查找RequestForegroundProcessing被调用的过程为, InvokeAsyncImpl调用RequestProcessing, RequestProcessing调用CriticalRequestProcessing

看看InvokeAsyncImpl的实现

1
2
3
4
5
6
7
8
9
10
11
12
13
14
15
16
17
18
19
20
21
22
23
24
25
26
27
28
29
30
31
32
33
34
35
36
37
38
39
40
41
42
43
44
45
46
47
48
49
50
51
52
53
54
55
56
57
58
59
60
61
62
63
64
65
66
67
68
69
70
71
72
73
/// <SecurityNote>
/// Critical:This code causes arbitrary delegate to execute asynchronously, also calls critical code.
/// </SecurityNote>
[SecurityCritical]
private void InvokeAsyncImpl(DispatcherOperation operation, CancellationToken cancellationToken)
{
DispatcherHooks hooks = null;
bool succeeded = false;

// Could be a non-dispatcher thread, lock to read
lock(_instanceLock)
{
if (!cancellationToken.IsCancellationRequested &&
!_hasShutdownFinished &&
!Environment.HasShutdownStarted)
{
// Add the operation to the work queue
operation._item = _queue.Enqueue(operation.Priority, operation);

// Make sure we will wake up to process this operation.
succeeded = RequestProcessing();

if (succeeded)
{
// Grab the hooks to use inside the lock; but we will
// call them below, outside of the lock.
hooks = _hooks;
}
else
{
// Dequeue the item since we failed to request
// processing for it. Note we will mark it aborted
// below.
_queue.RemoveItem(operation._item);
}
}
}

if (succeeded == true)
{
// We have enqueued the operation. Register a callback
// with the cancellation token to abort the operation
// when cancellation is requested.
if(cancellationToken.CanBeCanceled)
{
CancellationTokenRegistration cancellationRegistration = cancellationToken.Register(s => ((DispatcherOperation)s).Abort(), operation);

// Revoke the cancellation when the operation is done.
operation.Aborted += (s,e) => cancellationRegistration.Dispose();
operation.Completed += (s,e) => cancellationRegistration.Dispose();
}

if(hooks != null)
{
hooks.RaiseOperationPosted(this, operation);
}

if (EventTrace.IsEnabled(EventTrace.Keyword.KeywordDispatcher | EventTrace.Keyword.KeywordPerf, EventTrace.Level.Info))
{
EventTrace.EventProvider.TraceEvent(EventTrace.Event.WClientUIContextPost, EventTrace.Keyword.KeywordDispatcher | EventTrace.Keyword.KeywordPerf, EventTrace.Level.Info, operation.Priority, operation.Name, operation.Id);
}
}
else
{
// We failed to enqueue the operation, and the caller that
// created the operation does not expose it before we return,
// so it is safe to modify the operation outside of the lock.
// Just mark the operation as aborted, which we can safely
// return to the user.
operation._status = DispatcherOperationStatus.Aborted;
operation._taskSource.SetCanceled();
}
}

先将operation加入queue, 然后调用RequestProcessing, 发出_msgProcessQueue.

1
2
3
4
5
// Add the operation to the work queue
operation._item = _queue.Enqueue(operation.Priority, operation);

// Make sure we will wake up to process this operation.
succeeded = RequestProcessing();

另一处RequestProcessing是在processQueue中调用, 假如queue中还有其他operation

1
2
// If there is more to do, request processing for it.
RequestProcessing();

以上过程, 大致可以用下面这幅图联系起来http://www.cnblogs.com/powertoolsteam/archive/2010/12/31/1922794.html#2007193

从上图可以看到Dispatcher在调用BeginInvoke之后所经历的流程.

  1. 将调用的Delegate和优先级包装成一个DispatcherOperation放入Dispatcher维护的优先级队列当中, 这个Queue是按DispatcherPriority排序的, 高优先级的DispatcherOperation先被处理

  2. 往当前线程的消息队列中Post一个名为MsgProcessQueue的Message。这个消息是WPF自己定义的,见Dispatcher的静态构造函数当中的_msgProcessQueue = UnsafeNativeMethods.RegisterWindowMessage(“DispatcherProcessQueue”); 这个消息被Post到消息队列之前,还要设置MSG.Handle,这个Handle就是Window 1#的Handle. 指定Handle是为了在消息泵派发消息的时候,指定哪个窗口的WndProc(窗口过程)处理这个消息. 在这里所有BeginInvoke引起的消息都是Window1#的窗口过程来处理的.见return UnsafeNativeMethods.TryPostMessage(new HandleRef(this, _window.Value.Handle), _msgProcessQueue, IntPtr.Zero, IntPtr.Zero);

  3. 消息泵读取消息

  4. 系统根据消息的Handle, 发现跟Window1#的Handle相同,然后将这个消息派发到Window1#的窗口过程,让其处理

  5. 在窗口过程中,调用ProcessQueue方法, 从优先级队列中取出一个优先级最高的DispatcherOperation

  6. 执行DispatcherOperation.Invoke方法. Invoke方法的核心就是调用DispatcherOperation构造时传入的Delegate, 也就是Dispatcher.BeginInvoke传入的Delegate. 最终这个Foo()方法被执行了

小结如下, 每Invoke或者BeginInvoke

  1. 放一个DispatcherOperation到PriorityQueue中
  2. 放一个_msgProcessQueue到消息队列中
  3. GetMessage从消息队列中取出_msgProcessQueue, 派发到窗口过程, 窗口过程调用ProcessQueue, 从PriorityQueue中取出DispatcherOperation, 然后执行

CSharp笔记(X1) IDisposable

Posted on 2018-04-24 | In 编程

关于IDisposable, 官方有很多很好的资料, 例如Framework Design Guidelines中的Dispose Pattern一节(https://docs.microsoft.com/en-us/dotnet/standard/design-guidelines/dispose-pattern), 还有VS2015 Code Analysis for Managed Code Warnings中给出的使用示例CA1063: Implement IDisposable correctly(https://msdn.microsoft.com/en-us/library/ms244737.aspx)等等

相关细节很多, 这里简要记录两点 1. IDisposable用来做什么. 2. IDisposable的一般用法

1.IDisposable用来做什么

IDisposable提供了一种释放非托管资源的机制(Provides a mechanism for releasing unmanaged resources). 这里重点是两个1: 释放资源 2. 非托管资源

资源有托管和非托管之分, 非托管的资源包括 a file, a database connection, a socket, a mutex, a bitmap, an icon 等等
托管的资源由garbage collection 自动回收, 非托管的资源则需要手动释放.非托管资源一般会用一个托管类包装(wrap), 例如类FileStream, SqlConnection, Socket, Mutex, Bitmap. 对于这些包含非托管资源的托管类, C#提供了IDisposable接口, 表明在该类实例结束使用时, 需要手动调用它的Dispose方法来释放非托管资源.

手动意味着遗忘, 这里要引出C#中的析构方法(destructor 或者fnalizer). 析构方法会在实例被回收之前调用. 由于托管资源(内存)会被garbage collection自动回收,
一般不需要在类中定义析构方法. 如果托管类中包含非托管资源, 为了防止没有被手动释放, 可以将Dispose方法放在析构方法中. 于是在设计Dispose方法实现的时候, 需要考虑到这两种情况: 1. 手动释放 2. 由析构方法释放. 3. 如果已经手动释放过了, 要避免再被析构方法释放.
官方有标准实现, 具体见下面.

2.IDisposable的一般用法

这里分为3点: a 怎样使用实现IDisposable接口的类, b. 怎样设计实现IDisposable的类 c. 要不要实现IDisposable接口

a.怎样使用实现IDisposable接口的类
IDisposable和using搭配使用(标准用法)

1
2
3
4
5
6
7
8
9
10
11
12
13
14
15
16
17
18
19
20
21
22
23
24
25
26
27
28
29
30
31
32
33
34
35
36
37
38
39
using (FileStream fs = new FileStream ("myFile.txt", FileMode.Open))
{
// ... Write to the file ...
}
等同于
FileStream fs = new FileStream ("myFile.txt", FileMode.Open);
try
{
// ... Write to the file ...
}
finally
{//即使有异常, 也会执行
if (fs != null) ((IDisposable)fs).Dispose();
}

不要嵌套使用using(https://msdn.microsoft.com/en-us/library/ms182334.aspx)
using (Stream stream = new FileStream("file.txt", FileMode.OpenOrCreate))
{
using (StreamWriter writer = new StreamWriter(stream))
{
// Use the writer object...
}
}
改为
Stream stream = null;
try
{
stream = new FileStream("file.txt", FileMode.OpenOrCreate);
using (StreamWriter writer = new StreamWriter(stream))
{
stream = null;
// Use the writer object...
}
}
finally
{
if(stream != null)
stream.Dispose();
}

b. 怎样实现IDisposable的Dispose方法
流程图(C#图解教程):

官方标准实现(注释最为详尽)

1
2
3
4
5
6
7
8
9
10
11
12
13
14
15
16
17
18
19
20
21
22
23
24
25
26
27
28
29
30
31
32
33
34
35
36
37
38
39
40
41
42
43
44
45
46
47
48
49
50
51
52
53
54
55
56
57
58
59
60
61
62
63
64
65
66
67
68
69
70
71
72
73
74
75
76
77
78
79
80
81
82
83
84
85
86
87
88
89
90
91
92
93
94
95
96
97
98
using System;
using System.ComponentModel;

// The following example demonstrates how to create
// a resource class that implements the IDisposable interface
// and the IDisposable.Dispose method.

public class DisposeExample
{
// A base class that implements IDisposable.
// By implementing IDisposable, you are announcing that
// instances of this type allocate scarce resources.
public class MyResource: IDisposable
{
// Pointer to an external unmanaged resource.
private IntPtr handle;
// Other managed resource this class uses.
private Component component = new Component();
// Track whether Dispose has been called.
private bool disposed = false;

// The class constructor.
public MyResource(IntPtr handle)
{
this.handle = handle;
}

// Implement IDisposable.
// Do not make this method virtual.
// A derived class should not be able to override this method.
public void Dispose()
{
Dispose(true);
// This object will be cleaned up by the Dispose method.
// Therefore, you should call GC.SupressFinalize to
// take this object off the finalization queue
// and prevent finalization code for this object
// from executing a second time.
GC.SuppressFinalize(this);
}

// Dispose(bool disposing) executes in two distinct scenarios.
// If disposing equals true, the method has been called directly
// or indirectly by a user's code. Managed and unmanaged resources
// can be disposed.
// If disposing equals false, the method has been called by the
// runtime from inside the finalizer and you should not reference
// other objects. Only unmanaged resources can be disposed.
protected virtual void Dispose(bool disposing)
{
// Check to see if Dispose has already been called.
if(!this.disposed)
{
// If disposing equals true, dispose all managed
// and unmanaged resources.
if(disposing)
{
// Dispose managed resources.
component.Dispose();
}

// Call the appropriate methods to clean up
// unmanaged resources here.
// If disposing is false,
// only the following code is executed.
CloseHandle(handle);
handle = IntPtr.Zero;

// Note disposing has been done.
disposed = true;

}
}

// Use interop to call the method necessary
// to clean up the unmanaged resource.
[System.Runtime.InteropServices.DllImport("Kernel32")]
private extern static Boolean CloseHandle(IntPtr handle);

// Use C# destructor syntax for finalization code.
// This destructor will run only if the Dispose method
// does not get called.
// It gives your base class the opportunity to finalize.
// Do not provide destructors in types derived from this class.
~MyResource()
{
// Do not re-create Dispose clean-up code here.
// Calling Dispose(false) is optimal in terms of
// readability and maintainability.
Dispose(false);
}
}
public static void Main()
{
// Insert code here to create
// and use the MyResource object.
}
}

另外可以再加一个字段:
public bool IsDisposed { get; private set; }
如果该类被Dispose后还被调用该类的其他方法, 则抛出异常

区别Close和Dispose, Close方法不一定等同于Dispose. 可以再定义一个Close方法

c.要不要实现IDisposable接口

1) 假如该类包含了Socket, Bitmap, FileStream等实现了IDisposable接口的类, 那么该类也需要实现IDisposable接口
2) 假如该类的子类有可能用到非托管资源, 那么该类也实现IDisposable接口. 例如Stream类. 需要注意的是, 它的其中一个子类MemoryStream没有用到非托管资源, 但也实现了Dispose方法. 这是网上讨论的IDisposable接口污染问题. 详见https://www.zhihu.com/question/51592470

另外: IDisposable最初是用来释放非托管资源的, 但现在也有其他的用法, 例如Reactive Extention中的用法 https://msdn.microsoft.com/en-us/library/dd782981(v=vs.110).aspx

WPF笔记(X1) Threading Model (一)

Posted on 2018-04-24 | In 编程

学习官方MSDN的文档https://docs.microsoft.com/en-us/dotnet/framework/wpf/advanced/threading-model

wpf程序默认有2个线程: Render线程和UI线程. Render线程运行在后台, 负责wpf的绘制. UI线程负责接收用户输入, 处理事件监听, 重绘屏幕(Repaint事件), 还有运行wpf程序的逻辑代码. 大多数wpf程序只需要一个UI线程即可, 少数应用场景需要多个UI线程.

UI线程将需要处理的任务以”work item”的方式放到队列中, 然后根据work item的优先级从队列中取出执行, 执行完毕后再取出下一个work item, 循环往复. 这部分功能是封装在一个叫 Dispatcher的对象中. 每个UI线程至少有一个Dispatcher, 每个Dispatcher只在一个线程中执行work item. 什么样的work item呢? 可以见下图左边部分

可以看到, 用户逻辑代码和系统消息处理都是在dispatcher queue当中. 为了保持UI的及时响应. 用户逻辑代码和系统消息处理都不应该是耗时的操作. 否则UI就会失去响应. 对于那些耗时的操作, 例如复杂计算(long runing)或者远程数据查询(blocking), 可以启动work Thread执行. 当耗时操作完成时, 再通知UI线程去更新显示.

而对于UI元素, Windows系统只允许构建该UI元素的线程才能访问, 其他线程不能访问(thread affinity) . 这样做是为了确保UI元素的完整性, 可以想象一个listbox, 绘制的同时, 它的内容也在被其他线程更改, 这样就会显得很奇怪.

那work Thread怎么将执行的结果告知给UI线程呢? 它是将”更新”的操作封装成一个work item, 放到dispatcher的队列中. dispatcher提供了2种放的方式: Invoke 和 BeginInvoke. 前者是同步的, 放了之后要执行完才能返回. 后者是异步的, 放了之后, 立马返回.

那么如何得知该对象是否只能由UI线程访问呢? 看它的基类. wpf中大部分类都继承自DispatcherObject. 例如 Brush和Geometry都是继承DispatcherObject, 其他线程不能访问. 而*Color类不是, 其他线程可以访问. DispatcherObject对象会保存创建它的线程的Dispatcher引用, 并且在每一个DispatcherObject的方法调用之前, 会通过VerifyAccess方法验证当前线程的Dispatcher对象与它保存的Dispatcher引用是否一致. 如果不一致,则抛出异常.

以上就是wpf线程模型的概要. 下面是几个样例(位于wpf-sample的Threading目录中)

  1. 远程查询
  2. 利用UI程序的idle时间执行耗时操作
  3. 多个UI线程

1. 远程查询
这个例子是使用dispatcher最常见的那种情况: 后台线程通过dispatcher.BeginInvoke将更新操作委托给UI线程

UsingDispatcher样例

1
2
3
4
5
6
7
8
9
10
11
12
13
14
15
16
17
18
19
20
21
22
23
24

// Start fetching the weather forecast asynchronously.
var fetcher = new NoArgDelegate(
FetchWeatherFromServer);

fetcher.BeginInvoke(null, null);//异步委托,实际是起一个线程

private void FetchWeatherFromServer()//该方法是在非UI线程中执行
{
// Simulate the delay from network access.
Thread.Sleep(4000);

// Tried and true method for weather forecasting - random numbers.
var rand = new Random();
string weather;

weather = rand.Next(2) == 0 ? "rainy" : "sunny";

// Schedule the update function in the UI thread. 注意这里用到Schedule
tomorrowsWeather.Dispatcher.BeginInvoke(//wpf元素的Dispatcher可以在非UI线程中获取,但不能访问其他东西
DispatcherPriority.Normal,
new OneArgDelegate(UpdateUserInterface),
weather);
}

2. 利用UI程序的idle时间执行耗时操作

这个例子演示了即使是单个UI线程, 也可以在保持UI响应的同时, 做一些耗时的操作. 关键是利用好UI线程idle的时间. 就是前面用到的图:

SingleThreadedApplication样例

1
2
3
4
5
6
7
8
9
10
11
12
13
14
15
16
17
18
19
20
21
22
23
24
25
26
27
28
29
30
31
32
33
34
35
36
37
38
39
40
41
42
43
44
45
46
47
48
49
50
51
52
53
54
55
56
57
58
59
60
61
62
    public void CheckNextNumber()
{
if (_continueCalculating)
{
startStopButton.Dispatcher.BeginInvoke(
DispatcherPriority.SystemIdle,
new NextPrimeDelegate(CheckNextNumber));
}

通过这种方式,可以多次调度CheckNextNumber方法

private void StartOrStop(object sender, EventArgs e)
{
if (_continueCalculating)
{
_continueCalculating = false;
startStopButton.Content = "Resume";
}
else
{
_continueCalculating = true;
startStopButton.Content = "Stop";
startStopButton.Dispatcher.BeginInvoke(
DispatcherPriority.Normal,
new NextPrimeDelegate(CheckNextNumber));
}
}

public void CheckNextNumber()
{
var x = new Stopwatch();
x.Start();

// Reset flag.
_notAPrime = false;

for (long i = 3; i <= Math.Sqrt(_num); i++)
{
if (_num%i == 0)
{
// Set not a prime flag to ture.
_notAPrime = true;
break;
}
}

// If a prime number.
if (!_notAPrime)
{
x.Stop();
elapsed.Text = x.ElapsedMilliseconds.ToString();
bigPrime.Text = _num.ToString();
}

_num += 2;
if (_continueCalculating)
{
startStopButton.Dispatcher.BeginInvoke(
DispatcherPriority.SystemIdle,
new NextPrimeDelegate(CheckNextNumber));
}
}

3. 多个UI线程

MultiThreadingWebBrowser

1
2
3
4
5
6
7
8
9
10
11
12
13
14
15
16
    private void NewWindowHandler(object sender, RoutedEventArgs e)
{
var newWindowThread = new Thread(ThreadStartingPoint);
newWindowThread.SetApartmentState(ApartmentState.STA);
newWindowThread.IsBackground = true;
newWindowThread.Start();
}

private void ThreadStartingPoint()
{
var tempWindow = new MainWindow();
tempWindow.Show();
Dispatcher.Run();
}

这一样例在Multiple UI Threads and Dispatchers 一节中讲到(Programming WPF)

Each thread that hosts UI objects needs a dispatcher in order for those UI objects to function. In a single-threaded application, you don’t need to do anything special to create a dispatcher. The Application class creates one for you at startup, and shuts it down automatically on exit.

However, if you create multiple user interface threads, you will need to start up and shut down the dispatcher for those manually

The Dispatcher for a thread is created automatically the first time an object derived from the DispatcherObject base class is created. All WPF classes derive from this base class. So, the Dispatcher for the new thread will come into existence when the Window is created. All we have to do is call the static Dispatcher.Run method to ensure that messages are delivered to any UI objects created on the thread.

大多数情况下,我们是不需要多UI线程的,所谓多UI线程,就是指有两个或者两个以上的线程创建了UI对象。这种做法的好处是两个UI线程会分别进入各自的GetMessage循环,如果是需要多个监视实时数据的UI,或者说使用了DirectShow一些事件密集的程序,可以考虑新创建一个UI线程(GetMessage循环)来减轻单一消息泵的压力。当然,这样做的坏处也很多,不同UI线程中的UI对象互相访问是需要进行Invoke通信的,为了解决这个问题,WPF提供了VisualTarget来用于跨线程将一个对象树连接到另一个对象树,如:

1
2
3
4
5
6
7
8
9
10
11
12
13
14
15
16
17
18
19
20
21
22
23
24
25
26
27
28
29
30
public class VisualHost : FrameworkElement
{
public Visual Child
{
get { return _child; }
set
{
if (_child != null)
RemoveVisualChild(_child);
_child = value;
if (_child != null)
AddVisualChild(_child);
}
}

protected override Visual GetVisualChild(int index)
{
if (_child != null && index == 0)
return _child;
else
throw new ArgumentOutOfRangeException("index");
}

protected override int VisualChildrenCount
{
get { return _child != null ? 1 : 0; }
}

private Visual _child;
}

在另一个UI线程下的VisualTarget

1
2
3
4
5
6
7
8
9
10
11
12
13
14
15
16
17
18
19
20
21
22
23
24
25
26
27
28
29
30
31
32
33
34
Window win = new Window();

win.Loaded += (s, ex) =>
{
VisualHost vh = new VisualHost();
HostVisual hostVisual = new HostVisual();
vh.Child = hostVisual;
win.Content = vh;
Thread thread = new Thread(new ThreadStart(() =>
{
VisualTarget visualTarget = new VisualTarget(hostVisual);
DrawingVisual dv = new DrawingVisual();

using (var dc = dv.RenderOpen())
{
dc.DrawText(new FormattedText("UI from another UI thread",
System.Globalization.CultureInfo.GetCultureInfo("en-us"),
FlowDirection.LeftToRight,
new Typeface("Verdana"),
32,
Brushes.Black), new Point(10, 0));
}

visualTarget.RootVisual = dv;
Dispatcher.Run(); //启动Dispatcher

}));

thread.SetApartmentState(ApartmentState.STA);
thread.IsBackground = true;
thread.Start();
};

win.Show();

P&P笔记(X1) Exception Handle (三)

Posted on 2018-04-22 | In 编程

这一篇主要整理WPF中的异常处理.

WPF中的异常处理

类似于Task中对unobserved exception的处理, WPF中有Application.DispatcherUnhandledException事件监听那些unhandled exception. 关于这点, 官方链接提供了最重要的信息https://msdn.microsoft.com/en-us/library/system.windows.application.dispatcherunhandledexception(v=vs.110).aspx

By default, Windows Presentation Foundation (WPF) catches unhandled exceptions, notifies users of the exception from a dialog box (from which they can report the exception), and automatically shuts down an application.

However, if an application needs to perform custom unhandled exception processing from a centralized location, you should handle DispatcherUnhandledException.

DispatcherUnhandledException is raised by an Application for each exception that is unhandled by code running on the main UI thread.

If an exception is not handled on either a background user interface (UI) thread (a thread with its own Dispatcher) or a background worker thread (a thread without a Dispatcher), the exception is not forwarded to the main UI thread. Consequently, DispatcherUnhandledException is not raised. In these circumstances, you will need to write code to do the following:

  1. Handle exceptions on the background thread.

  2. Dispatch those exceptions to the main UI thread.

  3. Rethrow them on the main UI thread without handling them to allow DispatcherUnhandledException to be raised.

先看background worker thread中抛出异常的捕获

1
2
3
4
5
6
7
8
9
10
11
12
13
14
15
16
17
18
19
20
21
22
23
24
25
26
27
28
29
30
31
32
33
34
35
36
37
38
39
40
41
42
43
44
45
46
47
48
49
50
51
52
53
54
55
56
57
public partial class MainWindow : Window
{
public MainWindow()
{
InitializeComponent();

Title = $"Running on Main UI Thread {Thread.CurrentThread.ManagedThreadId}";
}

private void startSecondaryWorkerThreadButton_Click(object sender, RoutedEventArgs e)
{
// Creates and starts a secondary thread in a single threaded apartment (STA)
var thread = new Thread(MethodRunningOnSecondaryWorkerThread);
thread.SetApartmentState(ApartmentState.STA);
thread.IsBackground = true;
thread.Start();
}

// THIS METHOD RUNS ON A SECONDARY WORKER THREAD (THREAD WITHOUT A DISPATCHER)
private void MethodRunningOnSecondaryWorkerThread()
{
try
{
WorkerMethod();
}
catch (Exception ex)
{
// Dispatch the exception back to the main UI thread. Then, reraise
// the exception on the main UI thread and handle it from the handler
// the Application object's DispatcherUnhandledException event.
// 注意这里是Invoke和Send, 表示同步执行
var secondaryWorkerThreadId = Thread.CurrentThread.ManagedThreadId;
Application.Current.Dispatcher.Invoke(
DispatcherPriority.Send,
(DispatcherOperationCallback) delegate
{
// THIS CODE RUNS BACK ON THE MAIN UI THREAD
string msg = $"Exception forwarded from secondary worker thread {secondaryWorkerThreadId}.";
throw new Exception(msg, ex);
}
, null);

// NOTE - Application execution will only continue from this point
// onwards if the exception was handled on the main UI thread.
// by Application.DispatcherUnhandledException
}
}

private void WorkerMethod()
{
// This method would do real processing on the secondary worker thread.
// For the purposes of this sample, it throws an exception
string msg =
$"Exception raised secondary on worker thread {Dispatcher.CurrentDispatcher.Thread.ManagedThreadId}.";
throw new Exception(msg);
}
}

再来看看对background ui thread中抛出异常的捕获, 从中也可以学习如何启动一个ui thread

1
2
3
4
5
6
7
8
9
10
11
12
13
14
15
16
17
18
19
20
21
22
23
24
25
26
27
28
29
30
31
32
33
34
35
36
37
38
39
40
41
42
43
44
45
46
47
48
49
50
51
52
53
54
55
56
57
58
59
60
61
62
63
64
65
66
67
68
69
70
71
public partial class MainWindow : Window
{
public MainWindow()
{
InitializeComponent();
Title = $"Running on Main UI Thread {Thread.CurrentThread.ManagedThreadId}";
}

// THIS EVENT HANDLER RUNS ON THE MAIN UI THREAD
private void startSecondaryUIThreadButton_Click(object sender, RoutedEventArgs e)
{
// Creates and starts a secondary thread in a single threaded apartment (STA)
var thread = new Thread(MethodRunningOnSecondaryUIThread);
thread.SetApartmentState(ApartmentState.STA);
thread.IsBackground = true;
thread.Start();
}

// THIS METHOD RUNS ON A SECONDARY UI THREAD (THREAD WITH A DISPATCHER)
private void MethodRunningOnSecondaryUIThread()
{
var secondaryUiThreadId = Thread.CurrentThread.ManagedThreadId;
try
{
// On secondary thread, show a new Window before starting a new Dispatcher
// ie turn secondary thread into a UI thread
var window = new SecondaryUIThreadWindow();
window.Show();
Dispatcher.Run();
}
catch (Exception ex)
{
// Dispatch the exception back to the main ui thread and reraise it
Application.Current.Dispatcher.Invoke(
DispatcherPriority.Send,
(DispatcherOperationCallback) delegate
{
// THIS CODE RUNS BACK ON THE MAIN UI THREAD
string msg = $"Exception forwarded from secondary UI thread {secondaryUiThreadId}.";
throw new Exception(msg, ex);
}
, null);

// NOTE - Application execution will only continue from this point
// onwards if the exception was handled on the main UI thread
// by Application.DispatcherUnhandledException
}
}
}

public partial class SecondaryUIThreadWindow : Window
{
public SecondaryUIThreadWindow()
{
InitializeComponent();
Title = $"Running on Secondary UI Thread {Thread.CurrentThread.ManagedThreadId}";
}

private void raiseExceptionOnSecondaryUIThreadButton_Click(object sender, RoutedEventArgs e)
{
// Raise an exception on the secondary UI thread
string msg = $"Exception raised on secondary UI thread {Dispatcher.Thread.ManagedThreadId}.";
throw new Exception(msg);
}

private void SecondaryUiThreadWindow_Closed(object sender, EventArgs e)
{
// End this thread of execution
Dispatcher.InvokeShutdown();
}
}

The DispatcherUnhandledException event handler is passed a DispatcherUnhandledExceptionEventArgs argument that contains contextual information regarding the exception, including: 1.The exception (Exception). 2.The Dispatcher from which it originated (Dispatcher).

You can use this information to determine whether an exception is recoverable or not. A recoverable exception might be a FileNotFoundException, for example, while an unrecoverable exception might be a StackOverflowException, for example.

When you process an unhandled exception from DispatcherUnhandledException, and you don’t want WPF to continue processing it, you need to set the Handled property to true.

例如:

1
2
3
4
5
6
7
8
9
10
11
12
13
14
15
16
17
18
19
20
21
22
23
24
25
26
27
28
29
30
31
32
33
34
35
36
37
38
39
40
41
42
43
44
45
46
47
48
49
50
51
52
53
54
55
56
57
58
public partial class MainWindow : Window
{
public MainWindow()
{
InitializeComponent();
}

private void raiseRecoverableException_Click(object sender, RoutedEventArgs e)
{
throw new DivideByZeroException("Recoverable Exception");
}

private void raiseUnecoverableException_Click(object sender, RoutedEventArgs e)
{
throw new ArgumentNullException(@"Unrecoverable Exception");
}
}
public partial class App : Application
{
private void App_DispatcherUnhandledException(object sender, DispatcherUnhandledExceptionEventArgs e)
{
// Process unhandled exception
var shutdown = false;

// Process exception
if (e.Exception is DivideByZeroException)
{
// Recoverable - continue processing
shutdown = false;
}
else if (e.Exception is ArgumentNullException)
{
// Unrecoverable - end processing
shutdown = true;
}

if (shutdown)
{
// If unrecoverable, attempt to save data
var result =
MessageBox.Show("Application must exit:\n\n" + e.Exception.Message + "\n\nSave before exit?", "app",
MessageBoxButton.YesNo, MessageBoxImage.Error);
if (result == MessageBoxResult.Yes)
{
// Save data
}

// Add entry to event log
EventLog.WriteEntry("app", "Unrecoverable Exception: " + e.Exception.Message, EventLogEntryType.Error);

// Return exit code
Shutdown(-1);
}

// Prevent default unhandled exception processing
e.Handled = true;
}
}

以上示例代码来自WPFSample(https://github.com/Microsoft/WPF-Samples)

其他参考:

  1. Handling Unhandled Exceptions in WPF (The most complete collection of handlers)
    (https://code.msdn.microsoft.com/windowsdesktop/Handling-Unhandled-47492d0b)

  2. Order in Chaos: Handling unhandled exceptions in a WPF application
    (https://dzone.com/articles/order-chaos-handling-unhandled)

  3. Unhandled Exception Handler For WPF Applications(https://www.codeproject.com/articles/90866/unhandled-exception-handler-for-wpf-applications)

123…7

zmapleaf

67 posts
2 categories
11 tags
© 2020 zmapleaf
Powered by Hexo
|
Theme — NexT.Mist v5.1.4