远


  • Home

  • About

  • Tags

  • Categories

  • Archives

MonoGame笔记(X1)Camera2D

Posted on 2017-12-21 | In 编程

以前学习时一些零散的笔记, 新开一个系列.

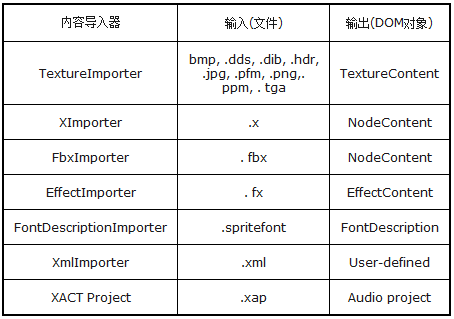
不管是side-scrolling(横版卷轴),还是tilemap,有一点是非常关键的,就是不同坐标系之间的变换。在三维中有一个视口变换。二维没有那么复杂,但原理差不多。Hero和地图上的tile(贴片),它们的位置是地图坐标,地图就是它们所在的世界,所以也可以说是世界坐标。在游戏逻辑中,Hero位置的改变,碰撞检测都是以地图坐标(世界坐标)进行的. 而在窗口屏幕中绘制Sprite和tile时,是以屏幕坐标为参照系的。因此在Draw方法中,必须将Hero和tile的地图坐标变换成屏幕坐标,从而在屏幕的适当位置显示出来。

1
2
3
4
5
6
7
8
9
10
11
12
13
14
15
16
17
18
19
20
21
22
23
24
25
26
protected override void Update(GameTime gameTime)  
{
// Allows the game to exit
if (GamePad.GetState(PlayerIndex.One).Buttons.Back == ButtonState.Pressed)
this.Exit();

float elapsedTime = (float)gameTime.ElapsedGameTime.TotalSeconds;
float moveRate = 20f;
if (hero!= null)
{
scroll += ((hero.Position - new Vector2(screenSize.X / 2f, screenSize.Y / 2f)) - scroll) * elapsedTime * moveRate;

float xLim = map.GetXLim();
float yLim = map.GetYLim();

if (scroll.X < 0f) scroll.X = 0f;
else if (scroll.X > xLim) scroll.X = xLim;
if (scroll.Y < 0f) scroll.Y = 0f;
else if (scroll.Y > yLim) scroll.Y = yLim;

hero.DoInput();
hero.Update(gameTime);
}

base.Update(gameTime);
}

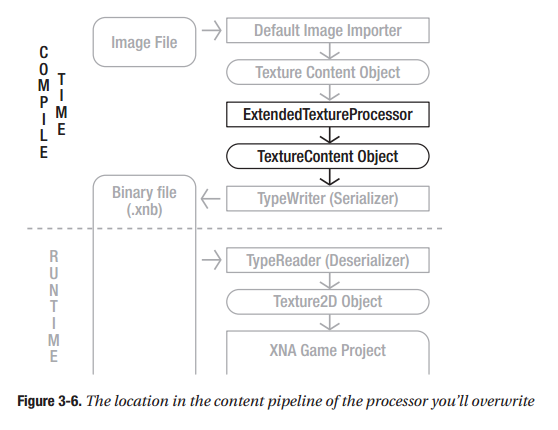
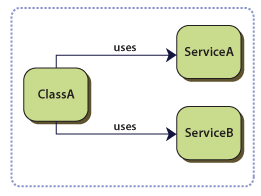
scroll表示游戏窗口与世界地图的相对位置, hero.Position表示hero的地图坐标, 如下图所示:

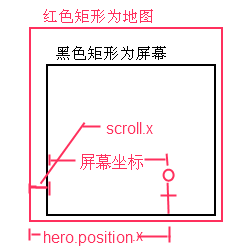
上面这段代码想要解决的一个设计场景是这样的: 以横版卷轴为例, 一开始屏幕位于地图最左侧, 此时Hero从屏幕左侧出生, 随后Hero往右移动. 当Hero未达到屏幕中间时, 屏幕是不会移动的. 当Hero达到屏幕中间, 此后屏幕和Hero一起往右移动, Hero始终占据屏幕的中心位置. 当屏幕达到地图最右侧时, 屏幕不再和Hero一起往右移动, Hero可以单独继续往右移动, 直到达到屏幕最右侧.

上面代码的关键是

1
scroll += ((hero.Position - new Vector2(screenSize.X / 2f, screenSize.Y / 2f)) - scroll)

当未达到屏幕中间时, scroll会是一个负值, 如果是负值就会被重置为0, 屏幕停留在地图最左侧. 同理, 超出地图右侧.

1
if (scroll.X < 0f) scroll.X = 0f;

那为什么要减去scroll呢?因为new Vector2(screenSize.X / 2f, screenSize.Y / 2f)是一个固定值,而hero.Position是一个不断变大的过程(往右移动), 假设前一帧移动后,hero.Position.x - screenSize.X = 10;这一帧移动后,hero.Position.x - screenSize.X = 20, 改变的是绝对值. 为了让不同性能的机子都能够流畅运行, scroll.x是以增量的形式增加的(scroll += ***), 即相对值. 因此需要减去原来的scroll得到一个增量,再将这个增量加回到scroll上.

这部分代码可以抽象出一个Camera2D类. scroll就是Camera2D的地图坐标, 屏幕大小就是Camera2D的ViewPort

1
2
3
4
5
6
7
8
9
10
11
12
13
14
15
16
17
18
19
20
21
22
23
24
25
26
27
28
29
30
31
32
33
34
35
36
37
38
39
40
41
42
43
44
45
46
47
48
49
50
51
52
public class Camera2D
{
public Vector2 position;//世界坐标
public Viewport viewPort;

public Camera2D(Vector2 position)
{
this.position = position;
}

public Camera2D()
{
this.position = Vector2.Zero;
}

public Camera2D(Viewport viewPort)
{
this.viewPort = viewPort;
this.position = Vector2.Zero;
}

public Matrix TransformMatrix
{
get
{
return Matrix.CreateTranslation(new Vector3(-position, 0f));
}
}

// 一般情况下, 使得Hero位于屏幕中间
public void LockCameraToPlayer(PlayerPosition playerPostion, Hero hero)
{
// Hero本身使用的sprite图片也有大小, 加上Center.X;
position.X = playerPostion.Position.X + hero.Center.X
- (viewPort.Width / 2);
position.Y = playerPostion.Position.Y + hero.Center.Y
- (viewPort.Height / 2);
}

public void LockCameraToBound()
{
/*position就是Camera的左上角位置,用viewport的坐标应该也能代替*/
position.X = MathHelper.Clamp(
position.X,
0,
TileEngine.tilemap.WidthInPixels - viewPort.Width);
position.Y = MathHelper.Clamp(
position.Y,
0,
TileEngine.tilemap.HeightInPixels - viewPort.Height);
}
}


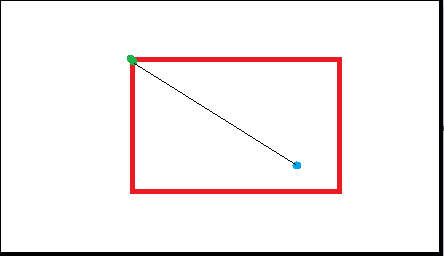
红色是视口,黑色是世界地图; 绿点是相机的Position(世界坐标); 蓝点是物体的Position(世界坐标)

官方有一个Camera2D的样例(http://xbox.create.msdn.com/en-US/education/catalog/sample/tiled_sprites), 支持rotation和zoom, 结构和上面介绍的有所不同

Although a game level might have tens of thousands of tiles in the game world, only those that are visible should be drawn. Otherwise, you see a severe performance hit for submitting more draw calls than are needed to render the scene.

To simplify interactions with the tiles in the game world, the sample provides a 2D Camera implementation. You will find a camera abstraction useful, particularly when rotating or zooming the world. This enables you to rapidly translate screen space to world space.

1
2
3
4
5
6
7
8
9
10
11
12
13
14
15
16
17
18
19
20
21
22
23
24
25
26
27
28
29
30
31
32
33
34
35
36
37
38
39
40
41
42
43
44
45
46
47
48
49
50
51
52
53
54
55
56
57
58
59
60
61
62
63
64
65
66
67
68
69
70
71
72
73
74
75
76
77
78
79
80
81
82
83
84
85
86
87
88
89
90
91
92
93
94
95
96
97
98
99
100
101
102
103
104
105
106
107
108
109
110
111
112
113
114
115
116
117
118
119
120
121
122
123
124
125
126
127
128
129
130
namespace TiledSprites
{
public class Camera2D
{
#region Fields
private Vector2 positionValue;
private bool isMovingUsingScreenAxis;
private float rotationValue;
private float zoomValue;
private bool cameraChanged;
#endregion

#region Public Properties
/// <summary>
/// Get/Set the postion value of the camera
/// </summary>
public Vector2 Position
{
set
{
if (positionValue != value)
{
cameraChanged = true;
positionValue = value;
}
}
get { return positionValue; }
}

/// <summary>
/// Get/Set the rotation value of the camera
/// </summary>
public float Rotation
{
//...同上
}

/// <summary>
/// Get/Set the zoom value of the camera
/// </summary>
public float Zoom
{
//...同上
}

/// <summary>
/// Gets whether or not the camera has been changed since the last
/// ResetChanged call
/// </summary>
public bool IsChanged
{
get { return cameraChanged; }
}

/// <summary>
/// Set to TRUE to pan relative to the screen axis when
/// the camera is rotated.
/// </summary>
public bool MoveUsingScreenAxis
{
set { isMovingUsingScreenAxis = value; }
get { return isMovingUsingScreenAxis; }
}
#endregion

#region Constructor
/// <summary>
/// Create a new Camera2D
/// </summary>
public Camera2D()
{
zoomValue = 1.0f;
rotationValue = 0.0f;
positionValue = Vector2.Zero;
}
#endregion

#region Movement Methods

/// <summary>
/// Used to inform the camera that new values are updated by the application.
/// </summary>
public void ResetChanged()
{
cameraChanged = false;
}

/// <summary>
/// Pan in the right direction. Corrects for rotation if specified.
/// </summary>
public void MoveRight(ref float dist)
{
if (dist != 0)
{
cameraChanged = true;
if (isMovingUsingScreenAxis)
{
positionValue.X += (float)Math.Cos(-rotationValue) * dist;
positionValue.Y += (float)Math.Sin(-rotationValue) * dist;
}
else
{
positionValue.X += dist;
}
}
}
/// <summary>
/// Pan in the left direction. Corrects for rotation if specified.
/// </summary>
public void MoveLeft(ref float dist)
{
//...
}
/// <summary>
/// Pan in the up direction. Corrects for rotation if specified.
/// </summary>
public void MoveUp(ref float dist)
{
//...
}
/// <summary>
/// Pan in the down direction. Corrects for rotation if specified.
/// </summary>
public void MoveDown(ref float dist)
{
//...
}
#endregion
}
}

使用

1
2
3
4
5
6
7
8
9
10
11
12
13
14
15
16
17
18
19
20
21
22
23
24
25
26
27
28
29
30
31
32
33
34
35
36
37
38
39
40
41
42
43
44
45
46
47
48
49
50
51
52
53
54
55
56
57
58
59
60
61
62
63
64
65
66
67
68
protected override void Update(GameTime gameTime)
{
//...
HandleGamePadInput((float)gameTime.ElapsedGameTime.TotalSeconds);

if (camera.IsChanged)
{
CameraChanged();
}
//...
}
public void HandleKeyboardInput(float elapsed)
{
//check for camera movement
float dX = ReadKeyboardAxis(currentKeyboardState, Keys.Left, Keys.Right) *
elapsed * MovementRate;
float dY = ReadKeyboardAxis(currentKeyboardState, Keys.Down, Keys.Up) *
elapsed * MovementRate;
camera.MoveRight(ref dX);
camera.MoveUp(ref dY);
//...
}

/// <summary>
/// This function is called when the camera's values have changed
/// and is used to update the properties of the tiles and animated sprite
/// </summary>
public void CameraChanged()
{
//set rotation
groundLayer.CameraRotation = detailLayer.CameraRotation =
cloudLayer.CameraRotation = rockLayer.CameraRotation =
animatedSprite.Rotation = camera.Rotation;

//set zoom
groundLayer.CameraZoom = detailLayer.CameraZoom =
rockLayer.CameraZoom = camera.Zoom;
animatedSprite.ScaleValue = animatedSpriteScale * camera.Zoom;
cloudLayer.CameraZoom = camera.Zoom + 1.0f;

//set position
groundLayer.CameraPosition = camera.Position;
detailLayer.CameraPosition = camera.Position;
rockLayer.CameraPosition = camera.Position;
//to acheive a paralax effect(视差效果), scale down cloud movement
cloudLayer.CameraPosition = camera.Position / 3.0f;

//...
}

/// <summary>
/// This is called when the game should draw itself.
/// </summary>
/// <param name="gameTime">Provides a snapshot of timing values.</param>
protected override void Draw(GameTime gameTime)
{
//...
groundLayer.Draw(spriteBatch);
detailLayer.Draw(spriteBatch);
rockLayer.Draw(spriteBatch);

animatedSprite.Draw(spriteBatch, Color.AntiqueWhite,
SpriteBlendMode.AlphaBlend);

//draw the clouds
cloudLayer.Draw(spriteBatch);
base.Draw(gameTime);
}

MonoGame笔记(十五)XML in the Content Pipeline

Posted on 2017-12-20 | In 编程

之前几篇笔记都是以图形资源为例, 对于游戏程序员来说, 可能打交道更多的资源文件是配置文件或者说数据文件. 而XML一般是配置文件的首选, 无论在MonoGame, 还是Flash, 抑或Unity3D. 官方对XML在Content Pipeline中的介绍如下(https://msdn.microsoft.com/en-us/library/ff604981.aspx)

Game assets managed through the Content Pipeline include graphic items such as textures, models and meshes; sound files such as dialogue or music; and custom data that governs the behavior of the game.

Data tables, for example, are custom data that might describe different characters’ attributes or the features of each level in the game. The content and format of this data is specific to the requirements of the game. Custom game data in the form of an XML file also can be loaded into your game through the standard features of the Content Pipeline.

When the Content Pipeline is used, the game does not have to parse the XML format in which the game data is originally stored. Data loaded by the game through ContentManager is read in deserialized form directly into a managed code object.

上面的介绍还是有些抽象. 看看官方的样例RolePlayingGameStarterkit中是怎么做的.
下图是英雄和NPC的数据配置

以QuestNPCs目录下的Ayttas.xml为例

1
2
3
4
5
6
7
8
9
10
11
12
13
14
15
<?xml version="1.0" encoding="utf-8" ?>
<XnaContent>
<Asset Type="RolePlayingGameData.QuestNpc">
<Name>Ayttas</Name>
<MapSprite>
<TextureName>Characters\Villager2IdleRight</TextureName>
<FrameDimensions>92 120</FrameDimensions>
<FramesPerRow>6</FramesPerRow>
<SourceOffset>46 89</SourceOffset>
<Animations />
</MapSprite>
<MapIdleAnimationInterval>150</MapIdleAnimationInterval>
<IntroductionDialogue>Welcome to Apple Village! Unfortunately, we're not in the best of shape right now because of these monstrosities. But enjoy your stay anyway! What choice is there, after all?</IntroductionDialogue>
</Asset>
</XnaContent>

其中和标签很关键, 前者表示该XML是一个Content, 后者表面是以哪个类去用该XML. 有了后者, 就可以用content.Load(@”Ayttas”);

使用内置的XMLImporter作为Content Pipeline中的导入器

XML中也可以是集合数据

1
2
3
4
5
6
7
8
9
10
11
12
13
14
15
16
17
18
19
20
21
22
23
<?xml version="1.0" encoding="utf-8" ?>
<XnaContent>
<Asset Type="System.Collections.Generic.List[XmlContentSampleShared.Sprite]">
<Item>
<Position>100 100</Position>
<Rotation>0</Rotation>
<Scale>.2 .2</Scale>
<TextureAsset>crate</TextureAsset>
</Item>
<Item>
<Position>400 300</Position>
<Rotation>0</Rotation>
<Scale>.2 .2</Scale>
<TextureAsset>crate</TextureAsset>
</Item>
<Item>
<Position>500 20</Position>
<Rotation>0</Rotation>
<Scale>.2 .2</Scale>
<TextureAsset>crate</TextureAsset>
</Item>
</Asset>
</XnaContent

使用sprites = Content.Load<List>(@”SpriteList”);

XNA是如何做到的? 其实XNA的Content Pipeline对XML有特殊照顾.

1
2
3
4
5
6
7
8
9
10
11
12
13
14
15
16
17
18
19
20
21
22
23
24
25
26
27
28
29
30
// MonoGame - Copyright (C) The MonoGame Team
// This file is subject to the terms and conditions defined in
// file 'LICENSE.txt', which is part of this source code package.

using System.Xml;
using Microsoft.Xna.Framework.Content.Pipeline.Serialization.Intermediate;

namespace Microsoft.Xna.Framework.Content.Pipeline
{
/// <summary>
/// Implements an importer for reading intermediate XML files. This is a wrapper around IntermediateSerializer.
/// </summary>
[ContentImporter(".xml", DisplayName = "Xml Importer - MonoGame", DefaultProcessor = "PassThroughProcessor")]
public class XmlImporter : ContentImporter<object>
{
/// <summary>
/// Called by the XNA Framework when importing an intermediate file to be used as a game
/// asset. This is the method called by the XNA Framework when an asset is to be imported
/// into an object that can be recognized by the Content Pipeline.
/// </summary>
/// <param name="filename">Name of a game asset file.</param>
/// <param name="context">Contains information for importing a game asset, such as a logger interface.</param>
/// <returns>The imported game asset.</returns>
public override object Import(string filename, ContentImporterContext context)
{
using (var reader = XmlReader.Create(filename))
return IntermediateSerializer.Deserialize<object>(reader, filename);
}
}
}

XmlImporter只是对IntermediateSerializer的一个简单封装. 关键在于IntermediateSerializer

Provides methods for reading and writing XNA intermediate XML format.
上面那种带标签的xml格式, 也叫做XNA intermediate XML format

1
2
3
4
5
6
7
8
9
10
11
12
13
14
15
16
17
18
19
20
21
22
23
24
25
26
27
28
29
30
31
32
33
34
35
36
37
38
39
40
41
42
43
44
45
46
47
48
49
50
namespace Microsoft.Xna.Framework.Content.Pipeline.Serialization.Intermediate
{
// The intermediate serializer implementation is based on testing XNA behavior and the following sources:
//
// http://msdn.microsoft.com/en-us/library/Microsoft.Xna.Framework.Content.Pipeline.Serialization.Intermediate.aspx
// http://blogs.msdn.com/b/shawnhar/archive/2008/08/12/everything-you-ever-wanted-to-know-about-intermediateserializer.aspx
// http://blogs.msdn.com/b/shawnhar/archive/2008/08/26/customizing-intermediateserializer-part-1.aspx
// http://blogs.msdn.com/b/shawnhar/archive/2008/08/26/customizing-intermediateserializer-part-2.aspx
// http://blogs.msdn.com/b/shawnhar/archive/2008/08/27/why-intermediateserializer-control-attributes-are-not-part-of-the-content-pipeline.aspx
public class IntermediateSerializer
{
public static T Deserialize<T>(XmlReader input, string referenceRelocationPath)
{
var serializer = new IntermediateSerializer();
var reader = new IntermediateReader(serializer, input, referenceRelocationPath);
var asset = default(T);

try
{
if (!reader.MoveToElement("XnaContent"))
throw new InvalidContentException(string.Format("Could not find XnaContent element in '{0}'.",
referenceRelocationPath));

// Initialize the namespace lookups from
// the attributes on the XnaContent element.
serializer.CreateNamespaceLookup(input);

// Move past the XnaContent.
input.ReadStartElement();

// Read the asset.
var format = new ContentSerializerAttribute {ElementName = "Asset"};
asset = reader.ReadObject<T>(format);

// Process the shared resources and external references.
reader.ReadSharedResources();
reader.ReadExternalReferences();

// Move past the closing XnaContent element.
input.ReadEndElement();
}
catch (XmlException xmlException)
{
throw reader.NewInvalidContentException(xmlException, "An error occured parsing.");
}

return asset;
}
}
}

这里不具体分析IntermediateSerializer的实现, 可以猜测的是对各种类型的序列化和反序列化.
下图是Microsoft.Xna.Framework.Content.Pipeline.Serialization.Intermediate命名空间下的文件

1
2
3
4
5
6
7
8
9
10
11
12
13
14
15
16
17
18
19
20
21
22
23
24
25
26
27
28
29
30
// MonoGame - Copyright (C) The MonoGame Team
// This file is subject to the terms and conditions defined in
// file 'LICENSE.txt', which is part of this source code package.

using System.Collections.Generic;
using System.Xml;

namespace Microsoft.Xna.Framework.Content.Pipeline.Serialization.Intermediate
{
[ContentTypeSerializer]
class Vector2Serializer : ElementSerializer<Vector2>
{
public Vector2Serializer() :
base("Vector2", 2)
{
}

protected internal override Vector2 Deserialize(string[] inputs, ref int index)
{
return new Vector2( XmlConvert.ToSingle(inputs[index++]),
XmlConvert.ToSingle(inputs[index++]));
}

protected internal override void Serialize(Vector2 value, List<string> results)
{
results.Add(XmlConvert.ToString(value.X));
results.Add(XmlConvert.ToString(value.Y));
}
}
}

往上一层

发现有一个Compiler, 进去一看

可以对比下

1
2
3
4
5
6
7
8
9
10
11
12
13
14
15
16
17
18
19
20
21
22
23
24
25
// MonoGame - Copyright (C) The MonoGame Team
// This file is subject to the terms and conditions defined in
// file 'LICENSE.txt', which is part of this source code package.
using System;
using TOutput = Microsoft.Xna.Framework.Vector2;

namespace Microsoft.Xna.Framework.Content.Pipeline.Serialization.Compiler
{
/// <summary>
/// Writes the Vector2 value to the output.
/// </summary>
[ContentTypeWriter]
class Vector2Writer : BuiltInContentWriter<TOutput>
{
/// <summary>
/// Writes the value to the output.
/// </summary>
/// <param name="output">The output writer object.</param>
/// <param name="value">The value to write to the output.</param>
protected internal override void Write(ContentWriter output, TOutput value)
{
output.Write(value);
}
}
}

这个Compiler文件夹下的Writer用于对Content Processor的输出进行序列化, 而Intermediate文件夹下的Serializer是用于XML Intermediate Format的序列化和反序列化. 所以说Content Pipeline对XML有特殊照顾

关于IntermediateSerializer, 推荐阅读XNA团队成员的系列文章:

Everything you ever wanted to know about IntermediateSerializer
http://blogs.msdn.com/b/shawnhar/archive/2008/08/12/everything-you-ever-wanted-to-know-about-intermediateserializer.aspx
讲了如何使用XNA intermediate XML format (XML中除了普通的数据, 还可以有shared resource和external resource)

IntermediateSerializer vs. XmlSerializer
http://blogs.msdn.com/b/shawnhar/archive/2008/07/28/intermediateserializer-vs-xmlserializer.aspx
讲了IntermediateSerializer的好处

XML and the Content Pipeline
http://blogs.msdn.com/b/shawnhar/archive/2008/05/30/xml-and-the-content-pipeline.aspx
讲了IntermediateSerializer的必要性

MonoGame笔记(十四)自定义Content Pipeline

Posted on 2017-12-20 | In 编程

XNA内置的Importer和Processor已经很够满足大部分需求

关于自定义Content Pipeline, 官方的介绍最为简介明了https://msdn.microsoft.com/en-us/library/ff433775.aspx

摘录如下:
自定义Content Pipeline有如下几种情形:

1. Supporting a New File Format

In this example, a nonstandard file format contains information that can be represented by a standard Content DOM type.

As illustrated, only a custom importer that can read the nonstandard file format and output a Content DOM object (in this case, a TextureContent object) is required. The remainder of the Content Pipeline process can be performed by a standard content processor and content loader.

只需要增加一个自定义的Importer.
官方样例:ObjImpoter(http://xbox.create.msdn.com/en-us/education/catalog/sample/custom_model_importer)

ObjImporter.cs的Import方法

1
2
3
4
5
6
7
8
9
10
11
12
13
14
15
16
17
18
19
20
21
22
23
24
25
26
27
28
29
30
31
32
33
34
35
36
37
38
39
40
41
42
43
44
45
46
47
48
49
50
51
52
53
54
55
56
57
58
59
60
61
62
63
64
65
/// <summary>
/// The importer's entry point.
/// Called by the framework when importing a game asset.
/// </summary>
/// <param name="filename">Name of a game asset file.</param>
/// <param name="context">
/// Contains information for importing a game asset, such as a logger interface.
/// </param>
/// <returns>Resulting game asset.</returns>
public override NodeContent Import(string filename,
ContentImporterContext context)
{
// Uncomment the following line to debug:
//System.Diagnostics.Debugger.Launch();

// Store the context for use in other methods
importerContext = context;

// Reset all importer state
// See field declarations for more information
rootNode = new NodeContent();
positions = new List<Vector3>();
texCoords = new List<Vector2>();
normals = new List<Vector3>();
meshBuilder = null;
// StartMesh sets positionMap, textureCoordinateDataIndex, normalDataIndex
materials = new Dictionary<string, MaterialContent>();
// ImportMaterials resets materialContent

// Model identity is tied to the file it is loaded from
rootNode.Identity = new ContentIdentity(filename);

try
{
// Loop over each tokenized line of the OBJ file
foreach (String[] lineTokens in
GetLineTokens(filename, rootNode.Identity))
{
ParseObjLine(lineTokens);
}

// If the file did not provide a model name (through an 'o' line),
// then use the file name as a default
if (rootNode.Name == null)
rootNode.Name = Path.GetFileNameWithoutExtension(filename);

// Finish the last mesh
FinishMesh();

// Done with entire model!
return rootNode;
}
catch (InvalidContentException)
{
// InvalidContentExceptions do not need further processing
throw;
}
catch (Exception e)
{
// Wrap exception with content identity (includes line number)
throw new InvalidContentException(
"Unable to parse obj file. Exception:\n" + e.Message,
rootNode.Identity, e);
}
}

2.Creating Special-Purpose Data from Standard Objects

For this example, a texture object that represents a map of normalized vectors derived from the original texture object is created

Since the texture is contained in a standard format for the game asset, a standard importer can be used to create the TextureContent object. A custom content processor (NormalMapProcessor) creates the special-purpose data, but uses the standard TextureContent class to contain the result so that it can be loaded by the standard content loader.

就是上一篇笔记中的扩展.
官方样例: Normal Mapping
(http://xbox.create.msdn.com/en-us/education/catalog/sample/normal_mapping)

1
2
3
4
5
6
7
8
9
10
11
12
13
14
15
16
17
18
19
20
21
22
23
24
25
26
27
28
29
30
31
32
33
34
35
36
37
38
39
40
/// <summary>
/// The NormalMappingModelProcessor is used to change the material/effect applied
/// to a model. After going through this processor, the output model will be set
/// up to be rendered with NormalMapping.fx.
/// </summary>
public class NormalMappingModelProcessor : ModelProcessor
{
//override, 注意NormalMappingMaterialProcessor
protected override MaterialContent ConvertMaterial(MaterialContent material,
ContentProcessorContext context)
{
EffectMaterialContent normalMappingMaterial = new EffectMaterialContent();
normalMappingMaterial.Effect = new ExternalReference<EffectContent>
(Path.Combine(directory, "NormalMapping.fx"));

OpaqueDataDictionary processorParameters = new OpaqueDataDictionary();
processorParameters["ColorKeyColor"] = this.ColorKeyColor;
processorParameters["ColorKeyEnabled"] = this.ColorKeyEnabled;
processorParameters["TextureFormat"] = this.TextureFormat;
processorParameters["GenerateMipmaps"] = this.GenerateMipmaps;
processorParameters["ResizeTexturesToPowerOfTwo"] =
this.ResizeTexturesToPowerOfTwo;

// copy the textures in the original material to the new normal mapping
// material. this way the diffuse texture is preserved. The
// PreprocessSceneHierarchy function has already added the normal map
// texture to the Textures collection, so that will be copied as well.
foreach (KeyValuePair<String, ExternalReference<TextureContent>> texture
in material.Textures)
{
normalMappingMaterial.Textures.Add(texture.Key, texture.Value);
}

// and convert the material using the NormalMappingMaterialProcessor,
// who has something special in store for the normal map.
return context.Convert<MaterialContent, MaterialContent>
(normalMappingMaterial, typeof(NormalMappingMaterialProcessor).Name,
processorParameters);
}
}
1
2
3
4
5
6
7
8
9
10
11
12
13
14
15
16
17
18
19
20
21
22
23
24
25
26
/// <summary>
/// The NormalMappingMaterialProcessor is very simple. It extends the regular
/// MaterialProcessor, overriding BuildTexture so that normal maps can go through
/// the NormalMapTextureProcessor and be converted to a signed normalmap format.
/// </summary>
[ContentProcessor]
[DesignTimeVisible(false)]
public class NormalMappingMaterialProcessor : MaterialProcessor
{
//注意NormalMapTextureProcessor
protected override ExternalReference<TextureContent> BuildTexture
(string textureName, ExternalReference<TextureContent> texture,
ContentProcessorContext context)
{
if (textureName == NormalMappingModelProcessor.NormalMapKey)
{
// put the normal map through the special NormalMapTextureProcessor,
// which will convert it to a signed format.
return context.BuildAsset<TextureContent, TextureContent>(texture,
typeof(NormalMapTextureProcessor).Name);
}

// Apply default processing to all other textures.
return base.BuildTexture(textureName, texture, context);
}
}

NormalMappingModelProcessor内部引用了NormalMappingMaterialProcessor, 后者内部又引用NormalMapTextureProcessor. 这种依赖关系可以参见下图:

3.Supporting Custom Data from a Nonstandard Game Asset

Illustrated in this example is a nonstandard game asset file containing data that does not correspond to any standard data types.

To read the nonstandard game asset file, a custom importer is required that outputs a CustomContent object. Since the output of the importer is a custom class, a custom content processor also is needed, and the ContentManager.Load method must be extended to support the custom data object.

这个相对比较复杂一些.

官方样例: Creating a Custom Importer and Processor (https://msdn.microsoft.com/en-us/library/bb447754.aspx)

The goal of the example in this tutorial is to import a pixel shader (in a file with the .psh extension), and to produce compiled effect data that can be assigned to an instance of Effect.

这里就不贴代码了.

MonoGame笔记(十三)扩展Content Pipeline

Posted on 2017-12-20 | In 编程

上一篇笔记提到Content Pipeline可以自定义和扩展. 扩展相对简单一些. XNA 3.0 Game Programming Recipes-A Problem-Solution Approach 3.9和3.10两节介绍了对Texture2D Processor的扩展, 可以一窥究竟.
摘录如下:

3-9. Extend the Image Content Processor

对Texture2D Processor进行扩展

如果我们想要替换图像中的某种颜色, 可以这样做:

1
2
3
4
5
6
7
8
9
10
11
12
13
14
15
16
17
18
19
20
21
22
23
namespace MyImagePipeline
{
[ContentProcessor(DisplayName = "ExtendedExample")]
public class ExtentedTextureProcessor : TextureProcessor
{
public override TextureContent Process(TextureContent input, ContentProcessorContext context)
{
TextureContent texContent = base.Process(input, context);
texContent.ConvertBitmapType(typeof(PixelBitmapContent<Color>));

for (int face = 0; face < texContent.Faces.Count; face++)
{
MipmapChain mipChain = texContent.Faces[face];
for (int mipLevel = 0; mipLevel < mipChain.Count; mipLevel++)
{
PixelBitmapContent<Color> image = (PixelBitmapContent<Color>) input.Faces[face][mipLevel];
image.ReplaceColor(Color.Black, Color.White);
}
}
return texContent;
}
}
}

Faces属性的第一个索引是图像的face. 标准2D图像只有一个face,而立方纹理有六个face。第二个索引是mipmap level,不使用mipmap的图像只有一个level。上面这段代码对纹理的每个face的每个mipmap level中的黑色变成白色

3-10. Extend the Image Content Processor: Grayscale Conversion and Processor Parameters

3-9简单地用新颜色值替换旧颜色值。对于很多图像处理技术来说,还需要获取像素的RGBA值进行计算,可能还会有外部输入参数. 下面这段代码对原图进行灰化, 并且提供了一个插值参数.

1
2
3
4
5
6
7
8
9
10
11
12
13
14
15
16
17
18
19
20
21
22
23
24
25
26
27
28
29
30
31
32
33
34
35
36
37
38
39
40
41
42
43
44
45
namespace GrayContentPipeline 
{
[ContentProcessor(DisplayName = "GrayScaleProcessor")]
public class ExtentedTextureProcessor : TextureProcessor
{
private float interpolation = 0.8f;

public float Interpolation
{
get { return interpolation; }
set { interpolation = value; }
}

public override TextureContent Process(TextureContent input, ContentProcessorContext context)
{
TextureContent texContent = base.Process(input, context);
texContent.ConvertBitmapType(typeof(PixelBitmapContent<Color>));

for (int face = 0; face < input.Faces.Count; face++)
{
MipmapChain mipChain = input.Faces[face];
for (int mipLevel = 0; mipLevel < mipChain.Count; mipLevel++)
{
PixelBitmapContent<Color> oldImage = PixelBitmapContent<Color>)input.Faces[face][mipLevel];
PixelBitmapContent<Vector4> grayImage = new PixelBitmapContent<Vector4> (oldImage.Width, oldImage.Height);
for (int x = 0; x < oldImage.Width; x++)
for (int y = 0; y < oldImage.Height; y++)
{
Color oldColor = oldImage.GetPixel(x, y);
float grayValue = oldColor.R * 0.299f / 255.0f;
grayValue += oldColor.G * 0.596f / 255.0f;
grayValue += oldColor.B * 0.211f / 255.0f;
float alpha = oldColor.A / 255.0f;
Vector4 grayColor = new Vector4(grayValue,grayValue, grayValue, alpha);
Vector4 origColor = oldColor.ToVector4();
Vector4 newColor = Vector4.Lerp(origColor, grayColor, interpolation);
grayImage.SetPixel(x, y, newColor);
}
input.Faces[face][mipLevel] = grayImage;
}
}
return texContent;
}
}
}

Interpolation作为公共属性, 会显示在属性面板上

MonoGame笔记(十二)Content Pipeline介绍

Posted on 2017-12-19 | In 编程

游戏中除了代码就是资源. 代码本身也是一种资源(Unity3D中代码和资源都被组织在Asset目录下). Unity3D属于All in One, Flash有强大的Flash CS编辑资源, 而XNA也有Content Pipeline, 集成在XNA Game Studio中, 通过属性面板的方式, 设置各个参数. 如下图所示:

其中Mipmaps和Resize to Power of two在Unity3D中对Sprite进行设置时也有

使用Content Pipeline的好处是什么?官方介绍如下: https://msdn.microsoft.com/en-us/library/bb447756.aspx

The chief reason XNA Game Studio uses a Content Pipeline is to help your game run fast. Without the content pipeline, your game would have to be built with its art assets in their original file format. When the game needs to load its art to draw it on the screen, it would have to determine its format and convert the data into a form it can use more directly. This would have to be performed at run time, for each asset, making the player wait to have fun.

The Content Pipeline remedies this by shifting this time-consuming work to when the game is built. At build time, each asset is imported from its original file format and processed into a managed code object. Those objects are then serialized to a file that is included in the game’s executable.

At run time, the game can then read the serialized data from the file directly into a managed code object for immediate use.

从分工上:

The Content Pipeline is designed to help you include such art assets in your game easily and automatically. An artist working on a a car model can add the resulting file to the XNA Game Studio Express game project, assign the model a name, and choose an importer and content processor for it. Then, a developer who wants to make the car drive can load it by name using a call to ContentManager.Load. This simple flow lets the artist focus on creating assets and the developer focus on using them, without either having to spend time worrying about content transformation.实际上程序员还是要花不少时间在处理资源上, 尤其是重新排列资源的组织方式

下图是Content Pipeline处理过程(https://msdn.microsoft.com/en-us/library/bb447745.aspx)

其中Importer和Content Processor属于Design-Time Components, Content Loader属于Runtime Components.

Importer将资源导入到XNA Game Studio中, 以Texture为例, 它的作用是对各类图像格式去差异化, 生成一个统一的Texture对象, 供Processor去处理.

Processor对Importer生成的资源对象进行处理, 以Texture为例, 生成Mipmap等等

Design-Time是指在属性面板中选择合适的Content Importer和Content Processor, 然后build, 生成xnb二进制文件.该文件可以在运行时被加载. 资源源文件不需要和游戏一起发布.Runtime是指游戏运行时. 上图中的Intermediate Format是指.xnb文件.

上图还缺少两个东西: 序列化和反序列化. 前者用于将Content Processor输出的内容序列化成xnb二进制文件, 后者将xnb文件反序列化成相应的对象. 序列化器属于Design-Time, 反序列化器属于RunTime, 体现在代码上就是二者所属的命名空间不同, 前者是namespace Microsoft.Xna.Framework.Content.Pipeline, 后者是namespace Microsoft.Xna.Framework

更详细的过程如下图所示:https://msdn.microsoft.com/zh-cn/library/bb447745(v=xnagamestudio.10)

Content Pipeline还可以进行自定义和扩展, 以支持新的资源格式, 或者对原有的Content Processor进行增强. 关于自定义和扩展, 官方的一个概略性介绍如下:

  • XNA Game Studio Express supplies standard importers and processors for a number of popular DCC file formats (see Standard Importers and Processors).
  • Third parties also create custom importers and processors for XNA Game Studio Express to support additional formats.
  • If you have enough information about a DCC file format, you can write your own custom importer and processor for it using classes provided by the Content Pipeline class library (see Writing a Custom Importer).
  • When you include an art asset file in your XNA Game Studio Express game project, you use its Properties sheet to specify the importer and processor that is appropriate to it. Thereafter, when you press F5 to build your game, the proper importer and processor for each asset is automatically invoked, and the asset is built into your game in a form that can be loaded at run time on Windows or the Xbox 360 by using ContentManager.Load. ContentManager.Load会寻找合适的ContentTypeReader, 将xnb文件反序列化成对象, 例如Texture2D, SpriteFont等

进一步的自定义和扩展介绍, 见后面的笔记.

以最常用的Texture2D为例, 看看各个组成部分到底是什么样子.

Importer

Importer加载各种图像原文件, 生成一个统一的TextureContent供Processor使用.
不同的图像格式, 有些是RGBA, 有些是BGRA等等, 去差异化

1
2
3
4
5
6
7
8
9
10
11
12
13
14
15
16
17
18
19
20
21
22
23
24
25
26
27
28
29
30
31
32
33
34
35
36
37
38
39
40
41
42
43
44
45
46
47
48
49
50
51
52
53
54
55
56
57
58
59
60
61
62
63
64
65
66
67
68
69
70
71
72
73
74
75
76
77
78
79
80
81
82
83
84
85
86
87
88
89
90
91
92
93
94
95
96
97
98
99
100
101
102
103
104
105
106
107
108
109
110
111
112
113
114
115
116
117
118
119
120
121
122
123
124
125
126
127
128
129
130
131
132
133
134
135
136
137
138
139
140
141
142
143
144
145
146
147
148
149
150
151
152
153
154
155
156
157
158
159
160
161
162
163
164
165
166
167
168
169
170
171
172
173
174
175
176
177
178
179
180
181
182
183
184
// MonoGame - Copyright (C) The MonoGame Team
// This file is subject to the terms and conditions defined in
// file 'LICENSE.txt', which is part of this source code package.

using System.Runtime.InteropServices;
using Microsoft.Xna.Framework.Graphics;
using Microsoft.Xna.Framework.Content.Pipeline.Graphics;
using Microsoft.Xna.Framework.Graphics.PackedVector;
using FreeImageAPI;
using System.IO;

namespace Microsoft.Xna.Framework.Content.Pipeline
{
/// <summary>
/// Provides methods for reading texture files for use in the Content Pipeline.
/// Texture支持大部分常用的图片格式
/// </summary>
[ContentImporter(".bmp", // Bitmap Image File
".cut", // Dr Halo CUT
".dds", // Direct Draw Surface
".g3", // Raw Fax G3
".hdr", // RGBE
".gif", // Graphcis Interchange Format
".ico", // Microsoft Windows Icon
".iff", // Interchange File Format
".jbg", ".jbig", // JBIG
".jng", ".jpg", ".jpeg", ".jpe", ".jif", ".jfif", ".jfi", // JPEG
".jp2", ".j2k", ".jpf", ".jpx", ".jpm", ".mj2", // JPEG 2000
".jxr", ".hdp", ".wdp", // JPEG XR
".koa", ".gg", // Koala
".pcd", // Kodak PhotoCD
".mng", // Multiple-Image Network Graphics
".pcx", //Personal Computer Exchange
".pbm", ".pgm", ".ppm", ".pnm", // Netpbm
".pfm", // Printer Font Metrics
".png", //Portable Network Graphics
".pict", ".pct", ".pic", // PICT
".psd", // Photoshop
".3fr", ".ari", ".arw", ".bay", ".crw", ".cr2", ".cap", ".dcs", // RAW
".dcr", ".dng", ".drf", ".eip", ".erf", ".fff", ".iiq", ".k25", // RAW
".kdc", ".mdc", ".mef", ".mos", ".mrw", ".nef", ".nrw", ".obm", // RAW
".orf", ".pef", ".ptx", ".pxn", ".r3d", ".raf", ".raw", ".rwl", // RAW
".rw2", ".rwz", ".sr2", ".srf", ".srw", ".x3f", // RAW
".ras", ".sun", // Sun RAS
".sgi", ".rgba", ".bw", ".int", ".inta", // Silicon Graphics Image
".tga", // Truevision TGA/TARGA
".tiff", ".tif", // Tagged Image File Format
".wbmp", // Wireless Application Protocol Bitmap Format
".webp", // WebP
".xbm", // X BitMap
".xpm", // X PixMap
DisplayName = "Texture Importer - MonoGame", DefaultProcessor = "TextureProcessor")]
public class TextureImporter : ContentImporter<TextureContent>
{
/// <summary>
/// Initializes a new instance of TextureImporter.
/// </summary>
public TextureImporter( )
{
}

/// <summary>
/// Called by the XNA Framework when importing a texture file to be used as a game asset. This is the method called by the XNA Framework when an asset is to be imported into an object that can be recognized by the Content Pipeline.该方法是被XNA Framework调用的. FreeImage是一个第三方图像库
/// </summary>
/// <param name="filename">Name of a game asset file.</param>
/// <param name="context">Contains information for importing a game asset, such as a logger interface.</param>
/// <returns>Resulting game asset.</returns>
public override TextureContent Import(string filename, ContentImporterContext context)
{
// Special case for loading DDS
if (filename.ToLower().EndsWith(".dds"))
return DdsLoader.Import(filename, context);

var output = new Texture2DContent { Identity = new ContentIdentity(filename) };

FREE_IMAGE_FORMAT format = FREE_IMAGE_FORMAT.FIF_UNKNOWN;
var fBitmap = FreeImage.LoadEx(filename, FREE_IMAGE_LOAD_FLAGS.DEFAULT, ref format);
//if freeimage can not recognize the image type
if(format == FREE_IMAGE_FORMAT.FIF_UNKNOWN)
throw new ContentLoadException("TextureImporter failed to load '" + filename + "'");
//if freeimage can recognize the file headers but can't read its contents
else if(fBitmap.IsNull)
throw new InvalidContentException("TextureImporter couldn't understand the contents of '" + filename + "'", output.Identity);
BitmapContent face = null;
var height = (int) FreeImage.GetHeight(fBitmap);
var width = (int) FreeImage.GetWidth(fBitmap);
//uint bpp = FreeImage.GetBPP(fBitmap);
var imageType = FreeImage.GetImageType(fBitmap);

// Swizzle channels and expand to include an alpha channel
fBitmap = ConvertAndSwapChannels(fBitmap, imageType);

// The bits per pixel and image type may have changed
uint bpp = FreeImage.GetBPP(fBitmap);
imageType = FreeImage.GetImageType(fBitmap);
var pitch = (int) FreeImage.GetPitch(fBitmap);
var redMask = FreeImage.GetRedMask(fBitmap);
var greenMask = FreeImage.GetGreenMask(fBitmap);
var blueMask = FreeImage.GetBlueMask(fBitmap);

// Create the byte array for the data
byte[] bytes = new byte[((width * height * bpp - 1) / 8) + 1];

//Converts the pixel data to bytes, do not try to use this call to switch the color channels because that only works for 16bpp bitmaps
FreeImage.ConvertToRawBits(bytes, fBitmap, pitch, bpp, redMask, greenMask, blueMask, true);
// Create the Pixel bitmap content depending on the image type
switch(imageType)
{
//case FREE_IMAGE_TYPE.FIT_BITMAP:
default:
face = new PixelBitmapContent<Color>(width, height);
break;
case FREE_IMAGE_TYPE.FIT_RGBA16:
face = new PixelBitmapContent<Rgba64>(width, height);
break;
case FREE_IMAGE_TYPE.FIT_RGBAF:
face = new PixelBitmapContent<Vector4>(width, height);
break;
}
FreeImage.UnloadEx(ref fBitmap);

face.SetPixelData(bytes);
output.Faces[0].Add(face);
return output;
}
/// <summary>
/// Expands images to have an alpha channel and swaps red and blue channels
/// </summary>
/// <param name="fBitmap">Image to process</param>
/// <param name="imageType">Type of the image for the procedure</param>
/// <returns></returns>
private static FIBITMAP ConvertAndSwapChannels(FIBITMAP fBitmap, FREE_IMAGE_TYPE imageType)
{
FIBITMAP bgra;
switch(imageType)
{
// RGBF are switched before adding an alpha channel.
case FREE_IMAGE_TYPE.FIT_RGBF:
// Swap R and B channels to make it BGR, then add an alpha channel
SwitchRedAndBlueChannels(fBitmap);
bgra = FreeImage.ConvertToType(fBitmap, FREE_IMAGE_TYPE.FIT_RGBAF, true);
FreeImage.UnloadEx(ref fBitmap);
fBitmap = bgra;
break;

case FREE_IMAGE_TYPE.FIT_RGB16:
// Swap R and B channels to make it BGR, then add an alpha channel
SwitchRedAndBlueChannels(fBitmap);
bgra = FreeImage.ConvertToType(fBitmap, FREE_IMAGE_TYPE.FIT_RGBA16, true);
FreeImage.UnloadEx(ref fBitmap);
fBitmap = bgra;
break;

case FREE_IMAGE_TYPE.FIT_RGBAF:
case FREE_IMAGE_TYPE.FIT_RGBA16:
//Don't switch channels in this case or colors will be shown wrong
break;

default:
// Bitmap and other formats are converted to 32-bit by default
bgra = FreeImage.ConvertTo32Bits(fBitmap);
SwitchRedAndBlueChannels(bgra);
FreeImage.UnloadEx(ref fBitmap);
fBitmap = bgra;
break;
}

return fBitmap;
}
/// <summary>
/// Switches the red and blue channels
/// </summary>
/// <param name="fBitmap">image</param>
private static void SwitchRedAndBlueChannels(FIBITMAP fBitmap)
{
var r = FreeImage.GetChannel(fBitmap, FREE_IMAGE_COLOR_CHANNEL.FICC_RED);
var b = FreeImage.GetChannel(fBitmap, FREE_IMAGE_COLOR_CHANNEL.FICC_BLUE);
FreeImage.SetChannel(fBitmap, b, FREE_IMAGE_COLOR_CHANNEL.FICC_RED);
FreeImage.SetChannel(fBitmap, r, FREE_IMAGE_COLOR_CHANNEL.FICC_BLUE);
FreeImage.UnloadEx(ref r);
FreeImage.UnloadEx(ref b);
}
}
}

TextureProcessor

Processor中的Public属性会显示在属性面板上

1
2
3
4
5
6
7
8
9
10
11
12
13
14
15
16
17
18
19
20
21
22
23
24
25
26
27
28
29
30
31
32
33
34
35
36
37
38
39
40
41
42
43
44
45
46
47
48
49
50
51
52
53
54
55
56
57
58
59
60
61
62
63
64
65
66
67
68
69
70
71
72
73
74
75
76
77
78
79
80
81
82
83
84
85
86
87
88
89
90
91
92
93
94
95
96
97
98
99
100
101
102
103
104
105
106
107
108
109
110
111
112
113
114
115
116
117
118
119
120
121
// MonoGame - Copyright (C) The MonoGame Team
// This file is subject to the terms and conditions defined in
// file 'LICENSE.txt', which is part of this source code package.

using System;
using System.ComponentModel;
using Microsoft.Xna.Framework.Content.Pipeline.Graphics;
using Microsoft.Xna.Framework.Graphics;

namespace Microsoft.Xna.Framework.Content.Pipeline.Processors
{
[ContentProcessor(DisplayName="Texture - MonoGame")]
public class TextureProcessor : ContentProcessor<TextureContent, TextureContent>
{
public TextureProcessor()
{
ColorKeyColor = new Color(255, 0, 255, 255);
ColorKeyEnabled = true;
PremultiplyAlpha = true;
}

[DefaultValueAttribute(typeof(Color), "255,0,255,255")]
public virtual Color ColorKeyColor { get; set; }

[DefaultValueAttribute(true)]
public virtual bool ColorKeyEnabled { get; set; }

public virtual bool GenerateMipmaps { get; set; }

[DefaultValueAttribute(true)]
public virtual bool PremultiplyAlpha { get; set; }

public virtual bool ResizeToPowerOfTwo { get; set; }

public virtual bool MakeSquare { get; set; }

public virtual TextureProcessorOutputFormat TextureFormat { get; set; }

public override TextureContent Process(TextureContent input, ContentProcessorContext context)
{
SurfaceFormat format;
if (input.Faces[0][0].TryGetFormat(out format))
{
// If it is already a compressed format, we cannot do anything else so just return it
if (format.IsCompressedFormat())
return input;
}

if (ColorKeyEnabled || ResizeToPowerOfTwo || MakeSquare || PremultiplyAlpha)
{
// Convert to floating point format for modifications. Keep the original format for conversion back later on if required.
var originalType = input.Faces[0][0].GetType();
try
{
input.ConvertBitmapType(typeof(PixelBitmapContent<Vector4>));
}
catch (Exception ex)
{
context.Logger.LogImportantMessage("Could not convert input texture for processing. " + ex.ToString());
throw ex;
}

for (int f = 0; f < input.Faces.Count; ++f)
{
var face = input.Faces[f];
for (int m = 0; m < face.Count; ++m)
{
var bmp = (PixelBitmapContent<Vector4>)face[m];

if (ColorKeyEnabled)
{
bmp.ReplaceColor(ColorKeyColor.ToVector4(), Vector4.Zero);
}

if (ResizeToPowerOfTwo)
{
if (!GraphicsUtil.IsPowerOfTwo(bmp.Width) || !GraphicsUtil.IsPowerOfTwo(bmp.Height) || (MakeSquare && bmp.Height != bmp.Width))
{
var newWidth = GraphicsUtil.GetNextPowerOfTwo(bmp.Width);
var newHeight = GraphicsUtil.GetNextPowerOfTwo(bmp.Height);
if (MakeSquare)
newWidth = newHeight = Math.Max(newWidth, newHeight);
var resized = new PixelBitmapContent<Vector4>(newWidth, newHeight);
BitmapContent.Copy(bmp, resized);
bmp = resized;
}
}
else if (MakeSquare && bmp.Height != bmp.Width)
{
var newSize = Math.Max(bmp.Width, bmp.Height);
var resized = new PixelBitmapContent<Vector4>(newSize, newSize);
BitmapContent.Copy(bmp, resized);
}

if (PremultiplyAlpha)
{
for (int y = 0; y < bmp.Height; ++y)
{
var row = bmp.GetRow(y);
for (int x = 0; x < bmp.Width; ++x)
row[x] = Color.FromNonPremultiplied(row[x]).ToVector4();
}
}

face[m] = bmp;
}
}

// If no change to the surface format was desired, change it back now before it early outs
if (TextureFormat == TextureProcessorOutputFormat.NoChange)
input.ConvertBitmapType(originalType);
}

// Get the texture profile for the platform and let it convert the texture.
var texProfile = TextureProfile.ForPlatform(context.TargetPlatform);
texProfile.ConvertTexture(context, input, TextureFormat, GenerateMipmaps, false);

return input;
}
}
}

序列化

注意它所属的命名空间. Serialization下面除了Compiler, 还有一个Serializer, 二者之间的差异见后面的笔记

1
2
3
4
5
6
7
8
9
10
11
12
13
14
15
16
17
18
19
20
21
22
23
24
25
26
27
28
29
30
31
32
33
34
35
36
// MonoGame - Copyright (C) The MonoGame Team
// This file is subject to the terms and conditions defined in
// file 'LICENSE.txt', which is part of this source code package.

using System;
using Microsoft.Xna.Framework.Content.Pipeline.Graphics;
using Microsoft.Xna.Framework.Graphics;

namespace Microsoft.Xna.Framework.Content.Pipeline.Serialization.Compiler
{
[ContentTypeWriter]
class Texture2DWriter : BuiltInContentWriter<Texture2DContent>
{
protected internal override void Write(ContentWriter output, Texture2DContent value)
{
var mipmaps = value.Faces[0]; // Mipmap chain.
var level0 = mipmaps[0]; // Most detailed mipmap level.

SurfaceFormat format;
if (!level0.TryGetFormat(out format))
throw new Exception("Couldn't get Format for TextureContent.");

output.Write((int)format);
output.Write(level0.Width);
output.Write(level0.Height);
output.Write(mipmaps.Count); // Number of mipmap levels.

foreach (var level in mipmaps)
{
var pixelData = level.GetPixelData();
output.Write(pixelData.Length);
output.Write(pixelData);
}
}
}
}

反序列化

注意该类的位置是在framework中, 不在content pipeline中,
因为该类是运行时用到的

1
2
3
4
5
6
7
8
9
10
11
12
13
14
15
16
17
18
19
20
21
22
23
24
25
26
27
28
29
30
31
32
33
34
35
36
37
38
39
40
41
42
43
44
45
46
47
48
49
50
51
52
53
54
55
56
57
58
59
60
61
62
63
64
65
66
67
68
69
70
71
72
73
74
75
76
77
78
79
80
81
82
83
84
85
86
87
88
89
90
91
92
93
94
95
96
97
98
99
100
101
102
103
104
105
106
107
108
109
110
111
112
113
114
115
116
117
118
119
120
121
122
123
124
125
126
127
128
129
130
131
132
133
134
135
136
137
138
139
140
141
142
143
144
145
146
147
148
149
150
151
152
153
154
155
156
157
158
159
160
161
162
163
164
165
166
167
168
169
170
// MonoGame - Copyright (C) The MonoGame Team
// This file is subject to the terms and conditions defined in
// file 'LICENSE.txt', which is part of this source code package.

using System;
using Microsoft.Xna;
using Microsoft.Xna.Framework;
using Microsoft.Xna.Framework.Content;
using Microsoft.Xna.Framework.Graphics;

namespace Microsoft.Xna.Framework.Content
{
internal class Texture2DReader : ContentTypeReader<Texture2D>
{
internal Texture2DReader()
{
// Do nothing
}

protected internal override Texture2D Read(ContentReader reader, Texture2D existingInstance)
{
Texture2D texture = null;

var surfaceFormat = (SurfaceFormat)reader.ReadInt32();
int width = reader.ReadInt32();
int height = reader.ReadInt32();
int levelCount = reader.ReadInt32();
int levelCountOutput = levelCount;

// If the system does not fully support Power of Two textures,
// skip any mip maps supplied with any non PoT textures.
if (levelCount > 1 && !reader.GraphicsDevice.GraphicsCapabilities.SupportsNonPowerOfTwo &&
(!MathHelper.IsPowerOfTwo(width) || !MathHelper.IsPowerOfTwo(height)))
{
levelCountOutput = 1;
System.Diagnostics.Debug.WriteLine(
"Device does not support non Power of Two textures. Skipping mipmaps.");
}

SurfaceFormat convertedFormat = surfaceFormat;
switch (surfaceFormat)
{
case SurfaceFormat.Dxt1:
case SurfaceFormat.Dxt1a:
if (!reader.GraphicsDevice.GraphicsCapabilities.SupportsDxt1)
convertedFormat = SurfaceFormat.Color;
break;
case SurfaceFormat.Dxt1SRgb:
if (!reader.GraphicsDevice.GraphicsCapabilities.SupportsDxt1)
convertedFormat = SurfaceFormat.ColorSRgb;
break;
case SurfaceFormat.Dxt3:
case SurfaceFormat.Dxt5:
if (!reader.GraphicsDevice.GraphicsCapabilities.SupportsS3tc)
convertedFormat = SurfaceFormat.Color;
break;
case SurfaceFormat.Dxt3SRgb:
case SurfaceFormat.Dxt5SRgb:
if (!reader.GraphicsDevice.GraphicsCapabilities.SupportsS3tc)
convertedFormat = SurfaceFormat.ColorSRgb;
break;
case SurfaceFormat.NormalizedByte4:
convertedFormat = SurfaceFormat.Color;
break;
}

texture = existingInstance ?? new Texture2D(reader.GraphicsDevice, width, height, levelCountOutput > 1, convertedFormat);
#if OPENGL
Threading.BlockOnUIThread(() =>
{
#endif
for (int level = 0; level < levelCount; level++)
{
var levelDataSizeInBytes = reader.ReadInt32();
var levelData = reader.ContentManager.GetScratchBuffer(levelDataSizeInBytes);
reader.Read(levelData, 0, levelDataSizeInBytes);
int levelWidth = width >> level;
int levelHeight = height >> level;

if (level >= levelCountOutput)
continue;

//Convert the image data if required
switch (surfaceFormat)
{
case SurfaceFormat.Dxt1:
case SurfaceFormat.Dxt1SRgb:
case SurfaceFormat.Dxt1a:
if (!reader.GraphicsDevice.GraphicsCapabilities.SupportsDxt1 && convertedFormat == SurfaceFormat.Color)
levelData = DxtUtil.DecompressDxt1(levelData, levelWidth, levelHeight);
break;
case SurfaceFormat.Dxt3:
case SurfaceFormat.Dxt3SRgb:
if (!reader.GraphicsDevice.GraphicsCapabilities.SupportsS3tc)
if (!reader.GraphicsDevice.GraphicsCapabilities.SupportsS3tc && convertedFormat == SurfaceFormat.Color)
levelData = DxtUtil.DecompressDxt3(levelData, levelWidth, levelHeight);
break;
case SurfaceFormat.Dxt5:
case SurfaceFormat.Dxt5SRgb:
if (!reader.GraphicsDevice.GraphicsCapabilities.SupportsS3tc)
if (!reader.GraphicsDevice.GraphicsCapabilities.SupportsS3tc && convertedFormat == SurfaceFormat.Color)
levelData = DxtUtil.DecompressDxt5(levelData, levelWidth, levelHeight);
break;
case SurfaceFormat.Bgra5551:
{
#if OPENGL
// Shift the channels to suit OpenGL
int offset = 0;
for (int y = 0; y < levelHeight; y++)
{
for (int x = 0; x < levelWidth; x++)
{
ushort pixel = BitConverter.ToUInt16(levelData, offset);
pixel = (ushort)(((pixel & 0x7FFF) << 1) | ((pixel & 0x8000) >> 15));
levelData[offset] = (byte)(pixel);
levelData[offset + 1] = (byte)(pixel >> 8);
offset += 2;
}
}
#endif
}
break;
case SurfaceFormat.Bgra4444:
{
#if OPENGL
// Shift the channels to suit OpenGL
int offset = 0;
for (int y = 0; y < levelHeight; y++)
{
for (int x = 0; x < levelWidth; x++)
{
ushort pixel = BitConverter.ToUInt16(levelData, offset);
pixel = (ushort)(((pixel & 0x0FFF) << 4) | ((pixel & 0xF000) >> 12));
levelData[offset] = (byte)(pixel);
levelData[offset + 1] = (byte)(pixel >> 8);
offset += 2;
}
}
#endif
}
break;
case SurfaceFormat.NormalizedByte4:
{
int bytesPerPixel = surfaceFormat.GetSize();
int pitch = levelWidth * bytesPerPixel;
for (int y = 0; y < levelHeight; y++)
{
for (int x = 0; x < levelWidth; x++)
{
int color = BitConverter.ToInt32(levelData, y * pitch + x * bytesPerPixel);
levelData[y * pitch + x * 4] = (byte)(((color >> 16) & 0xff)); //R:=W
levelData[y * pitch + x * 4 + 1] = (byte)(((color >> 8) & 0xff)); //G:=V
levelData[y * pitch + x * 4 + 2] = (byte)(((color) & 0xff)); //B:=U
levelData[y * pitch + x * 4 + 3] = (byte)(((color >> 24) & 0xff)); //A:=Q
}
}
}
break;
}

texture.SetData(level, null, levelData, 0, levelDataSizeInBytes);
}
#if OPENGL
});
#endif

return texture;
}
}
}

TextureContent

XNA Game Studio Content Document Object Model (DOM) 这个统一各个图像格式的TextureContent是什么样子, 里面的Faces用于mipmap

1
2
3
4
5
6
7
8
9
10
11
12
13
14
15
16
17
18
19
20
21
22
23
24
25
26
27
28
29
30
31
32
33
34
35
36
37
38
39
40
41
42
43
44
45
46
47
48
49
50
51
52
53
54
55
56
57
58
59
60
61
62
63
64
65
66
67
68
69
70
71
72
73
74
75
76
77
78
79
80
81
82
83
84
85
86
87
88
89
90
91
92
93
94
95
96
97
98
99
100
101
102
103
104
105
106
107
108
109
110
111
112
113
114
// MonoGame - Copyright (C) The MonoGame Team
// This file is subject to the terms and conditions defined in
// file 'LICENSE.txt', which is part of this source code package.

using System;
using System.Linq;
using Microsoft.Xna.Framework.Graphics;

namespace Microsoft.Xna.Framework.Content.Pipeline.Graphics
{
/// <summary>
/// Provides a base class for all texture objects.
/// </summary>
public abstract class TextureContent : ContentItem
{
MipmapChainCollection faces;

/// <summary>
/// Collection of image faces that hold a single mipmap chain for a regular 2D texture, six chains for a cube map, or an arbitrary number for volume and array textures.
/// </summary>
public MipmapChainCollection Faces
{
get
{
return faces;
}
}

/// <summary>
/// Initializes a new instance of TextureContent with the specified face collection.
/// </summary>
/// <param name="faces">Mipmap chain containing the face collection.</param>
protected TextureContent(MipmapChainCollection faces)
{
this.faces = faces;
}

/// <summary>
/// Converts all bitmaps for this texture to a different format.
/// </summary>
/// <param name="newBitmapType">Type being converted to. The new type must be a subclass of BitmapContent, such as PixelBitmapContent or DxtBitmapContent.</param>
public void ConvertBitmapType(Type newBitmapType)
{
if (newBitmapType == null)
throw new ArgumentNullException("newBitmapType");

if (!newBitmapType.IsSubclassOf(typeof (BitmapContent)))
throw new ArgumentException(string.Format("Type '{0}' is not a subclass of BitmapContent.", newBitmapType));

if (newBitmapType.IsAbstract)
throw new ArgumentException(string.Format("Type '{0}' is abstract and cannot be allocated.", newBitmapType));

if (newBitmapType.ContainsGenericParameters)
throw new ArgumentException(string.Format("Type '{0}' contains generic parameters and cannot be allocated.", newBitmapType));

if (newBitmapType.GetConstructor(new Type[2] {typeof (int), typeof (int)}) == null)
throw new ArgumentException(string.Format("Type '{0} does not have a constructor with signature (int, int) and cannot be allocated.",
newBitmapType));

foreach (var mipChain in faces)
{
for (var i = 0; i < mipChain.Count; i++)
{
var src = mipChain[i];
if (src.GetType() != newBitmapType)
{
var dst = (BitmapContent)Activator.CreateInstance(newBitmapType, new object[] { src.Width,src.Height });
BitmapContent.Copy(src, dst);
mipChain[i] = dst;
}
}
}
}

/// <summary>
/// Generates a full set of mipmaps for the texture.
/// </summary>
/// <param name="overwriteExistingMipmaps">true if the existing mipmap set is replaced with the new set; false otherwise.</param>
public virtual void GenerateMipmaps(bool overwriteExistingMipmaps)
{
// If we already have mipmaps and we're not supposed to overwrite
// them then return without any generation.
if (!overwriteExistingMipmaps && faces.Any(f => f.Count > 1))
return;

// Generate the mips for each face.
foreach (var face in faces)
{
// Remove any existing mipmaps.
var faceBitmap = face[0];
face.Clear();
face.Add(faceBitmap);
var faceType = faceBitmap.GetType();
int width = faceBitmap.Width;
int height = faceBitmap.Height;
while (width > 1 && height > 1)
{
width /= 2;
height /= 2;

var mip = (BitmapContent)Activator.CreateInstance(faceType, new object[] { width, height });
BitmapContent.Copy(faceBitmap, mip);
face.Add(mip);
}
}
}

/// <summary>
/// Verifies that all contents of this texture are present, correct and match the capabilities of the device.
/// </summary>
/// <param name="targetProfile">The profile identifier that defines the capabilities of the device.</param>
public abstract void Validate(GraphicsProfile? targetProfile);
}
}

MonoGame笔记(十一)GameService

Posted on 2017-12-17 | In 编程

http://gameprogrammingpatterns.com/component.html 中将Component模式归类于Decouple Pattern, 用来解耦. 那Component之间如何交互呢. MonoGame提供了GameService.
官方的介绍如下:https://msdn.microsoft.com/en-us/library/bb203873.aspx

Game services

Game services are a mechanism for maintaining loose coupling between objects that need to interact with each other. Services work through a mediator—in this case, Game.Services. Service providers register with Game.Services, and service consumers request services from Game.Services. This arrangement allows an object that requires a service to request the service without knowing the name of the service provider.

Game services are defined by an interface. A class specifies the services it provides by implementing interfaces and registering the services with Game.Services. A service is registered by calling Game.Services.AddService specifying the type of service being implemented and a reference to the object providing the service. For example, to register an object that provides a service represented by the interface IMyService, you would use the following code.

1
Services.AddService( typeof( IMyService ), myobject );

Once a service is registered, the object providing the service can be retrieved by Game.Services.GetService and specifying the desired service. For example, to retrieve IGraphicsDeviceService, you would use the following code.

1
IGraphicsDeviceService graphicsservice = (IGraphicsDeviceService)Services.GetService( typeof(IGraphicsDeviceService) );

Game Components Consuming Game Services

The GameComponent class provides the Game property so a GameComponent can determine what Game it is attached to. With the Game property, a GameComponent can call Game.Services.GetService to find a provider of a particular service. For example, a GameComponent would find the IGraphicsDeviceService provider by using the following code.

1
IGraphicsDeviceService graphicsservice = (IGraphicsDeviceService)Game.Services.GetService( typeof( IGraphicsDeviceService ) );

上面的介绍已经很清楚了, 可以追加一点的是, 提供Service的可以是GameComponent, 也可以不是GameComponent.

对于Game services, 我看过解释得最好的是下面这个链接(非常棒)http://zacharysnow.net/2010/02/18/creating-and-consuming-services-in-your-xna-game.html

全文摘录如下:

Creating and consuming services in your XNA Game

February 18, 2010 .NET 0 Comments

The GameServiceContainer implements the IServiceProvider interface and the MSDN documentation says about the IServiceProvider interface:
Defines a mechanism for retrieving a service object; that is, an object that provides custom support to other objects.

This article will attemp to describe how can you use the GameServiceContainer in your XNA game, in both your GameComponent(s) and your game’s entity objects.< !—more—>The most obvious place to use the GameServiceContainer is in your GameComponent(s). But first, lets talk about Coupling(耦合). Let’s assume you have the following components:

1
2
3
4
5
6
7
8
9
10
11
12
13
14
15
16
17
18
19
20
21
22
23
24
25
26
27
28
29
class FooComponent : GameComponent
{
public FooComponent(Game game)
: base(game)
{
}

public int DoFoo()
{
// Do something and return an int.
}
}

class BarComponent : GameComponent
{
FooComponent foo;

public BarComponent(Game game)
: base(game)
{
this.foo = new FooComponent(game);
}

public void DoBar()
{
int result = this.foo.DoFoo();
// Do something based on result.
}
}

There’s nothing wrong with the code, but BarComponent has a dependency on FooComponent(BarComponent直接依赖FooComponent). BarComponent directly interacts with FooComponent and therefore any change made to FooComponent indirectly affects BarComponent(任何对FooComponent的改动都会间接影响BarComponent). For instance, let’s assume the constructor for FooComponent needs to be modified. That means we now have to update not only the FooComponent class but as well the BarComponent class(例如修改了FooComponent的构造方法, 则BarComponent也需要做相应修改). Throw in a few more components with dependencies on FooComponent and you could start to get headache really fast. This design is highly coupled(高耦合).

Let’s try a slight redesign:

1
2
3
4
5
6
7
8
9
10
11
12
13
14
15
16
17
18
19
20
21
22
23
24
25
26
27
28
29
class FooComponent : GameComponent
{
public FooComponent(Game game)
: base(game)
{
}

public int DoFoo()
{
// Do something and return an int.
}
}

class BarComponent : GameComponent
{
FooComponent foo;

public BarComponent(Game game, FooComponent foo)
: base(game)
{
this.foo = foo;
}

public void DoBar()
{
int result = this.foo.DoFoo();
// Do something based on result.
}
}

We’ve now eliminated the construction of the FooComponent from within the BarComponent. The design is better but still not that great. BarComponent is still directly relying on and communicating with FooComponent. We want to change BarComponent so that it has no direct dependency on a concrete implementation of FooComponent. 这也是一种依赖注入, 但还不彻底

We’ll create an interface(面向接口编程):

1
2
3
4
5
6
7
8
9
10
11
12
13
14
15
16
17
18
19
20
21
22
23
24
25
26
27
28
29
30
31
32
33
34
interface IFooService
{
int DoFoo();
}

class FooComponent : GameComponent, IFooService
{
public FooComponent(Game game)
: base(game)
{
}

public int DoFoo()
{
// Do something and return an int.
}
}

class BarComponent : GameComponent
{
IFooService foo;

public BarComponent(Game game, IFooService foo)
: base(game)
{
this.foo = foo;
}

public void DoBar()
{
int result = this.foo.DoFoo();
// Do something based on result.
}
}

We can now change FooComponent as much as we want and BarComponent will be unaffected. BarComponent now communicates with FooComponent through the IFooService interface(接口隔离). This also allows us to have multiple implementations of DoFoo():

1
2
3
4
5
6
7
8
9
10
11
12
13
14
15
16
17
18
19
20
21
22
23
24
25
26
class SimpleFooComponent : GameComponent, IFooService
{
public SimpleFooComponent(Game game)
: base(game)
{
}

public int DoFoo()
{
return 5; // The class says “Simple”
}
}

class ComplexFooComponent : GameComponent, IFooService
{
public ComplexFooComponent(Game game)
: base(game)
{
}

public int DoFoo()
{
int result = 0;
// Do some very complex calculationreturn result;
}
}

We can pass BarComponent an instance of SimpleFooComponent or ComplexFooComponent. Whatever the situation may call for.
Where does GameServiceContainer fit into all of this? You can use the GameServiceContainer to hold all your “Services”. Add whatever class will implement the IFooService and then from within your BarComponent you can query for it:

1
2
3
4
5
6
7
8
9
10
11
12
13
14
15
16
17
18
19
20
21
22
23
24
25
26
class BarComponent : GameComponent
{
IFooService foo;

public BarComponent(Game game)
: base(game)
{
}

public override void Initialize()
{
this.foo = this.Game.Services.GetService(typeof(IFooService)) as IFooService;

if(this.foo == null)
throw new InvalidOperationException(“IFooService not found.”);
}

public void DoBar()
{
int result = this.foo.DoFoo();
// Do something based on result.
}
}

// In your Game’s constructor
this.Services.AddService(typeof(IFooService), new SimpleFooComponent(this));

Not only does BarComponent no longer require an instance of IFooService in its constructor, it also no longer matters if the instance of IFooService is constructed before or after the BarComponent. So long as all the services BarComponent requires are in the GameServiceContainer before Initialize() is called, it doesn’t matter what order your components are constructed in. Now, suppose that BarComponent didn’t necessarily depend on IFooService and instead the behavior of DoBar() is changed based on whether or not IFooService is available:

1
2
3
4
5
6
7
8
9
10
11
12
13
14
15
16
17
18
19
20
21
22
23
class BarComponent : GameComponent
{
IFooService foo;

public BarComponent(Game game)
: base(game)
{
}

public override void Initialize()
{
this.foo = this.Game.Services.GetService(typeof(IFooService)) as IFooService;
}

public intDoBar()
{
// If the IFooService is available, delegate to the DoFoo() method.if(this.foo != null)
return this.foo.DoFoo();

int result = 0;
// Otherwise do some other calculation.return result;
}
}

这一点是很微妙的, Initialize对BarComponent是全局的, DoBar对BarComponent是局部的, 从Initialize移到DoBar, 进一步降低耦合性

Service providers don’t always have to be GameComponent(s). Our BarComponent needs a Camera class now:

1
2
3
4
5
6
7
8
9
10
11
12
13
14
15
16
17
18
19
20
21
22
23
24
25
26
27
28
29
30
31
32
33
34
35
36
37
38
39
40
41
42
43
44
interface ICamera
{
Matrix Transform { get; }
}

class IdentityCamera : ICamera
{
public Matrix Transform
{
get { return Matrix.Identity; }
}
}

class MovingCamera : ICamera
{
public Matrix Transform
{
get;
set;
}
}

class BarComponent : DrawableGameComponent
{
ICamera camera;

public BarComponent(Game game)
: base(game)
{
}

public override void Initialize()
{
this.camera = this.Game.Services.GetService(typeof(ICamera)) as ICamera;
}

public override void Draw(GameTime gameTime)
{
Matrix transform = this.camera.Transform;
// Draw based on the transform matrix
}
}
// In your Game’s constructor.
this.Services.AddService(typeof(ICamera), new MovingCamera());

BarComponent uses the camera’s Transform matrix and doesn’t care how it is calculated. It’s completely decoupled from the camera’s implementation.

In closing, using the GameServiceContainer and interfaces makes your classes more loosely coupled. This makes it easier to make changes to the way your game works. Your classes also become more reusable as you can now mix and match service providers and consumers as needed. If you need a specific implementation of a camera for your game, you can still use the BarComponent so long as your camera class implements the ICamera interface.

Loosely coupling your classes has the added benefit of making them more testable. That’s another blog post though.

GameServiceContainer和IServiceProvider在Monogame中的实现如下:

1
2
3
4
5
6
7
8
9
10
11
12
13
14
15
16
17
18
19
20
21
22
23
24
25
26
27
28
29
30
31
32
33
34
35
36
37
38
39
40
41
42
43
44
45
46
47
48
49
50
51
52
53
54
55
56
57
58
59
60
61
62
63
64
65
66
67
68
69
70
71
72
73
// MIT License - Copyright (C) The Mono.Xna Team
// This file is subject to the terms and conditions defined in
// file 'LICENSE.txt', which is part of this source code package.
using System;
using System.Collections.Generic;
using Microsoft.Xna.Framework.Utilities;
​
namespace Microsoft.Xna.Framework
{
public class GameServiceContainer : IServiceProvider
{
Dictionary<Type, object> services;
​
public GameServiceContainer()
{
services = new Dictionary<Type, object>();
}
​
public void AddService(Type type, object provider)
{
if (type == null)
throw new ArgumentNullException("type");
if (provider == null)
throw new ArgumentNullException("provider");
if (!ReflectionHelpers.IsAssignableFrom(type, provider))
throw new ArgumentException("The provider does not match the specified service type!");
​
services.Add(type, provider);
}
​
public object GetService(Type type)
{
if (type == null)
throw new ArgumentNullException("type");

object service;
if (services.TryGetValue(type, out service))
return service;
​
return null;
}
​
public void RemoveService(Type type)
{
if (type == null)
throw new ArgumentNullException("type");
​
services.Remove(type);
}

public void AddService<T>(T provider)
{
AddService(typeof(T), provider);
}
​
public T GetService<T>() where T : class
{
var service = GetService(typeof(T));
​
if (service == null)
return null;
​
return (T)service;
}
}
}

public interface IServiceProvider
{
Object GetService(
Type serviceType
)
}

这种设计方法也是一种设计模式: Service Locator(http://gameprogrammingpatterns.com/service-locator.html)

The Service Locator pattern is a sibling to Singleton in many ways, so it’s worth looking at both to see which is most appropriate for your needs.

The Unity framework uses this pattern in concert with the Component pattern in its GetComponent() method.在Unity3D中, GameObject.GetComponent/GetComponentInParent也是同样的方式.

Microsoft’s XNA framework for game development has this pattern built into its core Game class. Each instance has a GameServices object that can be used to register and locate services of any type.

如同前一篇Component模式在Unity3D和XNA中的异同, Service Locator模式在Unity3D和XNA中的异同是一样的. 区别在于Unity3D中是在Entity的level, 而XNA是在Game的level.

这种模式并非游戏专用, 在MSDN中有更一般化的介绍https://msdn.microsoft.com/en-us/library/ee413842.aspx

You have classes with dependencies on services whose concrete types are specified at compile time. In the following example, ClassA has compile time dependencies on ServiceA and ServiceB. The following diagram illustrates this.
Classes with dependencies on services

This situation has the following drawbacks:

  • To replace or update the dependencies, you must change your classes’ source code and recompile the solution.
  • The concrete implementation of the dependencies must be available at compile time.
  • Your classes are difficult to test in isolation because they have a direct reference to their dependencies. This means that these dependencies cannot be replaced with stubs or mock objects.
  • Your classes contain repetitive code for creating, locating, and managing their dependencies.

The next section describes how to address these issues.

Objectives
Use the Service Locator pattern to achieve any of the following objectives:

  • You want to decouple your classes from their dependencies so that these dependencies can be replaced or updated with little or no change to the classes.
  • You want to write logic that depends on classes whose concrete implementation is not known at compile time.
  • You want to be able to test your classes in isolation, without the dependencies.
  • You do not want the logic that locates and manages the dependencies to be in your classes.
  • You want to divide your application into loosely coupled modules that can be independently developed, tested, versioned, and deployed.

Solution
Create a service locator that contains references to the services and that encapsulates the logic that locates them. In your classes, use the service locator to obtain service instances. The following diagram illustrates how classes use a service locator.

How classes use a service locator

The Service Locator pattern does not describe how to instantiate the services. It describes a way to register services and locate them. Typically, the Service Locator pattern is combined with the Factory pattern and/or the Dependency Injection pattern. This combination allows a service locator to create instances of services.

MonoGame笔记(十)GameComponent

Posted on 2017-12-17 | In 编程

上一篇笔记中TimerComponent, FrameRateCounter分别继承于GameComponent, DrawableGameComponent.关于GameComponent和DrawableGameComponent, 官方的介绍如下:

Game components provide a modular way of adding functionality to a game. You create a game component by deriving the new component either from the GameComponent class, or, if the component loads and draws graphics content, from the DrawableGameComponent class. You then add game logic and rendering code to the game component by overriding GameComponent.Update,DrawableGameComponent.Draw and GameComponent.Initialize. A game component is registered with a game by passing the component to Game.Components.Add. A registered component will have its draw, update, and initialize methods called from the Game.Initialize, Game.Update, and Game.Draw methods.
https://msdn.microsoft.com/en-us/library/bb203873.aspx

游戏组件提供了一种模块化的开发方式, 使得程序结构更加清晰. 除了上面提到的TimerComponent, FrameRateCounter, 包括像Input, SpriteManager, ScreenManager等等都可以用游戏组件的方式来提供.

Learn XNA 4.0中介绍的SpriteManager

1
2
3
4
5
6
7
8
9
10
11
12
13
14
15
16
17
18
19
20
21
22
23
24
25
26
27
28
29
30
31
32
33
34
35
36
37
38
39
40
41
42
43
44
45
46
47
48
49
50
51
52
53
54
55
56
57
58
59
public class SpriteManager : Microsoft.Xna.Framework.DrawableGameComponent
{
SpriteBatch spriteBatch;
UserControlledSprite player;
List<Sprite> spriteList = new List<Sprite>( );

protected override void LoadContent( )
{
spriteBatch = new SpriteBatch(Game.GraphicsDevice);

player = new UserControlledSprite(
Game.Content.Load<Texture2D>(@"Images/threerings"),
Vector2.Zero, new Point(75, 75), 10, new Point(0, 0),
new Point(6, 8), new Vector2(6, 6));

spriteList.Add(new AutomatedSprite(
Game.Content.Load<Texture2D>(@"Images/skullball"),
new Vector2(150, 150), new Point(75, 75), 10, new Point(0, 0),
new Point(6, 8), Vector2.Zero));

spriteList.Add(new AutomatedSprite(
Game.Content.Load<Texture2D>(@"Images/skullball"),
new Vector2(300, 150), new Point(75, 75), 10, new Point(0, 0),
new Point(6, 8), Vector2.Zero));

base.LoadContent( );
}

public override void Update(GameTime gameTime)
{
// Update player
player.Update(gameTime, Game.Window.ClientBounds);
// Update all sprites
foreach (Sprite s in spriteList)
{
s.Update(gameTime, Game.Window.ClientBounds);
// Check for collisions and exit game if there is one
if (s.collisionRect.Intersects(player.collisionRect))
Game.Exit();
}
base.Update(gameTime);
}

public override void Draw(GameTime gameTime)
{
spriteBatch.Begin(SpriteBlendMode.AlphaBlend,
SpriteSortMode.FrontToBack, SaveStateMode.None);
// Draw the player
player.Draw(gameTime, spriteBatch);
// Draw all sprites
foreach (Sprite s in spriteList)
s.Draw(gameTime, spriteBatch);
spriteBatch.End( );
base.Draw(gameTime);
}
}
//使用方式
spriteManger = new SpriteManager(this);
Components.Add(spriteManger);

注意Sprite自身不是GameComponent或者DrawableGameComponent, 虽然也有Update和Draw方法

RolePlayingGameStarterKit中使用的ScreenManager, 做法和SpriteManager一样, 也是继承DrawableGameComponent. 各种GameScreen, 就类似Sprite, 通过ScreenManager的draw方法进行绘制. GameScreen自己有draw方法, 用的是ScreenManager的spriteBatch.

除了上面介绍的游戏系统可以作为组件, 下面的这种方式也可以提供一种思路
http://blogs.microsoft.co.il/pavely/2010/11/06/xna-2d-game-tutorial-part-4/

1
2
3
4
5
6
7
8
9
10
11
12
13
14
15
16
17
18
19
20
21
22
23
24
25
26
27
28
29
30
31
32
33
34
35
36
37
38
39
40
41
42
43
44
45
46
47
48
49
50
51
52
53
54
55
//星空, 游戏背景
public class StarfieldComponent : DrawableGameComponent {
Star[] _stars = new Star[128];
Random _rnd = new Random();
Texture2D _starTexture;
SpriteBatch _batch;

public StarfieldComponent(Game game)
: base(game) {
// TODO: Construct any child components here
}

public override void Initialize() {
for(int i = 0; i < _stars.Length; i++) {
Star star = new Star();
star.Color = new Color(_rnd.Next(256), _rnd.Next(256), _rnd.Next(256), 128);
star.Position = new Vector2(_rnd.Next(Game.Window.ClientBounds.Width), _rnd.Next(Game.Window.ClientBounds.Height));
star.Speed = (float)_rnd.NextDouble() * 5 + 2;
_stars[i] = star;
}

base.Initialize();
}

protected override void LoadContent() {
_starTexture = Game.Content.Load<Texture2D>("Images/star");
_batch = new SpriteBatch(Game.GraphicsDevice);

base.LoadContent();
}

public override void Update(GameTime gameTime) {
int height = Game.Window.ClientBounds.Height;

for(int i = 0; i < _stars.Length; i++) {
var star = _stars[i];
if((star.Position.Y += star.Speed) > height) {
// "generate" a new star
star.Position = new Vector2(_rnd.Next(Game.Window.ClientBounds.Width), -_rnd.Next(20));
star.Speed = (float)_rnd.NextDouble() * 5 + 2;
star.Color = new Color(_rnd.Next(256), _rnd.Next(256), _rnd.Next(256), 128);
}
}

base.Update(gameTime);
}

public override void Draw(GameTime gameTime) {
_batch.Begin(SpriteSortMode.Deferred, BlendState.NonPremultiplied);
foreach(var star in _stars)
_batch.Draw(_starTexture, star.Position, null, star.Color, 0, Vector2.Zero, 1.0f, SpriteEffects.None, 1.0f);
_batch.End();
base.Draw(gameTime);
}
}

GameComponent和DrawableGameComponent的类图如下:

值得一提的是IUpdateable中有一个UpdateOrder, IDrawable中有一个DrawOrder, 这两个Order对于组件来说是不可或缺的. 例如寻路组件, 碰撞组件, 网络组件等之间会有一个先后顺序, 绘制的时候则有特效层, UI层, 场景中又细分为前景层, 中间层, 背景层.

GameComponent其实是一种设计模式(http://gameprogrammingpatterns.com/component.html), Unity3D中则更进一步, 每一个物体都是GameObject, 通过”挂”上各种GameComponent, 在游戏中运行. 另外还有一种ECS(Entity-Component-System 实体组件系统, 参考守望先锋), 则比Unity3D更加彻底(Entity就是Unity3D中的GameObject), 关于ECS还有待进一步学习.

http://gameprogrammingpatterns.com/component.html 最后提到了Unity3D和XNA中运用Component模式的区别: 二者之间的level不一样, XNA的level是在Game级别, 而Unity3D是在Entity级别.

The Unity framework’s core GameObject class is designed entirely around components.

Microsoft’s XNA game framework comes with a core Game class. It owns a collection of GameComponent objects. Where our example uses components at the individual game entity level, XNA implements the pattern at the level of the main game object itself, but the purpose is the same.

MonoGame笔记(九)其他几个时间相关程序设计

Posted on 2017-12-08 | In 编程

这里介绍其他几个和时间相关的程序设计: 1. 调整单个动画的速度 2.显示帧率(FPS) 3.定时器

调整单个动画的速度

调整游戏本身的帧率可以影响动画的速度, 但这样的影响是全局的. 不同动画之间的速度是不一样的, 所以需要单个调节. 以下是Learn XNA 4.0中的相关代码:

1
2
3
4
5
6
7
8
9
10
11
12
13
14
15
int timeSinceLastFrame = 0; //自上一帧之后经过了多少时间。
int millisecondsPerFrame = 50 //动画播放的帧率
timeSinceLastFrame += gameTime.ElapsedGameTime.Milliseconds;
if (timeSinceLastFrame > millisecondsPerFrame)
{
timeSinceLastFrame-= millisecondsPerFrame;
++currentFrame.X;
if (currentFrame.X >= sheetSize.X) //spritesheet
{
currentFrame.X = 0;
++currentFrame.Y;
if (currentFrame.Y >= sheetSize.Y)
currentFrame.Y = 0;
}
}

显示帧率FPS

来自上一篇笔记中提到作者的文章Displaying the framerate https://blogs.msdn.microsoft.com/shawnhar/2007/06/08/displaying-the-framerate/
技巧和调整单个动画的速度一样, 这里作者使用1秒钟Draw调用的次数来作为帧率

1
2
3
4
5
6
7
8
9
10
11
12
13
14
15
16
17
18
19
20
21
22
23
24
25
26
27
28
29
30
31
32
33
34
35
36
37
38
39
40
41
42
43
44
45
46
47
48
49
50
51
52
53
54
55
56
57
58
public class FrameRateCounter : DrawableGameComponent
{
ContentManager content;
SpriteBatch spriteBatch;
SpriteFont spriteFont;

int frameRate = 0;
int frameCounter = 0;
TimeSpan elapsedTime = TimeSpan.Zero;


public FrameRateCounter(Game game): base(game)
{
content = new ContentManager(game.Services);
}

protected override void LoadGraphicsContent(bool loadAllContent)
{
if (loadAllContent)
{
spriteBatch = new SpriteBatch(GraphicsDevice);
spriteFont = content.Load<SpriteFont>("Font");
}
}

protected override void UnloadGraphicsContent(bool unloadAllContent)
{
if (unloadAllContent)
content.Unload();
}


public override void Update(GameTime gameTime)
{
elapsedTime += gameTime.ElapsedGameTime;

if (elapsedTime > TimeSpan.FromSeconds(1))//elapsedTime大于1秒
{
elapsedTime -= TimeSpan.FromSeconds(1);
frameRate = frameCounter;
frameCounter = 0;
}
}

public override void Draw(GameTime gameTime)
{
frameCounter++;

string fps = string.Format("fps: {0}", frameRate);

spriteBatch.Begin();

spriteBatch.DrawString(spriteFont, fps, new Vector2(33, 33), Color.Black);
spriteBatch.DrawString(spriteFont, fps, new Vector2(32, 32), Color.White);

spriteBatch.End();
}
}

使用方式:在Game的构造方法中加入下面一行, 关于Component和SpriteFont见以后的笔记
Components.Add(new FrameRateCounter(this));

作者还使用了SpriteFont来显示:

1
2
3
4
5
6
7
8
9
10
11
12
13
14
15
16
17
<?xml version="1.0" encoding="utf-8"?>
<XnaContent xmlns:Graphics="Microsoft.Xna.Framework.Content.Pipeline.Graphics">
<Asset Type="Graphics:FontDescription">
<FontName>Arial</FontName>
<Size>14</Size>
<Spacing>2</Spacing>
<Style>Regular</Style>
<CharacterRegions>
<CharacterRegion><Start>f</Start><End>f</End></CharacterRegion>
<CharacterRegion><Start>p</Start><End>p</End></CharacterRegion>
<CharacterRegion><Start>s</Start><End>s</End></CharacterRegion>
<CharacterRegion><Start>:</Start><End>:</End></CharacterRegion>
<CharacterRegion><Start> </Start><End> </End></CharacterRegion>
<CharacterRegion><Start>0</Start><End>9</End></CharacterRegion>
</CharacterRegions>
</Asset>
</XnaContent>

定时器

https://www.gamedev.net/forums/topic/473544-how-to-make-a-timer-using-xna/

1
2
3
4
5
6
7
8
9
10
11
12
13
14
15
16
17
18
19
20
21
22
23
24
25
26
27
28
29
public class TimerComponent : GameComponent
{
TimeSpan interval = new TimeSpan(0, 0, 1);
TimeSpan lastTick = new TimeSpan();

public event EventHandler Tick;

public TimeSpan Interval
{
get { return interval; }
set { interval = value; }
}

public TimerComponent(Game game)
: base(game)
{
}

public override void Update(GameTime gameTime)
{
if (gameTime.TotalGameTime - lastTick >= interval)
{
if (Tick != null)
Tick(this, null);

lastTick = gameTime.TotalGameTime;
}
}
}

或者可以试下.NET自带的Timer

MonoGame笔记(八)Fixed step or variable step

Posted on 2017-12-07 | In 编程

用Fixed step还是variable step, XNA团队成员有如下解答
understanding-gametime https://blogs.msdn.microsoft.com/shawnhar/2007/07/25/understanding-gametime/

As a rule of thumb, console programmers prefer fixed timesteps, while PC programmers usually go for variable timing mode. There are two main reasons for this disparity:

  • Consoles are usually connected to a 60 hz television, while PC monitors can be set to many different refresh rates.

  • The speed of a console is known ahead of time, so while games must handle single frames that take longer than expected, it is unlikely they will be consistently too slow for the machine they are running on. PC games must support a wider range of hardware, so it is more important for them to cope well with way-too-slow machines.

主机程序员选择Fixed, PC程序员选择variable. 主机的性能是稳定的, 所以XNA默认是60帧; PC性能差异较大. 下面也说了, 并不绝对.

But there are no absolute rules. I’ve seen console games that worked well using variable timesteps, and I personally shipped a PC title that ran just fine with a 60 fps fixed timestep.

XNA defaults to fixed timestep mode because that is easier to program, but you are welcome to change this if you disagree with our choice.

Multiple Update Frequencies

不同的Component还可以用不同的Update rate

There is no law saying all parts of a game must update at the same frequency. For instance MotoGP combined three different update rates:

  • The main game logic ran at a fixed timestep 60 fps. This included input, sound, user interface logic, camera movement, rider animations, AI, and graphical effects.

  • The physics update ran at a fixed timestep 120 fps (we just called it twice in a row from our main Update method). This provided a more accurate simulation, which was important for simulating vehicles moving at extremely high speeds and right on the edge of loosing traction.

  • The network update ran at a fixed timestep anywhere between 4 and 30 fps, depending on how many players were in the game. The more players there were, the more data we had to send, so we adjusted by sending it less often to conserve bandwidth.

Running some parts of your update logic less often than others is a great way to make games more efficient. For instance pathfinding and AI often only need to be updated a couple of times a second. Once you have found a good path or made the decision to attack, you can follow that decision without having to repeat the entire original calculation on each update.

作者的另外一篇文章 Game timing in XNA Game Studio 2.0
https://blogs.msdn.microsoft.com/shawnhar/2007/11/23/game-timing-in-xna-game-studio-2-0/
讲了XNA 2.0与XNA 1.0用了不同的game loop策略, 值得一读

In 1.0, things worked like this:

  • Call Update as many times as needed to catch up to the current time
  • Call Draw repeatedly until it is time for the next Update

In 2.0, the Draw behavior has changed:

  • Call Update as many times as needed to catch up to the current time
  • Call Draw once
  • Wait until it is time for the next Update

In other words, we no longer call Draw more than once without an Update in between. That was a pointless thing to do, as it would just render the exact same image a second time!

Here’s why the new behavior is an improvement:

  • Consider a fixed timestep game running at 60 fps, with vsync enabled on a 75 hz monitor
  • Update completes in, let’s say, 3 milliseconds
  • Draw completes in, let’s say, 5 milliseconds
  • This has taken 8 milliseconds total
  • 60 fps is 16.7 milliseconds, so it is not yet time for another Update
  • We call Draw again
  • Because vsync is enabled, the graphics driver waits 13 milliseconds for the next 75 hz retrace
  • Yikes! By the time this returns, we have taken 21 milliseconds in total, so we are late for the next Update

In practice the effects of this were very minor, because the next Update would quickly catch up to the correct time, but it caused some unnecessary jitter in the rate of calls to Update.

In 2.0, we call Update at more precisely controlled times:

  • Update completes in 3 milliseconds
  • Draw completes in 5 milliseconds
  • There are 8.7 milliseconds left over, so we wait exactly that long
  • Rinse, lather, repeat

作者还有其他很多可以学习的文章.

另外以下关于GameLoop的4篇系列文章也值得一读
4 - The Game Loop http://rbwhitaker.wikidot.com/the-game-loop
5 - GameTime: A Game’s Heart Beat http://rbwhitaker.wikidot.com/gametime
6 - Time Steps http://rbwhitaker.wikidot.com/time-steps
7 - Cracking the Game Time Problem http://rbwhitaker.wikidot.com/cracking-the-game-time-problem

MonoGame笔记(七)Game Loop Timing

Posted on 2017-12-05 | In 编程

前面2篇笔记提到Game.Tick是在系统Idle状态下被调用的, Idle状态比我们想象的要多的多的多, 而MonoGame默认的帧率是60FPS, 所以在Game.Tick内部还需要对时间进行精确控制. 看过不少资料, 在这方面介绍最好的, 还是XNA的官方文档, 简洁明了. https://msdn.microsoft.com/en-us/library/bb203873.aspx,

Game Loop Timing

A Game is either fixed step or variable step, defaulting to fixed step. The type of step determines how often Update will be called and affects how you need to represent time-based procedures such as movement and animation.

这一段话包含很多信息. 首先Game Loop Timing有两类: fixed step和variable step, 默认是fixed step(60FPS). 它影响的是Update方法被调用的频率, 而不是Draw. 在编写位置与动画相关的代码时, 需要注意. 一个小人往前走, 它既有行走的动画, 同时它的位置也在改变.

Fixed-Step Game Loops

A fixed-step Game tries to call its Update method on the fixed interval specified in TargetElapsedTime. Setting Game.IsFixedTimeStep to true causes aGame to use a fixed-step game loop. A new XNA project uses a fixed-step game loop with a default TargetElapsedTime of 1/60th of a second.

1.设置Game.IsFixedTimeStep为true
2.设置帧率TargetElapsedTime

In a fixed-step game loop, Game calls Update once the TargetElapsedTime has elapsed. After Update is called, if it is not time to call Update again,Game calls Draw. After Draw is called, if it is not time to call Update again, Game idles until it is time to call Update.

在fixed-step下, 每隔TargetElapsedTime(假设1/60秒)调用一次Update. 假如一次Update所用的时间小于1/60秒, 那么就继续调用Draw方法. 假如Update+Draw加起来的时间还是小于1/60秒, 那么就等在那里(wait/idle), 直到1/60秒用完, 开始下一个1/60秒.

If Update takes too long to process, Game sets IsRunningSlowly to true and calls Update again, without calling Draw in between. When an update runs longer than the TargetElapsedTime, Game responds by calling Update extra times and dropping the frames associated with those updates to catch up. This ensures that Update will have been called the expected number of times when the game loop catches up from a slowdown. You can check the value of IsRunningSlowly in your Update if you want to detect dropped frames and shorten your Update processing to compensate. You can reset the elapsed times by calling ResetElapsedTime.

如果调用Update方法用了很长时间, Game会将IsRunningSlowly设置为True, 并且再次调用Update方法(可能多次), 跳过Draw.每次Update方法调用所花的时间并不一样(有些地方要进行大量的物理碰撞和AI计算), 可以在Update方法内部对IsRunningSlowly进行判断, 如果为真, 则简化某些计算, 这样就可以缩短Update的调用时间. 这部分需要结合代码去理解.

When your game pauses in the debugger, Game will not make extra calls to Update when the game resumes.

Variable-Step Game Loops(更推荐用这个)

A variable-step game calls its Update and Draw methods in a continuous loop without regard to the TargetElapsedTime. Setting Game.IsFixedTimeStepto false causes a Game to use a variable-step game loop.

在variable-step方式下, 调用完Update就接着调用Draw, 之后又是Update, 往复循环, 和TargetElapsedTime无关.

Animation and Timing

For operations that require precise timing, such as animation, the type of game loop your game uses (fixed-step or variable-step) is important.

Using a fixed step allows game logic to use the TargetElapsedTime as its basic unit of time and assume that Update will be called at that interval. Using a variable step requires the game logic and animation code to be based on ElapsedGameTime to ensure smooth gameplay. Because the Update method is called immediately after the previous frame is drawn, the time between calls to Update can vary. Without taking the time between calls into account, the game would seem to speed up and slow down. The time elapsed between calls to the Update method is available in the Update method’s gameTime parameter. You can reset the elapsed times by calling ResetElapsedTime.

在fixed step方式下, 可以使用TargetElapsedTime进行计算; 在variable step方式下, 则使用ElapsedGameTime, 这个值是变化的.

When using a variable-step game loop, you should express rates—such as the distance a sprite moves—in game units per millisecond (ms). The amount a sprite moves in any given update can then be calculated as the rate of the sprite times the elapsed time. Using this approach to calculate the distance the sprite moved ensures that the sprite will move consistently if the speed of the game or computer varies.

在variable step方式下, 应该使用速率(rate) * ElapsedGameTime来计算距离. 这样在性能好的与性能不好的机器上, 都能有流畅连续的移动

上面的介绍大致有了一些概念, 具体还是要看Game.Tick()代码实现

MSDN Game.Tick

  • Updates the game’s clock and calls Update and Draw.
  • In a fixed-step game, Tick calls Update only after a target time interval has elapsed.
  • In a variable-step game, Update is called every time Tick is called.

以下是MonoGame的实现

1
2
3
4
5
6
7
8
9
10
11
12
13
14
15
16
17
18
19
20
21
22
23
24
25
26
27
28
29
30
31
32
33
34
35
36
37
38
39
40
41
42
43
44
45
46
47
48
49
50
51
52
53
54
55
56
57
58
59
60
61
62
63
64
65
66
67
68
69
70
71
72
73
74
75
76
77
78
79
80
81
82
83
84
85
86
87
88
89
90
91
92
public void Tick()
{
// NOTE: This code is very sensitive and can break very badly
// with even what looks like a safe change. Be sure to test
// any change fully in both the fixed and variable timestep
// modes across multiple devices and platforms.

RetryTick:

// Advance the accumulated elapsed time.
var currentTicks = _gameTimer.Elapsed.Ticks;
_accumulatedElapsedTime += TimeSpan.FromTicks(currentTicks - _previousTicks);
_previousTicks = currentTicks;

// If we're in the fixed timestep mode and not enough time has elapsed
// to perform an update we sleep off the the remaining time to save battery
// life and/or release CPU time to other threads and processes.
if (IsFixedTimeStep && _accumulatedElapsedTime < TargetElapsedTime)
{
var sleepTime = (int)(TargetElapsedTime - _accumulatedElapsedTime).TotalMilliseconds;

// NOTE: While sleep can be inaccurate in general it is
// accurate enough for frame limiting purposes if some
// fluctuation is an acceptable result.
#if WINRT
Task.Delay(sleepTime).Wait();
#else
System.Threading.Thread.Sleep(sleepTime);
#endif
goto RetryTick;
}

// Do not allow any update to take longer than our maximum.
if (_accumulatedElapsedTime > _maxElapsedTime)
_accumulatedElapsedTime = _maxElapsedTime;

if (IsFixedTimeStep)
{
_gameTime.ElapsedGameTime = TargetElapsedTime;
var stepCount = 0;

// Perform as many full fixed length time steps as we can.
while (_accumulatedElapsedTime >= TargetElapsedTime)
{
_gameTime.TotalGameTime += TargetElapsedTime;
_accumulatedElapsedTime -= TargetElapsedTime;
++stepCount;

DoUpdate(_gameTime);
}

//Every update after the first accumulates lag
_updateFrameLag += Math.Max(0, stepCount - 1);

//If we think we are running slowly, wait until the lag clears before resetting it
if (_gameTime.IsRunningSlowly)
{
if (_updateFrameLag == 0)
_gameTime.IsRunningSlowly = false;
}
else if (_updateFrameLag >= 5)
{
//If we lag more than 5 frames, start thinking we are running slowly
_gameTime.IsRunningSlowly = true;
}

//Every time we just do one update and one draw, then we are not running slowly, so decrease the lag
if (stepCount == 1 && _updateFrameLag > 0)
_updateFrameLag--;

// Draw needs to know the total elapsed time
// that occured for the fixed length updates.
_gameTime.ElapsedGameTime = TimeSpan.FromTicks(TargetElapsedTime.Ticks * stepCount);
}
else
{
// Perform a single variable length update.
_gameTime.ElapsedGameTime = _accumulatedElapsedTime;
_gameTime.TotalGameTime += _accumulatedElapsedTime;
_accumulatedElapsedTime = TimeSpan.Zero;

DoUpdate(_gameTime);
}

// Draw unless the update suppressed it.
if (_suppressDraw)
_suppressDraw = false;
else
{
DoDraw(_gameTime);
}
}

Tick中的顺序是wait->Update->Draw, 在fixed-step模式下, 分为2种情况:

  1. 流畅. _accumulatedElapsedTime为上一次执行Tick到这一次执行Tick的TimeSpan. _accumulatedElapsedTime小于TargetElapsedTime, 则用Sleep将剩下的时间补足. 回到Tick的第一行代码, 此时_accumulatedElapsedTime约等于TargetElapsedTime, 往下执行Update方法和Draw方法.

  2. 卡顿. _accumulatedElapsedTime为上一次执行Tick到这一次执行Tick的TimeSpan, _accumulatedElapsedTime大于TargetElapsedTime, _accumulatedElapsedTime最大可以为1秒2帧(_maxElapsedTime), 是默认1秒60帧的30倍. 此时不需要Sleep, 直接进入While循环

1
2
3
4
5
6
7
8
9
// Perform as many full fixed length time steps as we can.
while (_accumulatedElapsedTime >= TargetElapsedTime)
{
_gameTime.TotalGameTime += TargetElapsedTime;
_accumulatedElapsedTime -= TargetElapsedTime;
++stepCount;

DoUpdate(_gameTime);
}

DoUpdate会在While里面最多连续调用30次. 为什么要这么做, 它是怎么能Catch Up from slow down的? 我想, 这里有一个很重要的假设: 这一次Tick调用Update所花费的时间是正常的(假设1/60秒). 上一次Tick调用Update所花费的时间是不正常的(假设1/2秒). 对于Game来说, 上一次的Tick所花费的时间相当于正常情况下的30倍, 即相当于正常情况下的30个Update所需要的时间.30个Update可以做很多事情. 连续30个Update之后, 再调用Draw, 画面上就会出现跳跃. 这应该就是所谓的跳帧, 虽然画面不连续, 但还是赶上了其他人的步伐.

为什么有这样一个假设(这一次Tick的Update是正常开销). 因为如果这一次的Update依旧开销很大, 那么永远都无法catch up.

那正常开销, 就能赶上来吗? while循环中的30个Update()叠加所用的时间不也是很大的开销么?
可以这样想, 虽然默认是1/60帧, 这是为了和显示器的刷新频率对应, 本身Update所占的时间可能都在1/600秒(随便举个数字), 1/60帧中的大部分都在Idle. 只要将多次调用Update的时间, 挪到Idle里面, 少Sleep即可

注: 这里有一个疑惑点

1
2
3
4
5
6
7
// Draw unless the update suppressed it. 注释有问题
if (_suppressDraw)
_suppressDraw = false;
else
{
DoDraw(_gameTime);
}

_suppressDraw为true是在Exit中被调用设置, 并没有在其他地方看到. 所以一次Tick当中, Draw是一定会被调用的, 除非是Exit.

XNA 4.0 Refresh中的实现:

1
2
3
4
5
6
7
8
9
10
11
12
13
14
15
16
17
18
19
20
21
22
23
24
25
26
27
28
29
30
31
32
33
34
35
36
37
38
39
40
41
42
43
44
45
46
47
48
49
50
51
52
53
54
55
56
57
58
59
60
61
62
63
64
65
66
67
68
69
70
71
72
73
74
75
76
77
78
79
80
81
82
83
84
85
86
87
88
89
90
91
92
93
94
95
96
97
98
99
100
101
102
103
104
105
106
107
108
109
110
// Microsoft.Xna.Framework.Game
public void Tick()
{
if (this.ShouldExit)
{
return;
}
if (!this.isActive)
{
Thread.Sleep((int)this.inactiveSleepTime.TotalMilliseconds);
}
this.clock.Step();
bool flag = true;
TimeSpan timeSpan = this.clock.ElapsedAdjustedTime;
if (timeSpan < TimeSpan.Zero)
{
timeSpan = TimeSpan.Zero;
}
if (this.forceElapsedTimeToZero)
{
timeSpan = TimeSpan.Zero;
this.forceElapsedTimeToZero = false;
}
if (timeSpan > this.maximumElapsedTime)
{
timeSpan = this.maximumElapsedTime;
}
if (this.isFixedTimeStep)
{
if (Math.Abs(timeSpan.Ticks - this.targetElapsedTime.Ticks) < this.targetElapsedTime.Ticks >> 6)
{
timeSpan = this.targetElapsedTime;
}
this.accumulatedElapsedGameTime += timeSpan;
long num = this.accumulatedElapsedGameTime.Ticks / this.targetElapsedTime.Ticks;
this.accumulatedElapsedGameTime = TimeSpan.FromTicks(this.accumulatedElapsedGameTime.Ticks % this.targetElapsedTime.Ticks);
this.lastFrameElapsedGameTime = TimeSpan.Zero;
if (num == 0L)
{
return;
}
TimeSpan timeSpan2 = this.targetElapsedTime;
if (num > 1L)
{
this.updatesSinceRunningSlowly2 = this.updatesSinceRunningSlowly1;
this.updatesSinceRunningSlowly1 = 0;
}
else
{
if (this.updatesSinceRunningSlowly1 < 2147483647)
{
this.updatesSinceRunningSlowly1++;
}
if (this.updatesSinceRunningSlowly2 < 2147483647)
{
this.updatesSinceRunningSlowly2++;
}
}
this.drawRunningSlowly = (this.updatesSinceRunningSlowly2 < 20);
while (num > 0L)
{
if (this.ShouldExit)
{
break;
}
num -= 1L;
try
{
this.gameTime.ElapsedGameTime = timeSpan2;
this.gameTime.TotalGameTime = this.totalGameTime;
this.gameTime.IsRunningSlowly = this.drawRunningSlowly;
this.Update(this.gameTime);
flag &= this.suppressDraw;
this.suppressDraw = false;
}
finally
{
this.lastFrameElapsedGameTime += timeSpan2;
this.totalGameTime += timeSpan2;
}
}
}
else
{
TimeSpan t = timeSpan;
this.drawRunningSlowly = false;
this.updatesSinceRunningSlowly1 = 2147483647;
this.updatesSinceRunningSlowly2 = 2147483647;
if (!this.ShouldExit)
{
try
{
this.gameTime.ElapsedGameTime = (this.lastFrameElapsedGameTime = t);
this.gameTime.TotalGameTime = this.totalGameTime;
this.gameTime.IsRunningSlowly = false;
this.Update(this.gameTime);
flag &= this.suppressDraw;
this.suppressDraw = false;
}
finally
{
this.totalGameTime += t;
}
}
}
if (!flag)
{
this.DrawFrame();
}
}

1…345…7

zmapleaf

67 posts
2 categories
11 tags
© 2020 zmapleaf
Powered by Hexo
|
Theme — NexT.Mist v5.1.4